静态文档 Github 自动同步服务器
Vuepress 或部分静态文档自动同步服务器
使用 Github action 加服务器 git commit hash 匹配
本文以 Vuepress 为例子, 其他同理
请确保 服务器 安装 git 环境, 本文不再赘述
Github Action
原理: 通过 Github Action 工作流把代码编译并且部署到 gh_pages 分支
本文示例使用
npm部署,yarn在yaml中更改配置创建
.github/workflows/文件名.yml
# 工作流的名称,如果省略,则使用当前文件名
name: Auto Deploy

# 从工作流生成的工作流运行的名称,如果省略,则使用提交时的commit信息
run-name: Deploy by @${{ github.actor }}

# 触发部署的条件
on:
  # 每当 push 到 master 分支时触发部署
  push:
    branches:
      - main

# 当前流程要执行的任务,可以是多个。[my_first_job]就是一个任务
jobs:
  my_first_job:
    # 任务的名称,不设置则默认my_first_job
    name: build-and-deploy

    # 运行所需要的虚拟机环境
    runs-on: ubuntu-latest

    # 每个任务下的运行步骤,短横杠 - 表示一个步骤,从上至下依次执行。
    steps:
      # clone 该仓库的源码到工作流中
      - name: Clone Code
        uses: actions/checkout@v3
        with:
          # "最近更新时间"等 git 日志相关信息,需要拉取全部提交记录
          fetch-depth: 0

      # 安装 Node 环境
      - name: Setup Node.js
        uses: actions/setup-node@v3
        with:
          # 选择要使用的 node 版本
          node-version: '16'

      # 如果你的依赖是使用npm的,用这种
      # 缓存 npm node_modules
      - name: Cache dependencies
        uses: actions/cache@v3
        with:
          path: ~/.npm
          key: ${{ runner.os }}-npm-cache-${{ hashFiles('**/package-lock.json') }}
          restore-keys: |
            ${{ runner.os }}-npm-cache-

      # 安装依赖 npm
      - name: Install dependencies
        # 如果没有命中缓存才执行 npm install
        if: steps.cache-deps.outputs.cache-hit != 'true'
        run: npm install

      # 如果你的依赖是使用yarn的,用这种
      # 缓存 yarn node_modules
      # - name: Cache dependencies
      #   uses: actions/cache@v3
      #   id: yarn-cache
      #   with:
      #     path: |
      #       **/node_modules
      #     key: ${{ runner.os }}-yarn-${{ hashFiles('**/yarn.lock') }}
      #     restore-keys: |
      #       ${{ runner.os }}-yarn-

      # 安装依赖 yarn
      # - name: Install dependencies
      #   # 如果没有命中缓存才执行 npm install
      #   if: steps.npm-cache.outputs.cache-hit != 'true'
      #   run: yarn --frozen-lockfile

      # 运行构建脚本
      - name: Run Build Script
        run: npm run build

      # 部署到 GitHub Pages
      - name: Deploy to GitHub Pages
        # 此actions的官方文档 https://github.com/JamesIves/github-pages-deploy-action
        uses: JamesIves/github-pages-deploy-action@v4
        with:
          # 要部署的文件夹,必填
          FOLDER: src/.vuepress/dist
          # 希望部署的分支,默认gh-pages
          BRANCH: gh-pages
          # # 仓库范围的访问令牌,可以将个人令牌的值存储在GitHub Secrets中
          # # 默认情况是不需要填的,如果您需要更多权限,例如部署到另一个存储库才需要填写
          # # ACCESS_TOKEN 对应GitHub Secrets中设置的字段,不要照搬
          # TOKEN: ${{ secrets.ACCESS_TOKEN }}
          # # 部署到GitHub的不同仓库 <用户名>/<仓库名>
          # # 此选项必须配置了TOKEN才能正常执行
          # REPOSITORY-NAME: leoleor/leo2
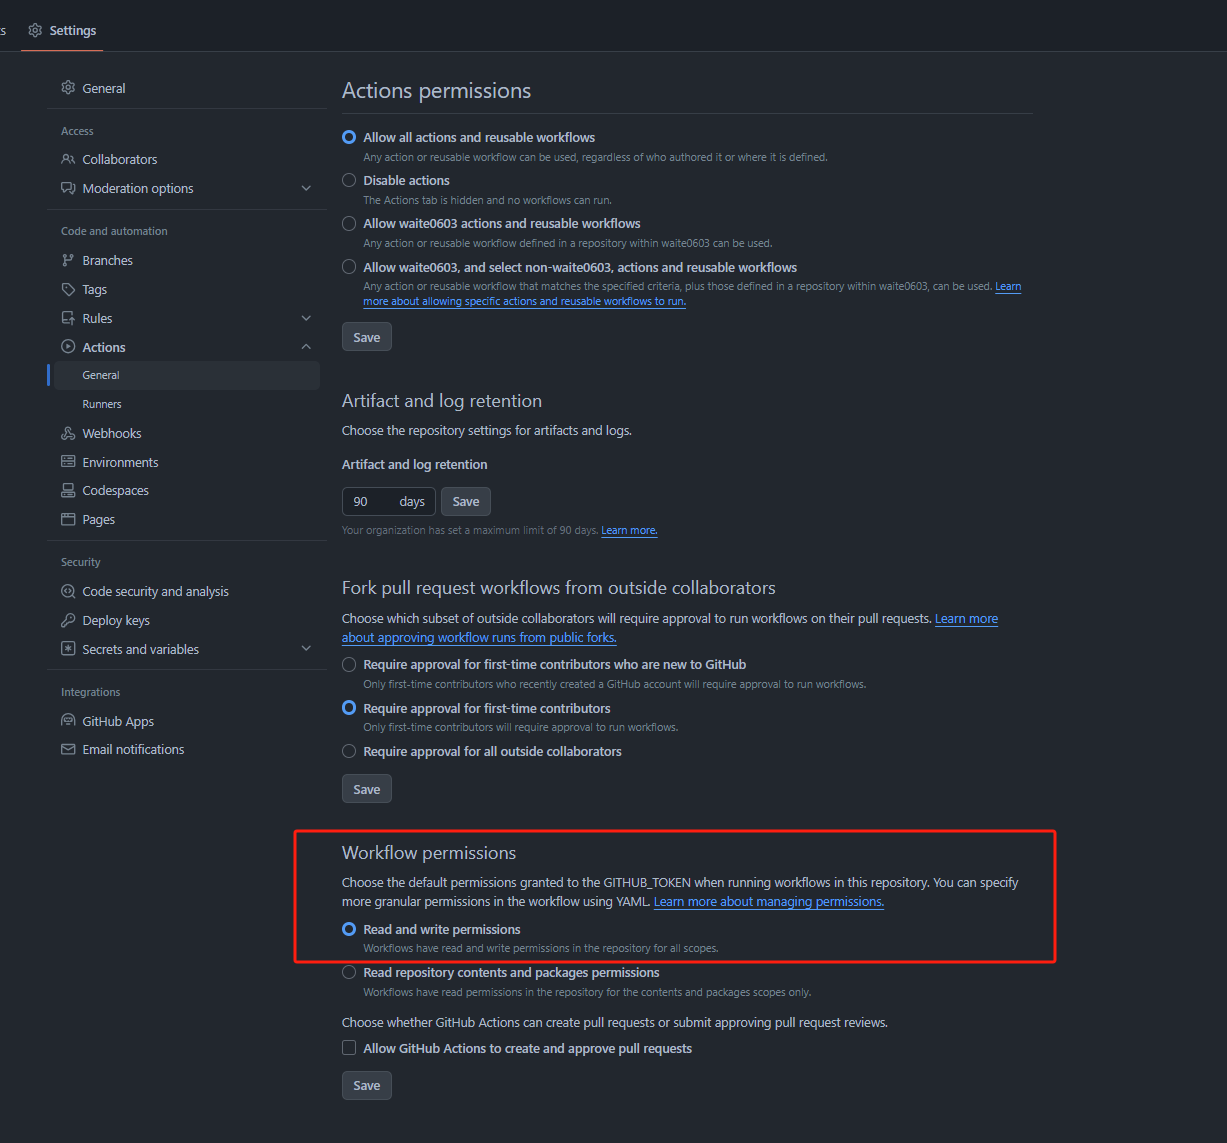
注意 !!!!!! 需要开启以下设置, 不然会报错 ->
The deploy step encountered an error: The process '/usr/bin/git' failed with exit code 128 ❌
服务器设置
- 在你的网页目录
git clone, 克隆指定分支
<!-- The command to use is -->
git clone --branch <branchname> --single-branch <remote-repo-url>
<!-- From your terminal run -->
git clone --branch gh-pages --single-branch https://github.com/XXX/xxx.git
- 编写 sh 脚本文件
cd /
cd {{your site folder}}

git pull
- 设置定时脚本执行, 或者通过配置服务器 crontab 来实现自动更新
这是一个定时任务命令,每隔10分钟会执行一次 /root/update-blog.sh 脚本。脚本的输出会被重定向到 /www/logs/update-blog.log 文件中,2>&1 则表示将错误输出也重定向到同一个日志文件中。
crontab -e */10 * * * * /bin/bash /root/update-blog.sh >> /www/logs/update-blog.log 2>&1
- 也可以在本地编译, 例如
hugo, 可以 每个 commit 都有其对应的 hash 值, 可以定时git pull从仓库拉取内容, 并对比pull前后 commit 值的变化, 以判断是否存在更新. 如果存在更新, 则执行重新构建的流程.
cd {{your site folder}}

commit=$(cat .git/refs/heads/main)

git pull

new_commit=$(cat .git/refs/heads/main)

if [[ "$new_commit" != "$commit" ]]; then
	# 改为你的网站构建流程, ps: rm -rf public/* -> ./hugo
    {{execute your site rebuild program}}
fi

echo "----------------------------------------------------------------------------"
endDate=`date +"%Y-%m-%d %H:%M:%S"`
echo ">> [$endDate] Successful"
echo "----------------------------------------------------------------------------"
其他
如果你博客的 GitHub 仓库不是公开仓库, 那在执行
git pull的时候可能需要输入用户名和密码, 无法实现自动化. 你需要在服务器项目路径内执行git config credential.helper store, 然后手动git pull一次, 凭证将自动保存在服务器, 下次无需输入密码.
CentOS 服务器 git clone下载加速(下载过慢或超时)
以下为本人实践之后, 在进行以下之前, 请先行检查代理/ 缓存大小/ 权限 等等问题, 以下方法可能仅仅适用于笔者, 不确保一定可以成功
# 缓存
git config --global http.postBuffer 104857600

# 代理
git config --global --unset http.proxy
git config --global --unset https.proxy
- 在
CentOS 服务器上通过git clone下载项目,速度很慢或直接超时
[root@VM-0-11-centos home]# git clone https://github.com/dengzemiao/DZMLuckyDraw.git
正克隆到 'DZMLuckyDraw'...
error: RPC failed; result=35, HTTP code = 0
fatal: The remote end hung up unexpectedly
-
git clone 特别慢,是因为 github.global.ssl.fastly.net 域名被限制了,只要找到这个域名对应的 IP 地址,然后在 hosts 文件中加上 ip–>域名 的映射,刷新 DNS 缓存便可。
-
nslookup 命令获取 github IP 地址
- 如果没有安装,则需要安装一下
yum -y install bind-utils- 获取
IP地址
nslookup github.global.ssl.fastly.net
nslookup github.com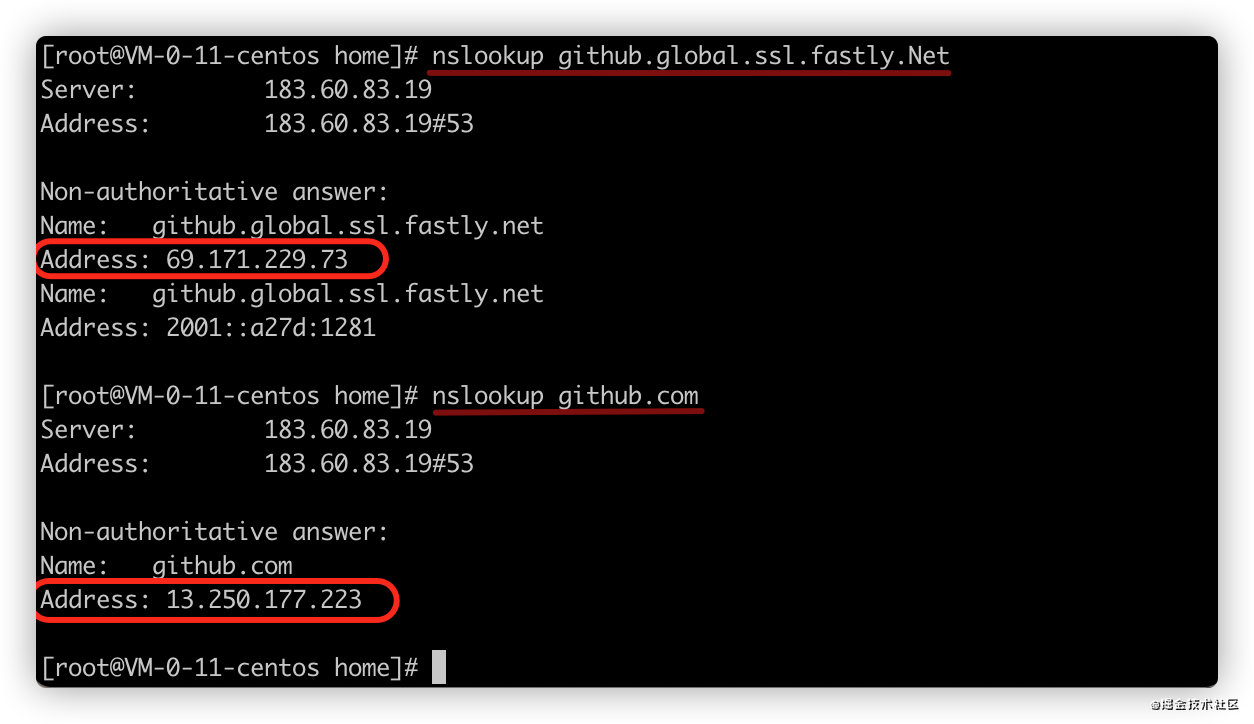
-
修改
hosts文件- 编辑
hosts
sudo vim /etc/hosts- 填入内容,保存
格式:
x.x.x.x http://global-ssl.fastly.net
x.x.x.x http://github.com

例如拿上面得到的IP地址:
69.171.229.73 http://global-ssl.fastly.net
13.250.177.223 http://github.com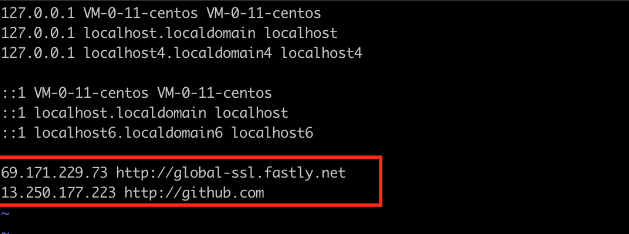
- 编辑
-
-
nscd命令更新DNS缓存- 如果没有安装,则需要安装一下
yum install -y nscd- 更新
DNS缓存
$ nscd -i hosts- 然后再次执行
git clone,则会进入下载。