Vue3 CompositionAPI
Options API的弊端
-
在Vue2中,我们编写组件的方式是Options API:
- Options API的一大特点就是在对应的属性中编写对应的功能模块;
- 比如data定义数据、methods中定义方法、computed中定义计算属性、watch中监听属性改变,也包括生命 周期钩子;
-
但是这种代码有一个很大的弊端:
- 当我们实现某一个功能时,这个功能对应的代码逻辑会被拆分到各个属性中;
- 当我们组件变得更大、更复杂时,逻辑关注点的列表就会增长,那么同一个功能的逻辑就会被拆分的很分散;
- 尤其对于那些一开始没有编写这些组件的人来说,这个组件的代码是难以阅读和理解的(阅读组件的其他人);
-
下面我们来看一个非常大的组件,其中的逻辑功能按照颜色进行了划分:
- 这种碎片化的代码使用理解和维护这个复杂的组件变得异常困难,并且隐藏了潜在的逻辑问题;
- 并且当我们处理单个逻辑关注点时,需要不断的跳到相应的代码块中;
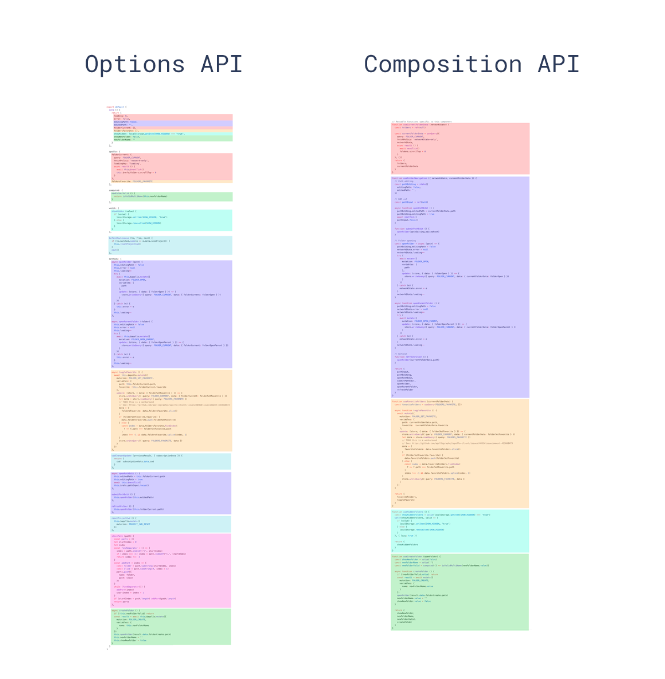
- 如果我们能将同一个逻辑关注 点相关的代码收集在一起会更 好。
- 这就是Composition API想 要做的事情,以及可以帮助我 们完成的事情。
- 也有人把Vue Composition API简称为VCA。
- 我们无需再为了一个逻辑关注点在不同的选项块间来回滚动切换。此外,我们现在可以很轻松地将这一组代码移动到一个外部文件中,不再需要为了抽象而重新组织代码,大大降低了重构成本,这在长期维护的大型项目中非常关键。
认识 组合式 API (Composition API)
https://cn.vuejs.org/guide/extras/composition-api-faq.html#what-is-composition-api
组合式 API (Composition API) 是一系列 API 的集合,使我们可以使用函数而不是声明选项的方式书写 Vue 组件。它是一个概括性的术语,涵盖了以下方面的 API:
- 响应式 API:例如
ref()和reactive(),使我们可以直接创建响应式状态、计算属性和侦听器。 - 生命周期钩子:例如
onMounted()和onUnmounted(),使我们可以在组件各个生命周期阶段添加逻辑。 - 依赖注入:例如
provide()和inject(),使我们可以在使用响应式 API 时,利用 Vue 的依赖注入系统。
组合式 API 是 Vue 3 及 Vue 2.7 的内置功能。对于更老的 Vue 2 版本,可以使用官方维护的插件 @vue/composition-api。在 Vue 3 中,组合式 API 基本上都会配合 `` 语法在单文件组件中使用。下面是一个使用组合式 API 的组件示例:
<script setup>
import { ref, onMounted } from 'vue'

// 响应式状态
const count = ref(0)

// 更改状态、触发更新的函数
function increment() {
  count.value++
}

// 生命周期钩子
onMounted(() => {
  console.log(`计数器初始值为 ${count.value}。`)
})
</script>

<template>
  <button @click="increment">点击了:{{ count }} 次</button>
</template>
虽然这套 API 的风格是基于函数的组合,但组合式 API 并不是函数式编程。组合式 API 是以 Vue 中数据可变的、细粒度的响应性系统为基础的,而函数式编程通常强调数据不可变。
setup()
以下的代码 均会采用选项式的写法, 组合式 Api 的写法可以参考官方文档, 但基本原理差不多, 而且 Vue3 选项式写法是基于组合式写法产生的!
setup() 钩子是在组件中使用组合式 API 的入口,通常只在以下情况下使用:
- 需要在非单文件组件中使用组合式 API 时。
- 需要在基于选项式 API 的组件中集成基于组合式 API 的代码时。
setup函数的参数
- 主要有两个参数:
- 第一个参数:props
- 第二个参数:context
setup函数的第一个参数是组件的props。和标准的组件一致,一个setup函数的props是响应式的,并且会在传入新的 props 时同步更新。:- 对于定义props的类型,我们还是和之前的规则是一样的,在props选项中定义;
- 并且在template中依然是可以正常去使用props中的属性,比如message;
- 如果我们在setup函数中想要使用props,那么不可以通过 this 去获取
<!-- 推荐使用以下写法 -->
<script>
import { ref } from 'vue'

export default {
  setup() {
    const count = ref(0)

    // 返回值会暴露给模板和其他的选项式 API 钩子
    return {
      count
    }
  },

  mounted() {
    console.log(this.count) // 0
  }
}
</script>

<template>
  <button @click="count++">{{ count }}</button>
</template>
<!-- 当然也可以使用以下写法 -->
<script>
  export default {
    props: {
      message: {
        type: String,
        required: true
      }
    },
    data() {
      return {
        counter: 100
      }
    },
    setup(props, ....){
      .....
    }
    ...
}
</script>
setup函数的第一个参数是组件的props。和标准的组件一致,一个setup函数的props是响应式的,并且会在传入新的 props 时同步更新。
export default {
  props: {
    title: String
  },
  setup(props) {
    console.log(props.title)
  }
}
请注意如果你解构了 props 对象,解构出的变量将会丢失响应性。因此我们推荐通过 props.xxx 的形式来使用其中的 props。
如果你确实需要解构 props 对象,或者需要将某个 prop 传到一个外部函数中并保持响应性,那么你可以使用 toRefs() 和 toRef() 这两个工具函数:
import { toRefs, toRef } from 'vue'

export default {
  setup(props) {
    // 将 `props` 转为一个其中全是 ref 的对象,然后解构
    const { title } = toRefs(props)
    // `title` 是一个追踪着 `props.title` 的 ref
    console.log(title.value)

    // 或者,将 `props` 的单个属性转为一个 ref
    const title = toRef(props, 'title')
  }
}
- 另外一个参数是context,我们也称之为是一个SetupContext,它里面包含三个属性:
- attrs:所有的非prop的attribute;
- slots:父组件传递过来的插槽(这个在以渲染函数返回时会有作用,后面会讲到);
- emit:当我们组件内部需要发出事件时会用到emit(因为我们不能访问this,所以不可以通过 this.$emit发出事件);
export default {
  setup(props, context) {
    // 透传 Attributes(非响应式的对象,等价于 $attrs)
    console.log(context.attrs)

    // 插槽(非响应式的对象,等价于 $slots)
    console.log(context.slots)

    // 触发事件(函数,等价于 $emit)
    console.log(context.emit)

    // 暴露公共属性(函数)
    console.log(context.expose)
  }

   // 该上下文对象是非响应式的,可以安全地解构:
    setup(props, {attrs, slots, emit}) {
      console.log(props.message);
      console.log(attrs.id, attrs.class);
      console.log(slots);
      console.log(emit);
    }
}
attrs 和 slots 都是有状态的对象,它们总是会随着组件自身的更新而更新。这意味着你应当避免解构它们,并始终通过 attrs.x 或 slots.x 的形式使用其中的属性。此外还需注意,和 props 不同,attrs 和 slots 的属性都不是响应式的。如果你想要基于 attrs 或 slots 的改变来执行副作用,那么你应该在 onBeforeUpdate 生命周期钩子中编写相关逻辑。
代码示例
<template>
  <HelloWorld msg="Welcome to Your Vue.js App" class="app-attr" />
</template>
<script>
import HelloWorld from './components/HelloWorld.vue';
export default {
  name: 'App',
  components: {
    HelloWorld
  }
};
</script>
<style></style>
<template>
  <div class="hello">
    <!-- 使用接受过来的参数 -->
    {{ msg }}
  </div>
</template>
<script>
export default {
  name: 'HelloWorld',
  // 组件接受的参数
  props: {
    msg: String
  },
  // 发射的事件这里可以标注一下
  emits:['change'],
  setup(props, context) {
    // 这样可以拿到传递过来的msg的值
    console.log(props.msg);
    // attrs
    console.log(context.attrs);
    // 发射事件
    context.emit('change');
  }
};
</script>
<style scoped></style>
setup函数的返回值
setup 也可以返回一个渲染函数,此时在渲染函数中可以直接使用在同一作用域下声明的响应式状态:
import { h, ref } from 'vue'

export default {
  setup() {
    const count = ref(0)
    return () => h('div', count.value)
  }
}
返回一个渲染函数将会阻止我们返回其他东西。对于组件内部来说,这样没有问题,但如果我们想通过模板引用将这个组件的方法暴露给父组件,那就有问题了。
我们可以通过调用 expose() 解决这个问题:
import { h, ref } from 'vue'

export default {
  setup(props, { expose }) {
    const count = ref(0)
    const increment = () => ++count.value

    expose({
      increment
    })

    return () => h('div', count.value)
  }
}
此时父组件可以通过模板引用来访问这个 increment 方法。
export default {
  props: {
    message: {
      type: String,
      required: true
    }
  },
  setup() {
    let counter = 100;

    // 局部函数
    const increment = () => {
      counter++;
      console.log(counter);
    }

    return {
      title: "Hello Home",
      counter,
      increment
    }
  }
}
- setup的返回值可以在模板template中被使用
- 也就是说可以通过setup的返回值来替代data选项
最后导出的一定要是个对象
<template>
  <div class="hello">
    <!-- 使用导出的变量 -->
    <h1>{{ count }}</h1>
    <!-- 使用导出的方法 -->
    <button @click="increment">+ 1</button>
  </div>
</template>
<script>
export default {
  name: 'HelloWorld',
  setup() {
    // 定义普通的变量,可以被正常使用
    // 缺点 : 数据不是响应式的
    let count = 100;
    // 定义方法
    const increment = () => {
      count++;
      console.log(count);
    };
    // 导出
    return {
      count,
      increment
    };
  }
};
</script>
<style scoped></style>
因为只是定义了个变量,然后导出了,并没有使它响应式
补充: 为什么 setup 不能使用 this
在Vue 3中,setup 函数是用来替代以前的 data, computed, methods 等选项的。setup() 自身并不含对组件实例的访问权,即在 setup() 中访问 this 会是 undefined。你可以在选项式 API 中访问组合式 API 暴露的值,但反过来则不行。
定义响应式数据的两种方式
Reactive API
如果想为在setup中定义的数据提供响应式的特性,那么可以使用reactive的函数
ps : 如果传入一个基本数据类型(String、Number、Boolean)会报一个警告
应用场景 : reactive API对传入的类型是有限制的,它要求我们必须传入的是一个对象或者数组类型,最好相互有关联的数据时使用
比如说想要上面的例子实现响应式, 我们可以做如下操作
<template>
  <div class="hello">
    <!-- 这样使用即可 -->
    <h1>{{ state.count }}</h1>
    <button @click="increment">+ 1</button>
  </div>
</template>
<script>
// 从vue中导入reactive
import { reactive } from 'vue';
export default {
  name: 'HelloWorld',
  setup() {
    // 使用reactive,会返回一个响应式对象
    const state = reactive({
      // 在对象中编写自己所需要的属性
      count: 100
    });
    const increment = () => {
      // 这样使用
      state.count++;
      console.log(state.count);
    };
    return {
      // 导出响应式state对象
      state,
      increment
    };
  }
};
</script>
Reactive判断的API
- isProxy : 检查对象是否是由 reactive 或 readonly创建的 proxy
- isReactive : 检查对象是否是由 reactive创建的响应式代理,如果该代理是 readonly 建的,但包裹了由 reactive 创建的另一个代理,它也会返回 true
- isReadonly : 检查对象是否是由 readonly 创建的只读代理
- toRaw : 返回 reactive 或 readonly 代理的原始对象(不建议保留对原始对象的持久引用。请谨慎使用)
- shallowReactive : 创建一个响应式代理,它跟踪其自身 property 的响应性,但不执行嵌套对象的深层响应式转换 (深层还是原生对象),只响应第一层
- shallowReadonly : 创建一个 proxy,使其自身的 property 为只读,但不执行嵌套对象的深度只读转换(深层还是可读、可写的)只检查第一层
import { reactive, readonly, isProxy, isReactive, isReadonly, toRaw, shallowReactive, shallowReadonly } from 'vue';

// 创建一个响应式对象
const original = { count: 0 };
const obj = reactive(original);

// 检查对象是否是代理对象
console.log(isProxy(obj)); // true

// 检查对象是否是由 reactive 创建的响应式代理
console.log(isReactive(obj)); // true

// 检查对象是否是由 readonly 创建的只读代理
const ro = readonly(obj);
console.log(isReadonly(ro)); // true

// 返回 reactive 或 readonly 代理的原始对象
const rawObj = toRaw(obj);

// 创建一个浅层响应式代理
const shallowObj = shallowReactive({ nested: { count: 0 } });

// 创建一个浅层只读代理
const shallowRo = shallowReadonly({ nested: { count: 0 } });
以下是一些名词解释:
- 代理对象:在Vue 3中,代理对象是由 reactive 或 readonly 创建的对象的代理,用于跟踪对象的属性的变化。
- readonly:readonly 是一个函数,用于创建一个只读的代理对象,该代理对象只能读取属性值,不能修改属性值。
- 浅层响应式:浅层响应式是指只有对象的第一层属性会被设置为响应式,而嵌套对象的属性不会被设置为响应式。
- 浅层只读代理:浅层只读代理是指只有对象的第一层属性会被设置为只读,而嵌套对象的属性不会被设置为只读。
import { reactive, readonly, shallowReactive, shallowReadonly } from 'vue';

// 创建一个普通对象
const original = { count: 0, nested: { count: 1 } };

// 创建一个响应式代理对象
const reactiveObj = reactive(original);
reactiveObj.count = 1; // 可以修改属性值
reactiveObj.nested.count = 2; // 嵌套对象的属性也会被设置为响应式

// 创建一个只读代理对象
const readonlyObj = readonly(original);
// readonlyObj.count = 2; // 试图修改只读属性会报错
// readonlyObj.nested.count = 2; // 嵌套对象的属性也是只读的

// 创建一个浅层响应式代理对象
const shallowReactiveObj = shallowReactive(original);
shallowReactiveObj.count = 2; // 可以修改属性值
shallowReactiveObj.nested.count = 2; // 嵌套对象的属性不会被设置为响应式

// 创建一个浅层只读代理对象
const shallowReadonlyObj = shallowReadonly(original);
shallowReadonlyObj.count = 2; // 试图修改只读属性会报错
shallowReadonlyObj.nested.count = 2; // 嵌套对象的属性不会被设置为只读
Ref API
Ref函数 : 定义简单类型的数据,也可以定义复杂类型的数据
应用场景 : 定义一些简单的数据,或者从接口中获得的数据
- ref 会返回一个可变的响应式对象,该对象作为一个 响应式的引用 维护着它内部的值,这就是ref名称的来源
- 它内部的值是在
ref的value属性中被维护的 - 不管传入的是基本类型还是引用类型,都放在
.value中
使用的时候是用 .value,但是有两个注意事项:
- 在模板中引入ref的值时,Vue会自动帮助我们进行解包操作,所以并不需要在模板中通过 ref.value 的方式,直接使用即可
- 在 setup 函数内部,它依然是一个 ref引用, 所以对其进行操作时,依然需要使用 ref.value的方式
基本使用
<template>
  <div class="hello">
    <!-- 这样使用即可,不需要使用count.value,会自动解包,取出其中的value -->
    <h1>{{ count }}</h1>
    <button @click="increment">+ 1</button>
  </div>
</template>
<script>
// 从vue中导入ref
import { ref } from 'vue';
export default {
  name: 'HelloWorld',
  setup() {
    // 使用Ref,会返回一个响应式对象
    let count = ref(100);
    const increment = () => {
      // 这样使用,需要使用 .value
      count.value++;
      console.log(count.value);
    };
    return {
      // 直接导出count即可
      count,
      increment
    };
  }
};
</script>
Ref自动解包
- 模板中的解包是浅层的解包,如果我们的代码是下面的方式:
- 如果我们将
ref放到一个reactive的属性当中,那么在模板中使用时,它会自动解包:
const count = ref(1)
const obj = reactive({ count })

// ref 会被解包
console.log(obj.count === count.value) // true

// 会更新 `obj.count`
count.value++
console.log(count.value) // 2
console.log(obj.count) // 2

// 也会更新 `count` ref
obj.count++
console.log(obj.count) // 3
console.log(count.value) // 3
注意当访问到某个响应式数组或 Map 这样的原生集合类型中的 ref 元素时,不会执行 ref 的解包:
const books = reactive([ref('Vue 3 Guide')])
// 这里需要 .value
console.log(books[0].value)

const map = reactive(new Map([['count', ref(0)]]))
// 这里需要 .value
console.log(map.get('count').value)
Ref判断的API
- isRef : 判断值是否是一个ref对象
- unref : 如果我们想要获取一个ref引用中的value,那么也可以通过unref方法
- 如果参数是一个 ref,则返回内部值,否则返回参数本身
- 这是 val = isRef(val) ? val.value : val 的语法糖函数
- shallowRef:shallowRef 是用来创建一个浅层的 ref 对象的函数。浅层的意思是只有对象的第一层属性会被设置为响应式,而嵌套对象的属性不会被设置为响应式。这意味着对嵌套对象属性的修改不会触发响应。
- triggerRef:triggerRef 用于手动触发与 shallowRef 相关联的副作用。当 shallowRef 关联的数据发生变化时,相关的副作用将被触发执行。
import { ref, isRef, unref, shallowRef, triggerRef } from 'vue';

// 判断值是否是一个 ref 对象
const count = ref(0);
console.log(isRef(count)); // true

// 获取 ref 引用中的值
const value = unref(count);

// 语法糖函数示例
const val = isRef(count) ? count.value : count;

// 创建一个浅层的 ref 对象
const shallowCount = shallowRef({ value: 0 });
shallowCount.value = 1; // 可以直接修改 value 属性

// 手动触发与 shallowRef 相关联的副作用
triggerRef(shallowCount);
自定义Ref => customRef
- 创建一个自定义的ref,并对其依赖项跟踪和更新触发进行显示控制:
- 它需要一个工厂函数,该函数接受
track和trigger函数作为参数; - 并且应该返回一个带有
get和set的对象;
- 它需要一个工厂函数,该函数接受
- 这里我们使用一个的案例:
- 对双向绑定的属性进行debounce(节流)的操作
import { customRef } from 'vue';

// 自定义ref
export default function(value, delay = 300) {
  let timer = null;
  return customRef((track, trigger) => {
    return {
      get() {
        track();
        return value;
      },
      set(newValue) {
        clearTimeout(timer);
        timer = setTimeout(() => {
          value = newValue;
          trigger();
        }, delay);
      }
    }
  })
}
<template>
  <div>
    <input v-model="message"/>
    <h2>{{message}}</h2>
  </div>
</template>

<script>
  import debounceRef from './hook/useDebounceRef';

  export default {
    setup() {
      const message = debounceRef("Hello World");

      return {
        message
      }
    }
  }
</script>
readonly
概念
在我们传递给其他组件数据时,往往希望其他组件使用我们传递的内容,但是不允许它们修改时,就可以使用
readonly了;
- 只读代理是深层的:对任何嵌套属性的访问都将是只读的。它的 ref 解包行为与
reactive()相同,但解包得到的值是只读的。 - 要避免深层级的转换行为,请使用 shallowReadonly() 作替代。
- 在开发中常见的readonly方法会传入三个类型的参数:
- 类型一:普通对象
- 类型二:reactive返回的对象
- 类型三:ref的对象
- 在readonly的使用过程中,有如下规则 :
- readonly返回的对象都是不允许修改的
- 但是经过readonly处理的原来的对象是允许被修改的
- 比如 const info = readonly(obj),info对象是不允许被修改的
- 当obj被修改时,readonly返回的info对象也会被修改
- 但是不能去修改readonly返回的对象info
<template>
  <div class="hello">
    <button @click="btnClick">按钮</button>
  </div>
</template>
<script setup>
import { reactive, readonly, watchEffect } from 'vue'

const original = reactive({ count: 0 })

const copy = readonly(original)

const btnClick = () => {
  original.count++
}

watchEffect(() => {
  // 用来做响应性追踪
  console.log(copy.count)
})

// 更改源属性会触发其依赖的侦听器
original.count++

// 更改该只读副本将会失败,并会得到一个警告
copy.count++ // warning!
</script>
toRefs && toRef
toRefs
如果使用ES6的解构语法,对reactive返回的对象进行解构获取值,那么之后无论是修改结构后的变量,还是修改reactive 返回的state对象,数据都不再是响应式的
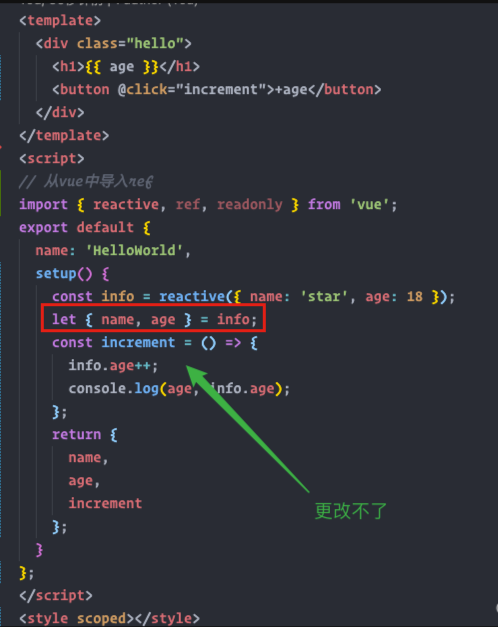
- 如何改成响应式呢,Vue提供了一个toRefs的函数
- 可以将reactive返回的对象中的属性都转成ref,这样解构出来的就是响应式的了
<template>
  <div class="hello">
    <h1>{{ age }}</h1>
    <button @click="increment">+age</button>
  </div>
</template>
<script>
// 从vue中导入ref
import { reactive, ref, readonly, toRefs } from 'vue';
export default {
  name: 'HelloWorld',
  setup() {
    const info = reactive({ name: 'star', age: 18 });
    // 使用toRefs包裹需要结构的reactive对象,这样解构出来的值也是响应式的
    let { name, age } = toRefs(info);
    const increment = () => {
      info.age++;
      // 👆这样都可以修改age,都是响应式的👇
      // 相当于已经建立了链接,任何一个修改都会引起另外一个变化
      age.value++;
      console.log(age, info.age);
    };
    return {
      name,
      age,
      increment
    };
  }
};
</script>
<style scoped></style>
toRef
如果只希望转换reactive对象中的其中某个属性为ref, 那么可以使用toRef的方法
ps : 这个效率会更高点, 这种做法相当于已经在state.name和ref.value之间建立了 链接,任何一个修改都会引起另外一个变化
let age = toRef(info, "age");

const changeAge = () => {
  age.value++;
}
computed
- 在前面的Options API中,我们是使用computed选项来完成的;
- 在Composition API中,我们可以在 setup 函数中使用 computed 方法来编写一个计算属性;
- 如何使用computed呢?
- 方式一:接收一个getter函数,并为 getter 函数返回的值,返回一个不变的 ref 对象;
- 方式二:接收一个具有 get 和 set 的对象,返回一个可变的(可读写)ref 对象;
方式一
<template>
  <!-- coderstar -->
  {{ fullName }}
  <!-- 一般 -->
  {{ scoreState }}
</template>

<script>
import { computed, reactive, ref } from 'vue';
export default {
  name: 'App',
  setup() {
    const names = reactive({
      firstName: 'coder',
      lastName: 'star'
    });
    // 直接使用getter函数,正常来说都这么使用
    const fullName = computed(() => names.firstName + names.lastName);

    const score = ref(88);
    const scoreState = computed(() => (score.value > 90 ? '优秀' : '一般'));

    return {
      fullName,
      scoreState
    };
  }
};
</script>
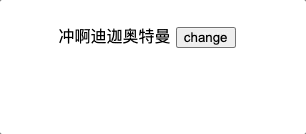
方式二
<template>
  {{ fullName }}
  <button @click="changeName">change</button>
</template>

<script>
import { computed, reactive } from 'vue';
export default {
  name: 'App',
  setup() {
    const names = reactive({
      firstName: '冲啊',
      lastName: '迪迦奥特曼'
    });
    // 会返回一个ref对象
    const fullName = computed({
      set(newValue) {
        const tempNames = newValue.split(' ');
        names.firstName = tempNames[0];
        names.lastName = tempNames[1];
      },
      get() {
        return names.firstName + names.lastName;
      }
    });
    // 设置值
    const changeName = () => {
      fullName.value = fullName.value === '冲啊迪迦奥特曼' ? '神秘的 宇宙人' : '冲啊 迪迦奥特曼';
    };

    return {
      fullName,
      changeName
    };
  }
};
</script>
生命周期钩子
setup中可以直接使用导入的onX函数注册生命周期,并且同一个生命周期可以使用多次
所有罗列在本页的 API 都应该在组件的
setup()阶段被同步调用。相关细节请看指南 - 生命周期钩子。
- 可以使用直接导入的 onX 函数注册生命周期钩子;
- beforeCreate和create在setup中没有相对应的onX的函数
- 如果想要在beforeCreate和create中进行操作
- 可以把代码直接写入到setup中
- setup的执行时序比beforeCreate和create还要早
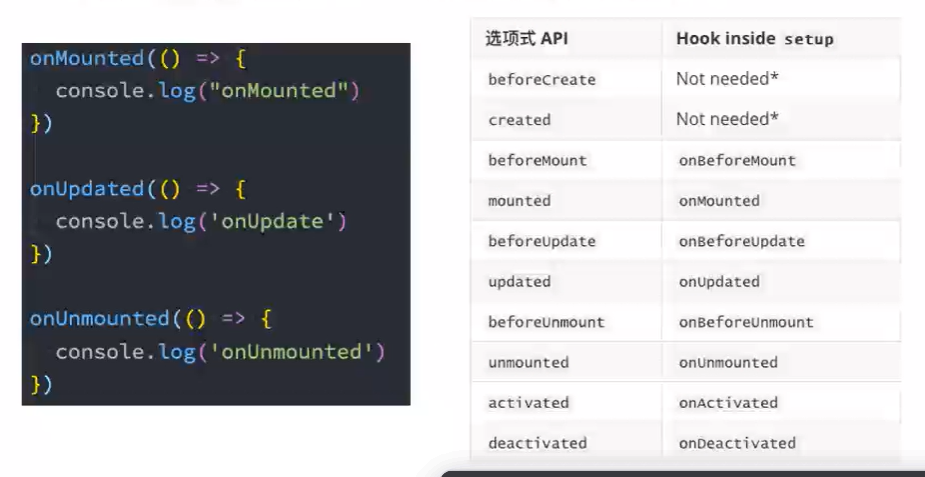
import { onBeforeMount, onMounted, onBeforeUpdate, onUpdated, onBeforeUnmount, onUnmounted } from 'vue';

// 注册生命周期钩子
export default {
  setup() {
    onBeforeMount(() => {
      console.log('Before Mount'); // 组件挂载前
    });

    onMounted(() => {
      console.log('Mounted'); // 组件挂载后
    });

    onBeforeUpdate(() => {
      console.log('Before Update'); // 组件更新前
    });

    onUpdated(() => {
      console.log('Updated'); // 组件更新后
    });

    onBeforeUnmount(() => {
      console.log('Before Unmount'); // 组件卸载前
    });

    onUnmounted(() => {
      console.log('Unmounted'); // 组件卸载后
    });

    // 同一个生命周期可以使用多次
    onMounted(() => {
      console.log('Another Mounted'); // 另一个组件挂载后
    });

    return {};
  }
};
setup中使用ref获取元素或组件
要定义一个ref对象,绑定到元素或者组件的ref属性上即可
只有在挂载完成后才能拿到值, 所以需要在生命周期中调用拿值
获取元素
<template>
  <!-- 1. 指定ref -->
  <h2 ref="titleRef">我是迪迦</h2>
</template>

<script>
import { onMounted, ref } from 'vue';
export default {
  name: 'App',
  setup() {
    // 2. 生成ref对象
    const titleRef = ref();

    // 4. 可以在生命周期中获取到值
    onMounted(() => {
      console.log(titleRef.value); // <h2>我是迪迦</h2>
    });

    return {
      // 3. 返回出去,会自动匹配到对应的ref的
      titleRef
    };
  }
};
</script>
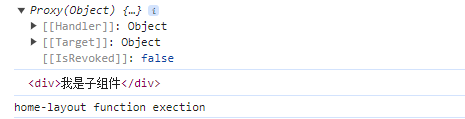
获取组件
<template>
  <div>我是子组件</div>
</template>

<script>
export default {
  name: 'home-layout',
  setup() {
    const showMessage = () => {
      console.log('home-layout function exection');
    };
    return { showMessage };
  }
};
</script>
<template>
  <!-- 1. 指定ref -->
  <home ref="homeCompRef" />
</template>

<script>
import { onMounted, ref } from 'vue';
import home from './home.vue';
export default {
  name: 'App',
  components: { home },
  setup() {
    // 2. 生成ref对象
    const homeCompRef = ref();

    // 4. 可以在生命周期中获取到值
    onMounted(() => {
      console.log(homeCompRef.value); // proxy对象
      console.log(homeCompRef.value.$el); // <div>我是子组件</div>
      homeCompRef.value.showMessage(); // 调用子组件方法
    });

    return {
      // 3. 返回出去,会自动匹配到对应的ref的
      homeCompRef
    };
  }
};
</script>
侦听数据的变化
-
在前面的Options API中,我们可以通过watch选项来侦听data或者props的数据变化,当数据变化时执行某一些 操作。
-
在Composition API中,我们可以使用watchEffect和watch来完成响应式数据的侦听;
- watchEffect用于自动收集响应式数据的依赖;
- watch需要手动指定侦听的数据源;
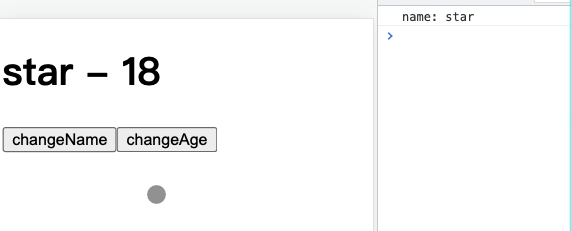
watchEffect
基本使用
- 自动收集响应式数据的依赖
- watchEffect传入的函数会被立即执行一次,并且在执行的过程中会收集依赖
- 只有收集的依赖发生变化时,watchEffect传入的函数才会再次执行
<template>
  <div>
    <h1>{{ name }} - {{ age }}</h1>
    <button @click="changeName">changeName</button>
    <button @click="changeAge">changeAge</button>
  </div>
</template>
<script>
import { ref, watchEffect } from 'vue';
export default {
  setup() {
    let name = ref('star');
    let age = ref(18);

    const changeName = () => (name.value === 'star' ? (name.value = 'xuanyu') : (name.value = 'star'));
    const changeAge = () => age.value++;

    watchEffect(() => {
      // 因为这里只使用了name,所以只会监听name,如果把age也写进来,那么两个都会监听
      console.log('name:', name.value);
    });

    return { name, age, changeName, changeAge };
  }
};
</script>
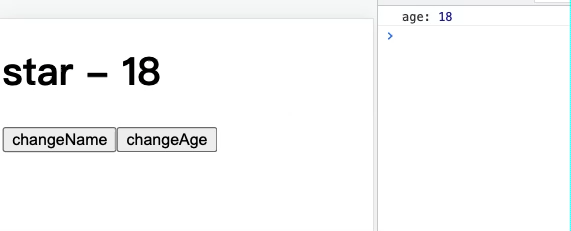
停止监听
- 如果在发生某些情况下,我们希望停止侦听,这个时候我们可以获取watchEffect的返回值函数,调用该函数即可。
<template>
  <div>
    <h1>{{ name }} - {{ age }}</h1>
    <button @click="changeName">changeName</button>
    <button @click="changeAge">changeAge</button>
  </div>
</template>
<script>
import { ref, watchEffect } from 'vue';
export default {
  setup() {
    let name = ref('star');
    let age = ref(18);

    const changeName = () => (name.value === 'star' ? (name.value = 'xuanyu') : (name.value = 'star'));
    // 获取返回值
    const stopWatchEffect = watchEffect(() => {
      // 自动监听age
      console.log('age:', age.value);
    });
    const changeAge = () => {
      age.value++;
      if (age.value > 22) {
        // 停止监听
        stopWatchEffect();
      }
    };

    return { name, age, changeName, changeAge };
  }
};
</script>
清除副作用
- 什么是清除副作用呢?
- 比如在开发中我们需要在侦听函数中执行网络请求,但是在网络请求还没有达到的时候,我们停止了侦听器, 或者侦听器侦听函数被再次执行了
- 那么上一次的网络请求应该被取消掉,这个时候我们就可以清除上一次的副作用;
- 在我们给watchEffect传入的函数被回调时,其实可以获取到一个参数:onInvalidate
- 当副作用即将重新执行 或者 侦听器被停止 时会执行该函数传入的回调函数;
- 我们可以在传入的回调函数中,执行一些清除工作;
<template>
  <div>
    <h2>{{ name }}-{{ age }}</h2>
    <button @click="changeName">修改name</button>
    <button @click="changeAge">修改age</button>
  </div>
</template>

<script>
import { ref, watchEffect } from 'vue';

export default {
  setup() {
    // watchEffect: 自动收集响应式的依赖
    const name = ref("why");
    const age = ref(18);

    const stop = watchEffect((onInvalidate) => {
      const timer = setTimeout(() => {
        console.log("网络请求成功~");
      }, 2000)

      // 根据name和age两个变量发送网络请求
      onInvalidate(() => {
        // 在这个函数中清除额外的副作用
        // request.cancel()
        clearTimeout(timer);
        console.log("onInvalidate");
      })
      console.log("name:", name.value, "age:", age.value);
    });

    const changeName = () => name.value = name.value === "why" ? "kobe" : "why";
    const changeAge = () => age.value++;

    return {
      name,
      age,
      changeName,
      changeAge
    }
  }
}
</script>
watchEffect的执行时机
- 默认情况下,组件的更新会在副作用函数执行之前:
- 如果我们希望在副作用函数中获取到元素,是否可行呢?
<template>
  <div>
    <h2 ref="title">哈哈哈</h2>
  </div>
</template>

<script>
  import { ref, watchEffect } from 'vue';

  export default {
    setup() {
      const title = ref(null);

      watchEffect(() => {
        console.log(title.value);
      })

      return {
        title
      }
    }
  }
</script>

- 我们会发现打印结果打印了两次:
- 这是因为setup函数在执行时就会立即执行传入的副作用函数,这个时候DOM并没有挂载,所以打印为null;
- 而当DOM挂载时,会给
title的ref对象赋值新的值,副作用函数会再次执行,打印出来对应的元素;
- 这个时候我们需要改变副作用函数的执行时机;
- 它的默认值是pre,它会在元素 挂载 或者 更新 之前执行;
- 所以我们会先打印出来一个空的,当依赖的title发生改变时,就会再次执行一次,打印出元素;
- 我们可以设置副作用函数的执行时机:
- pre : 默认值,它会在元素 挂载 或者 更新 之前执行
- post : 元素 挂载 或者 更新 之后执行
- sync : 强制同步一起执行,效率很低,不推荐
<script>
  import { ref, watchEffect } from 'vue';

  export default {
    setup() {
      const title = ref(null);

      watchEffect(() => {
        console.log(title.value);
      }, {
        flush: "post"
      })

      return {
        title
      }
    }
  }
</script>
Watch
- watch的API完全等同于组件watch选项的Property:
- watch需要侦听特定的数据源,并在回调函数中执行副作用;
- 默认情况下它是惰性的,只有当被侦听的源发 生变化时才会执行回调;
- 与watchEffect的比较,watch允许我们:
- 懒执行副作用(第一次不会直接执行);
- 更具体的说明当哪些状态发生变化时,触发侦听器的执行;
- 访问侦听状态变化前后的值;
侦听单个数据源
watch侦听函数的数据源有两种类型:
- 一个getter函数:但是该getter函数必须引用可响应式的对象(比如reactive或者ref);
- 直接写入一个可响应式的对象,ref(如果是一个 reactive 的对象的侦听, 需要进行某些转换 );
import { watch, reactive, ref, toRefs } from 'vue';

// 一个getter函数引用可响应式的对象
const state = reactive({ count: 0 });
watch(
  () => state.count,
  (newValue, oldValue) => {
	console.log(`Count changed from ${oldValue} to ${newValue}`);
});

// 直接写入一个可响应式的对象
const count = ref(0);
watch(count, (newValue, oldValue) => {
  console.log(`Count changed from ${oldValue} to ${newValue}`);
});

// 直接写入一个可响应式的对象,需要进行某些转换
const reactiveState = reactive({ count: 0 });
const { count } = toRefs(reactiveState);
watch(count, (newValue, oldValue) => {
  console.log(`Count changed from ${oldValue} to ${newValue}`);
});
注意:
reactive对象获取到的newValue以及oldValue本身都是reactive对象watch( info, (newInfo, oldInfo) => { console.log(newInfo, oldInfo); } )
如果希望两者都是一个普通对象, 可以使用以下写法(JavaScript中的展开运算符):
watch(
  () => ({ ...info }),
  (newInfo, oldInfo) => {
    console.log(newInfo, oldInfo);
  }
)
以下是完整代码:
<template>
  <div>
    <h2 ref="title">{{ info.name }}</h2>
    <button @click="changeData">修改数据</button>
  </div>
</template>

<script>
import { reactive, watch } from 'vue';

export default {
  setup() {
    const info = reactive({ name: "why", age: 18 });

    watch(
      () => ({ ...info }),
      (newInfo, oldInfo) => {
        console.log(newInfo, oldInfo);
      }
    )
    watch(
      info,
      (newInfo, oldInfo) => {
        console.log(newInfo, oldInfo);
      }
    )

    const changeData = () => info.name = info.name === "why" ? "kobe" : "why";
    return {
      changeData,
      info
    }
  }
}
</script>


侦听多个数据源
当侦听多个来源时,回调函数接受两个数组,分别对应来源数组中的新值和旧值:
watch([fooRef, barRef], ([foo, bar], [prevFoo, prevBar]) => {
  /* ... */
})
<template>
  <div>
    <h2 ref="title">{{ info.name }}</h2>
    <button @click="changeData">修改数据</button>
  </div>
</template>

<script>
import { ref, reactive, watch } from 'vue';

export default {
  setup() {
    const info = reactive({ name: "why", age: 18 });
    const name = ref("why");

    watch([() => ({ ...info }), name], ([newInfo, newName], [oldInfo, oldName]) => {
      console.log(newInfo, newName, oldInfo, oldName);
    })

    const changeData = () => {
      info.name = "kobe";
    }

    return {
      changeData,
      info
    }
  }
}
</script>
watch的选项
- deep : 是否深度监听
- immediate : 是否立即执行
watch侦听reactive时默认是深度侦听的, 但是在使用{...info}展开运算符时, 是不会深度监听的, 所以我们要设置deep: Trueimmediate: 第一次会执行
watch(
  () => {
    const obj = { ...info }
    obj.friend = { ...obj.friend }
    return obj
  },
  (newValue, oldValue) => {
    console.log(newValue, oldValue)
  },
  {
    // 如果有多层,需要加上deep
    deep: true,
    // 立即执行
    immediate: true
  }
)
停止侦听
const stop = watch(source, callback)

// 当已不再需要该侦听器时:
stop()
副作用清理
watch(id, async (newId, oldId, onCleanup) => {
  const { response, cancel } = doAsyncWork(newId)
  // 当 `id` 变化时,`cancel` 将被调用,
  // 取消之前的未完成的请求
  onCleanup(cancel)
  data.value = await response
})
provide && inject
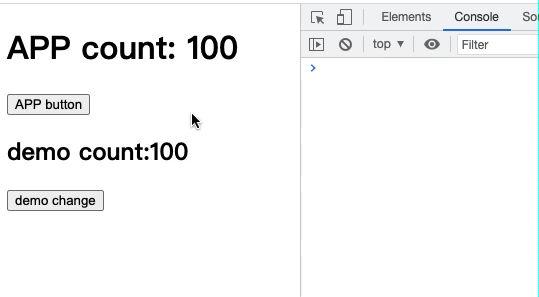
provide 和 inject 通常成对一起使用,使一个祖先组件作为其后代组件的依赖注入方,无论这个组件的层级有多深都可以注入成功,只要他们处于同一条组件链上。
provide可以传入两个参数 :
- name:提供的属性名称
- value:提供的属性值
inject可以传入两个参数 :
- 对应provide传过来的name值
- 默认值
<template>
  <h1>APP count: {{ count }}</h1>
  <button @click="change">APP button</button>
  <demo />
</template>

<script>
import { ref, provide, readonly } from 'vue'
import demo from './components/demo.vue'

export default {
  name: 'App',
  components: {
    demo
  },
  setup() {
    let count = ref(100)
    // 第一个参数key  第二个参数值,不让子组件随便修改,用readonly包裹一下
    provide('count', readonly(count))
    const change = () => count.value++
    return {
      count,
      change
    }
  }
}
</script>
<template>
  <h2>demo count:{{ count }}</h2>
  <button @click="change">demo change</button>
</template>
<script>
import { ref, inject } from 'vue'
export default {
  setup() {
    // 接收   第二个参数可以给一个默认值
    let count = inject('count', '')
    // 因为设置了readOnly 所以更改不了
    const change = () => count.value++
    return {
      count,
      change
    }
  }
}
</script>
h函数
- Vue在生成真实的DOM之前,会将节点转换成VNode,而VNode组合在一起形成一颗树结构,就是虚拟DOM ( VDOM )
- 事实上,编写的 template 中的HTML 最终也是使用渲染函数生成对应的VNode
- 那么,如果想充分的利用JavaScript的编程能力,可以自己来编写 createVNode 函数,生成对应的VNode
- h() 函数是一个用于创建 vnode 的一个函数
- 其实更准备的命名是 createVNode() 函数,但是为了简便在Vue将之简化为 h() 函数
参数
// 完整参数签名
function h(
  type: string | Component,
  props?: object | null,
  children?: Children | Slot | Slots
): VNode

// 省略 props
function h(type: string | Component, children?: Children | Slot): VNode

type Children = string | number | boolean | VNode | null | Children[]

type Slot = () => Children

type Slots = { [name: string]: Slot }
- 第一个参数既可以是一个字符串 (用于原生元素) 也可以是一个 Vue 组件定义。第二个参数是要传递的 prop,第三个参数是子节点。
- 当创建一个组件的 vnode 时,子节点必须以插槽函数进行传递。如果组件只有默认槽,可以使用单个插槽函数进行传递。否则,必须以插槽函数的对象形式来传递。
- 为了方便阅读,当子节点不是插槽对象时,可以省略 prop 参数。
基本使用
h函数可以在两个地方使用:
- render函数选项中;
- setup函数选项中(setup本身需要是一个函数类型,函数再返回h函数创建的VNode);
在render函数选项中
<script>
// 1. 引入h函数
import { h } from 'vue';

export default {
  data() {
    return {
      counter: 0
    };
  },
  // 2. 定义render选项
  render() {
    // 3. 返回自定义的h函数
    return h('div', { class: 'app-view', name: 'abc' }, [
      // 4. 定义h2
      h('h2', { className: 'title' }, this.counter),
      // 5. 定义增加按钮
      h(
        'button',
        {
          className: 'add-btn',
          onClick: () => {
            this.counter++;
          }
        },
        '加一'
      ),
      // 6. 定义减少按钮
      h(
        'button',
        {
          className: 'remove-btn',
          onClick: () => {
            this.counter--;
          }
        },
        '减一'
      )
    ]);
  }
}
</script>
在setup函数选项中
<script>
import { h, ref } from 'vue';

export default {
  setup() {
    const counter = ref(0);
    const increment = () => {
      counter.value++;
    };
    const decrement = () => {
      counter.value--;
    };

    // 返回render函数
    return () =>
      h('div', { class: 'app-view', name: 'abc' }, [
        h('h2', { className: 'title' }, counter.value),
        h(
          'button',
          {
            onClick: increment
          },
          '+1'
        ),
        h(
          'button',
          {
            onClick: decrement
          },
          '-1'
        )
      ]);
  }
};
</script>
在setup语法糖中
<template>
  <!-- 2. 使用一下 -->
  <star-render />
</template>

<script setup>
import { h, ref } from 'vue';

const counter = ref(0);
const increment = () => {
  counter.value++;
};
const decrement = () => {
  counter.value--;
};

// 1. 拿到render函数
const starRender = () =>
  h('div', { class: 'app-view', name: 'abc' }, [
    h('h2', { className: 'title' }, counter.value),
    h(
      'button',
      {
        onClick: increment
      },
      '+1'
    ),
    h(
      'button',
      {
        onClick: decrement
      },
      '-1'
    )
  ]);
</script>
其他写法
创建原生元素:
import { h } from 'vue'

// 除了 type 外,其他参数都是可选的
h('div')
h('div', { id: 'foo' })

// attribute 和 property 都可以用于 prop
// Vue 会自动选择正确的方式来分配它
h('div', { class: 'bar', innerHTML: 'hello' })

// class 与 style 可以像在模板中一样
// 用数组或对象的形式书写
h('div', { class: [foo, { bar }], style: { color: 'red' } })

// 事件监听器应以 onXxx 的形式书写
h('div', { onClick: () => {} })

// children 可以是一个字符串
h('div', { id: 'foo' }, 'hello')

// 没有 prop 时可以省略不写
h('div', 'hello')
h('div', [h('span', 'hello')])

// children 数组可以同时包含 vnode 和字符串
h('div', ['hello', h('span', 'hello')])
创建组件:
import Foo from './Foo.vue'

// 传递 prop
h(Foo, {
  // 等价于 some-prop="hello"
  someProp: 'hello',
  // 等价于 @update="() => {}"
  onUpdate: () => {}
})

// 传递单个默认插槽
h(Foo, () => 'default slot')

// 传递具名插槽
// 注意,需要使用 `null` 来避免
// 插槽对象被当作是 prop
h(MyComponent, null, {
  default: () => 'default slot',
  foo: () => h('div', 'foo'),
  bar: () => [h('span', 'one'), h('span', 'two')]
})
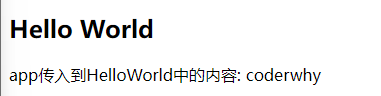
函数组件和插槽的使用
<script>
  import { h } from "vue";

  export default {
    render() {
      return h("div", null, [
        h("h2", null, "Hello World"),
        this.$slots.default ? this.$slots.default({name: "coderwhy"}): h("span", null, "我是HelloWorld的插槽默认值")
      ])
    }
  }
</script>

<style lang="scss" scoped>

</style>
<template>
  <starRender />
</template>

<script setup>
import { h } from 'vue';
import HelloWorld from './HelloWorld.vue';

const starRender = () =>
  h("div", null, [
    h(HelloWorld, null, {
      default: props => h("span", null, `app传入到HelloWorld中的内容: ${props.name}`)
    })
  ])
</script>
Jsx
JSX 是 JavaScript 的一个类似 XML 的扩展,有了它,我们可以用以下的方式来书写代码:
const vnode = <div>hello</div>
在 JSX 表达式中,使用大括号来嵌入动态值:
const vnode = <div id={dynamicId}>hello, {userName}</div>
配置
vue-cli环境
npm install @vue/babel-plugin-jsx -Dbabel.config.js中配置
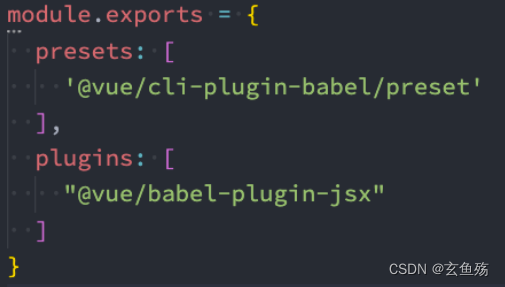
vite环境
npm install @vitejs/plugin-vue-jsx -Dvite.config.js中配置
import { fileURLToPath, URL } from 'node:url';

import { defineConfig } from 'vite';
import vue from '@vitejs/plugin-vue';
import jsx from '@vitejs/plugin-vue-jsx';

export default defineConfig({
  plugins: [vue(), jsx()],
  resolve: {
    alias: {
      '@': fileURLToPath(new URL('./src', import.meta.url))
    }
  }
});
基本使用
在render函数中
<!-- 1. 这里加上注明语言使用jsx -->
<script lang="jsx">
import Home from './pages/home.vue';

export default {
  data() {
    return {
      counter: 0
    };
  },
  render() {
    // 2. 返回jsx写法
    return (
      <div class="app-view">
        <h2>当前计数:{this.counter}</h2>
        <button onClick={this.increment}>+1</button>
        <button onClick={this.decrement}>-1</button>
      </div>
    );
  },
  methods: {
    increment() {
      this.counter++;
    },
    decrement() {
      this.counter--;
    }
  }
};
</script>
在setup函数中
<!-- 1. 这里加上注明语言使用jsx -->
<script lang="jsx">

export default {
  data() {
    return {
      counter: 0
    };
  },
  render() {
    // 2. 返回jsx写法
    return (
      <div class="app-view">
        <h2>当前计数:{this.counter}</h2>
        <button onClick={this.increment}>+1</button>
        <button onClick={this.decrement}>-1</button>
      </div>
    );
  },
  methods: {
    increment() {
      this.counter++;
    },
    decrement() {
      this.counter--;
    }
  }
};
</script>
在setup语法糖中
<template>
  <!-- 3. 使用 -->
  <star-render />
</template>

<!-- 1. 这里加上注明语言使用jsx -->
<script setup lang="jsx">
import { ref } from 'vue';

const counter = ref(0);
const increment = () => counter.value++;
const decrement = () => counter.value--;

// 2. 拿到render函数
const starRender = () => (
  <div class="app-view">
    <h2>当前计数:{counter.value}</h2>
    <button onClick={increment}>+1</button>
    <button onClick={decrement}>-1</button>
  </div>
);
</script>
script setup语法糖
<script setup>是在单文件组件 (SFC) 中使用组合式 API 的编译时语法糖,当同时使用 SFC 与组合式 API 时则推荐该语法
- 更少的样板内容,更简洁的代码
- 能够使用纯 Typescript 声明 prop 和抛出事件
- 更好的运行时性能
- 更好的 IDE 类型推断性能
顶层的绑定会被暴露给模板
当使用
<script setup>的时候,任何在<script setup>声明的顶层的绑定 (包括变量,函数声明,以及 import 引入的内容) 能在模板中直接使用, 导入的组件也可以直接使用
<template>
  <div>{{ mes }}</div>
  <button @click="addClick">按钮</button>
</template>

<!-- 1. 这里加上setup属性 -->
<script setup>
import { ref } from 'vue';

// 定义数据后,template中可以直接使用,无需返回
const mes = ref(0);
// 定义的方法也是,直接可被使用
const addClick = () => {
  console.log('hahah');
};
</script>
<template>
  <!-- 2. 直接使用,不用通过compoents注册 -->
  <my-home></my-home>
</template>

<script setup>
// 1. 这是导入的组件
import myHome from './myHome.vue';
</script>
defineProps()
defineProps => 用来接收从父组件传递过来的数据
<template>
  <my-home name="hello" :age="18"></my-home>
</template>

<script setup>
import myHome from './myHome.vue';
</script>
<template>
  <div>{{ name }} - {{ age }}</div>
</template>

<script setup>
// defineProps是内置组件,可以直接使用,不用导入
// 可以接收一下返回的props对象,也可以不用
const props = defineProps({
  name: {
    type: String,
    default: ''
  },
  age: {
    type: Number,
    default: 0
  }
});
console.log(props); // Proxy {name: 'hello', age: 18}
</script>
defineEmits()
defineProps => 用来发射事件给父组件
<template>
  <button @click="btnClick">发送</button>
</template>

<script setup>
// 1. 注册一下发射的事件
const emits = defineEmits(['btnClick']);
// 2. 监听按钮的点击
const btnClick = () => {
  // 3. 发射
  emits('btnClick', '我发射了');
};
</script>
<template>
  <!-- 1. 监听子组件发射来的事件 -->
  <my-home @btnClick="handleClick"></my-home>
</template>

<script setup>
import myHome from './myHome.vue';

// 2. 获取子组件传递过来的值
const handleClick = (message) => {
  console.log(message); // 我发射了
};
</script>
defineExpose()
defineExpose => 用来暴露数据
ps : 使用
<script setup>的组件是默认关闭的
<script setup>
const foo = () => {
  console.log('foo');
};
// 暴露出去,才可以被访问到
defineExpose({
  foo
});
</script>
<template>
  <!-- 1. 定义ref -->
  <my-home ref="myHomeRef"></my-home>
</template>

<script setup>
import { onMounted, ref } from 'vue';
import myHome from '../../../Vue3/06_阶段六-Vue3全家桶实战/code/04_learn_composition/src/11_script_setup语法/myHome.vue';
// 2. 定义名称一样
const myHomeRef = ref();
onMounted(() => {
  // 3. 在生命周期中访问
  console.log(myHomeRef.value);
});
</script>
自定义组件
指令的生命周期
- 一个指令定义的对象,Vue提供了如下的几个钩子函数:
- created:在绑定元素的 attribute 或事件监听器被应用之前调用;
- beforeMount:当指令第一次绑定到元素并且在挂载父组件之前调用;
- mounted:在绑定元素的父组件被挂载后调用;
- beforeUpdate:在更新包含组件的 VNode 之前调用;
- updated:在包含组件的 VNode 及其子组件的 VNode 更新后调用;
- beforeUnmount:在卸载绑定元素的父组件之前调用;
- unmounted:当指令与元素解除绑定且父组件已卸载时,只调用一次;
指令钩子
一个指令的定义对象可以提供几种钩子函数 (都是可选的):
const myDirective = {
  // 在绑定元素的 attribute 前
  // 或事件监听器应用前调用
  created(el, binding, vnode, prevVnode) {
    // 下面会介绍各个参数的细节
  },
  // 在元素被插入到 DOM 前调用
  beforeMount(el, binding, vnode, prevVnode) {},
  // 在绑定元素的父组件
  // 及他自己的所有子节点都挂载完成后调用
  mounted(el, binding, vnode, prevVnode) {},
  // 绑定元素的父组件更新前调用
  beforeUpdate(el, binding, vnode, prevVnode) {},
  // 在绑定元素的父组件
  // 及他自己的所有子节点都更新后调用
  updated(el, binding, vnode, prevVnode) {},
  // 绑定元素的父组件卸载前调用
  beforeUnmount(el, binding, vnode, prevVnode) {},
  // 绑定元素的父组件卸载后调用
  unmounted(el, binding, vnode, prevVnode) {}
}
指令的钩子会传递以下几种参数:
el:指令绑定到的元素。这可以用于直接操作 DOM。binding:一个对象,包含以下属性。value:传递给指令的值。例如在v-my-directive="1 + 1"中,值是2。oldValue:之前的值,仅在beforeUpdate和updated中可用。无论值是否更改,它都可用。arg:传递给指令的参数 (如果有的话)。例如在v-my-directive:foo中,参数是"foo"。modifiers:一个包含修饰符的对象 (如果有的话)。例如在v-my-directive.foo.bar中,修饰符对象是{ foo: true, bar: true }。instance:使用该指令的组件实例。dir:指令的定义对象。
vnode:代表绑定元素的底层 VNode。prevNode:代表之前的渲染中指令所绑定元素的 VNode。仅在beforeUpdate和updated钩子中可用。
举例来说,像下面这样使用指令:
<div v-example:foo.bar="baz">
binding 参数会是一个这样的对象:
{
  arg: 'foo',
  modifiers: { bar: true },
  value: /* `baz` 的值 */,
  oldValue: /* 上一次更新时 `baz` 的值 */
}
和内置指令类似,自定义指令的参数也可以是动态的。举例来说:
<div v-example:[arg]="value"></div>
这里指令的参数会基于组件的 arg 数据属性响应式地更新。
除了
el外,其他参数都是只读的,不要更改它们。若你需要在不同的钩子间共享信息,推荐通过元素的 dataset attribute 实现。
简单使用
Vue中自带的指令例如v-show、v-for、v-model等等,除了使用这些指令之外,Vue 也允许我们来自定义自己的指令
ps : 一般需要对dom元素进行底层操作时使用
- 自定义指令分为两种:
- 自定义局部指令:组件中通过 directives 选项,只能在当前组件中使用;
- 自定义全局指令:app的 directive 方法,可以在任意组件中被使用;
默认实现方式
一个自定义指令由一个包含类似组件生命周期钩子的对象来定义。钩子函数会接收到指令所绑定元素作为其参数。下面是一个自定义指令的例子,当一个 input 元素被 Vue 插入到 DOM 中后,它会被自动聚焦:
<script setup>
// 在模板中启用 v-focus
const vFocus = {
  mounted: (el) => el.focus()
}
</script>

<template>
  <input v-focus />
</template>
<template>
  <div class="app-view">
    <input type="text" ref="inputRef" />
  </div>
</template>

<script setup>
import { onMounted, ref } from 'vue';

const inputRef = ref(null);

onMounted(() => {
  inputRef.value.focus();
});
</script>
使用局部指令
在 <script setup> 中,任何以 v 开头的驼峰式命名的变量都可以被用作一个自定义指令。在上面的例子中,vFocus 即可以在模板中以 v-focus 的形式使用。
在没有使用 <script setup> 的情况下,自定义指令需要通过 directives 选项注册:
<template>
  <div>
    <input type="text" v-focus>
  </div>
</template>

<script>
  export default {
    // 局部指令
    directives: {
      focus: {
        mounted(el, bindings, vnode, preVnode) {
          console.log("focus mounted");
          el.focus();
        }
      }
    }
  }
</script>
自定义全局指令
main.js中注册
import { createApp } from 'vue'
import App from './App.vue'

const app = createApp(App)

// 指令名称
app.directive('focus', {
  // 使用自定义指令的生命周期,挂载后访问
  mounted(el, bindings, vnode, preVnode) {
    el?.focus()
  }
})

app.mount('#app')
进行抽取
- 注册directives文件夹
- /directives/format-time.js
import dayjs from 'dayjs';

export default function(app) {
  app.directive("format-time", {
    created(el, bindings) {
      bindings.formatString = "YYYY-MM-DD HH:mm:ss";
      if (bindings.value) {
        bindings.formatString = bindings.value;
      }
    },
    mounted(el, bindings) {
      const textContent = el.textContent;
      let timestamp = parseInt(textContent);
      if (textContent.length === 10) {
        timestamp = timestamp * 1000
      }
      el.textContent = dayjs(timestamp).format(bindings.formatString);
    }
  })
}
- /directives/index.js
import registerFormatTime from './format-time';

export default function registerDirectives(app) {
  registerFormatTime(app);
}
- mian.js
import registerDirectives from './directives'

registerDirectives(app);
setup
函数
<template>
  <h1 v-fomat-time="timeFormatType">{{ timeStamp }}</h1>
</template>
<script>
import { ref } from 'vue'
import dayJs from 'dayjs'
export default {
  directives: {
    'fomat-time': {
      mounted(el, bindings) {
        // 默认显示时间类型
        let formatType = bindings.value
        console.log(formatType)
        // 转换成number类型
        let time = el.textContent.length === 10 ? el.textContent * 1000 : el.textContent * 1;
        // 格式化
        el.textContent = dayJs(time).format(formatType)
        setInterval(() => {
          // 定时器
          time = dayJs(new Date().valueOf()).format(formatType)
          el.textContent = time
        }, 1000)
      }
    }
  },
  setup() {
    // 设置初始时间戳
    const timeStamp = ref(new Date().valueOf())

    const timeFormatType = ref('YYYY-MM-DD HH:mm:ss')

    return {
      timeStamp,
      timeFormatType
    }
  }
}
</script>

<style>
h1 {
  display: inline-block;
  color: transparent;
  -webkit-background-clip: text;
  background-image: linear-gradient(to right, red, blue);
}
</style>
语法糖
<template>
  <h1 v-fomat-time="timeFormatType">{{ timeStamp }}</h1>
</template>
<script setup>
import { ref } from 'vue';
import dayJs from 'dayjs';

// 设置初始时间戳
const timeStamp = ref(new Date().valueOf());
// 设置初始时间格式
const timeFormatType = ref('YYYY-MM-DD HH:mm:ss');

// 自定义时间格式化指令
const vFomatTime = {
  mounted(el, bindings) {
    // 获取定义的时间格式
    const { value: timeFormatType } = bindings;
    // 转换成number类型
    let time = el.textContent.length === 10 ? el.textContent * 1000 : el.textContent * 1;
    // 使用dayJs,根据时间格式来格式化时间,并赋值给el
    el.textContent = dayJs(time).format(timeFormatType);
    // 定时器,每隔一秒,重新赋值给el
    setInterval(() => {
      time = dayJs(new Date().valueOf()).format(timeFormatType);
      el.textContent = time;
    }, 1000);
  }
};
</script>

<style>
h1 {
  display: inline-block;
  color: transparent;
  -webkit-background-clip: text;
  background-clip: text;
  background-image: linear-gradient(to right, red, blue);
}
</style>
内置组件
Teleport
<Teleport>是一个内置组件,它可以将一个组件内部的一部分模板“传送”到该组件的 DOM 结构外层的位置去。
- 在某些情况下,希望组件不是挂载在当前组件树上的,可能是移动到Vue app之外的其他位置
- 比如移动到body元素上,或者我们有其他的div#app之外的元素上
- 可以通过teleport来完成
- teleport 翻译过来是心灵传输、远距离运输的意思,有两个属性
- to : 指定将其中的内容移动到的目标元素,可以使用选择器
- disabled : 是否禁用 teleport 的功能
基本使用
<template>
  <div class="app-view">
    <!-- 把该组件挂载到body元素上 -->
    <teleport to="body">
      <h1>Teleport</h1>
    </teleport>
  </div>
</template>
<script setup></script>

<style>
h1 {
  display: inline-block;
  color: transparent;
  -webkit-background-clip: text;
  background-clip: text;
  background-image: linear-gradient(to right, red, green, pink, yellow, blue);
}
</style>

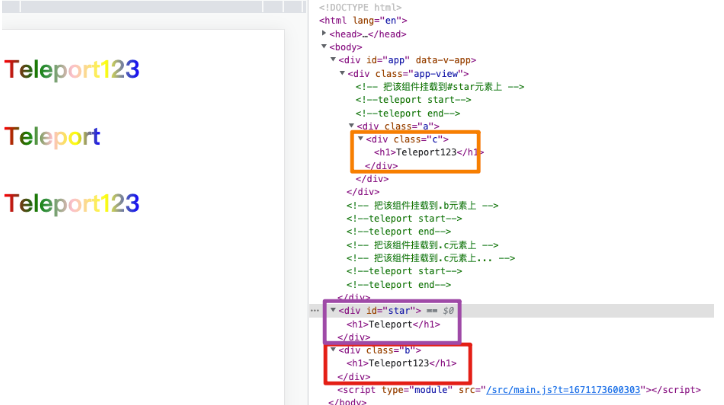
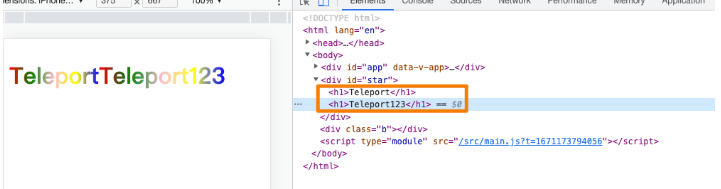
挂载到#app之外的指定元素上
<template>
  <div class="app">
    <div id="star"></div>
    <div class="b">
        <div class="c"></div>
    </div>

  </div>

  <!-- 把该组件挂载到#star元素上 -->
  <teleport to="#star">
    <h1>Teleport</h1>
  </teleport>

  <!-- 把该组件挂载到.b元素上 -->
  <teleport to=".b">
    <h1>Teleport123</h1>
  </teleport>

  <!-- 文档上说是挂载到#app之外的元素,可是我发现自己内部的也可以指定,emmmm,优先是从内部一层层往外找的 -->
  <!-- 把该组件挂载到.c元素上... -->
  <teleport to=".c">
    <h1>Teleport123</h1>
  </teleport>
</template>
<script setup></script>

<style>
h1 {
  display: inline-block;
  color: transparent;
  -webkit-background-clip: text;
  background-clip: text;
  background-image: linear-gradient(to right, red, green, pink, yellow, blue);
}
</style>
多个Teleport
会合并,谁先谁在前面
<template>
  <div id="star"></div>

  <div class="app-view">
    <!-- 把该组件挂载到#star元素上 -->
    <teleport to="#star">
      <h1>Teleport</h1>
    </teleport>
  </div>
  <!-- 把该组件挂载到#star元素上 -->
  <teleport to="#star">
    <h1>Teleport123</h1>
  </teleport>
</template>
<script setup></script>

<style>
h1 {
  display: inline-block;
  color: transparent;
  -webkit-background-clip: text;
  background-clip: text;
  background-image: linear-gradient(to right, red, green, pink, yellow, blue);
}
</style>
其他
Vue插件
- 通常我们向Vue全局添加一些功能时,会采用插件的模式,它有两种编写方式:
- 对象类型:一个对象,但是必须包含一个
install的函数,该函数会在安装插件时执行; - 函数类型:一个
function,这个函数会在安装插件时自动执行;
- 对象类型:一个对象,但是必须包含一个
- 插件可以完成的功能没有限制,比如下面的几种都是可以的:
- 添加全局方法或者
property,通过把它们添加到config.globalProperties上实现; - 添加全局资源:指令/过滤器/过渡等;
- 通过全局
mixin来添加一些组件选项; - 一个库,提供自己的 API,同时提供上面提到的一个或多个功能;
- 添加全局方法或者
对象类型
对象类型:一个对象,但是必须包含一个 install 的函数,该函数会在安装插件时执行
app.use({
  install(app) {
    console.log('对象方式,插件被调用了', app);
  }
});
函数类型
函数类型:一个function,这个函数会在安装插件时自动执行
app.use(function(app){
  console.log('函数方式,插件被调用了', app);
})
改写自定义指令
import { createApp } from 'vue';

import App from './App.vue';
// 1. 导入指令方法
import installDirectives from './directives';

// 2。 注册所有指令
// installDirectives(app);

// 这样使用use方法注册指令,因为传入的是一个函数,所以会自动执行
// 并且会把app实例传入,这样就可以在函数内部注册指令了
createApp(App).use(installDirectives).mount('#app');