Stage 模型
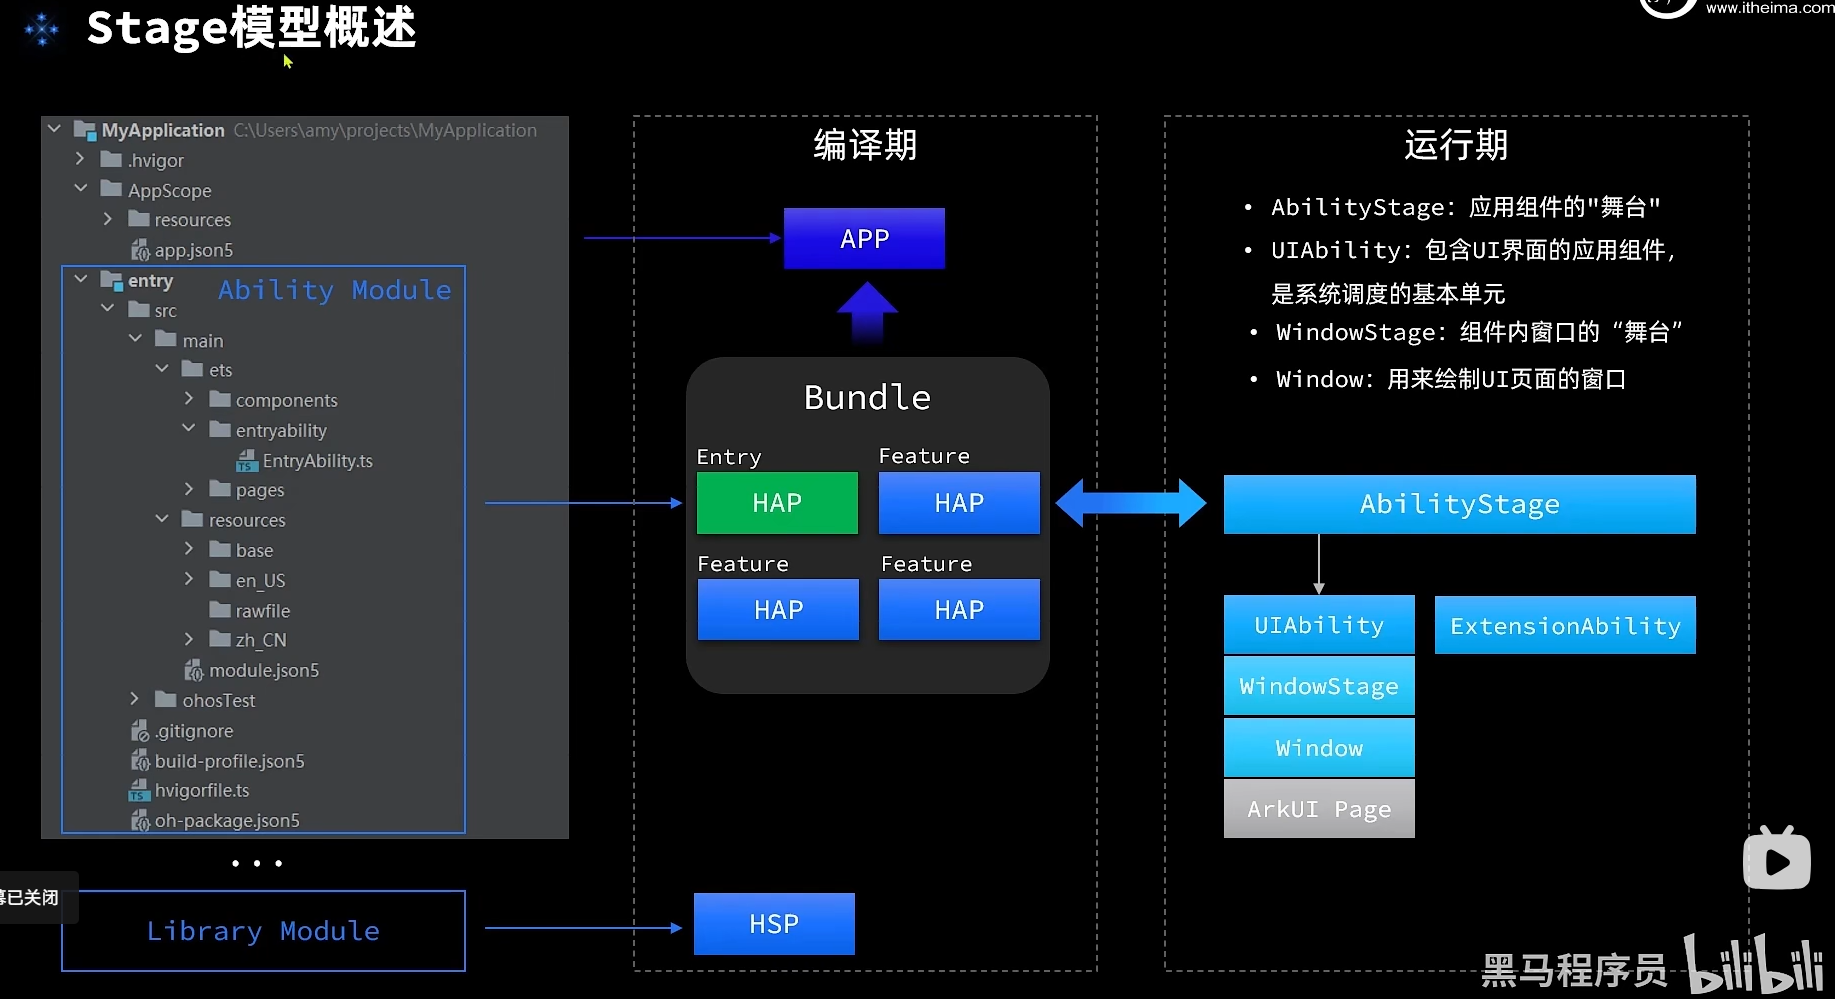
一个应用只能有一个 @EntryAbility,但可以有多个 @PageAbility。
(Stage模型)目录结构
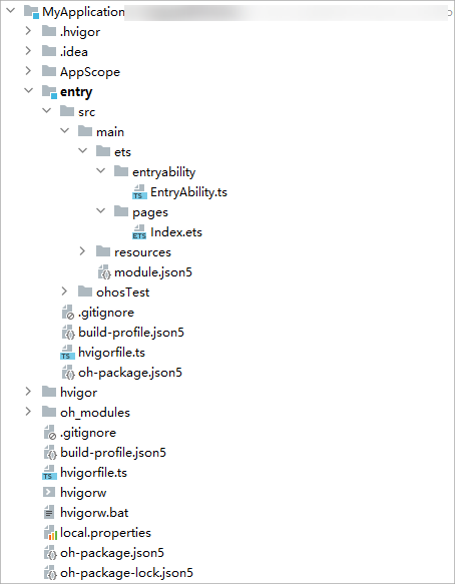
- AppScope > app.json5:应用的全局配置信息。
- entry:HarmonyOS工程模块,编译构建生成一个HAP包。
- src > main > ets:用于存放ArkTS源码。 src > main > ets > entryability:应用/服务的入口。
- src > main > ets > pages:应用/服务包含的页面
- src > main > resources:用于存放应用/服务所用到的资源文件,如图形、多媒体、字符串、布局文件等。关于资源文件,详见资源分类与访问。
- src > main > module.json5:Stage模型模块配置文件。主要包含HAP包的配置信息、应用/服务在具体设备上的配置信息以及应用/服务的全局配置信息。具体的配置文件说明,详见 module.json5配置文件。
- build-profile.json5:当前的模块信息、编译信息配置项,包括buildOption、targets配置等。其中targets中可配置当前运行环境,默认为HarmonyOS。
- hvigorfile.ts:模块级编译构建任务脚本,开发者可以自定义相关任务和代码实现。
- oh_modules:用于存放三方库依赖信息。关于原npm工程适配ohpm操作,请参考历史工程迁移。
- build-profile.json5:应用级配置信息,包括签名、产品配置等。
- hvigorfile.ts:应用级编译构建任务脚本。
应用配置文件
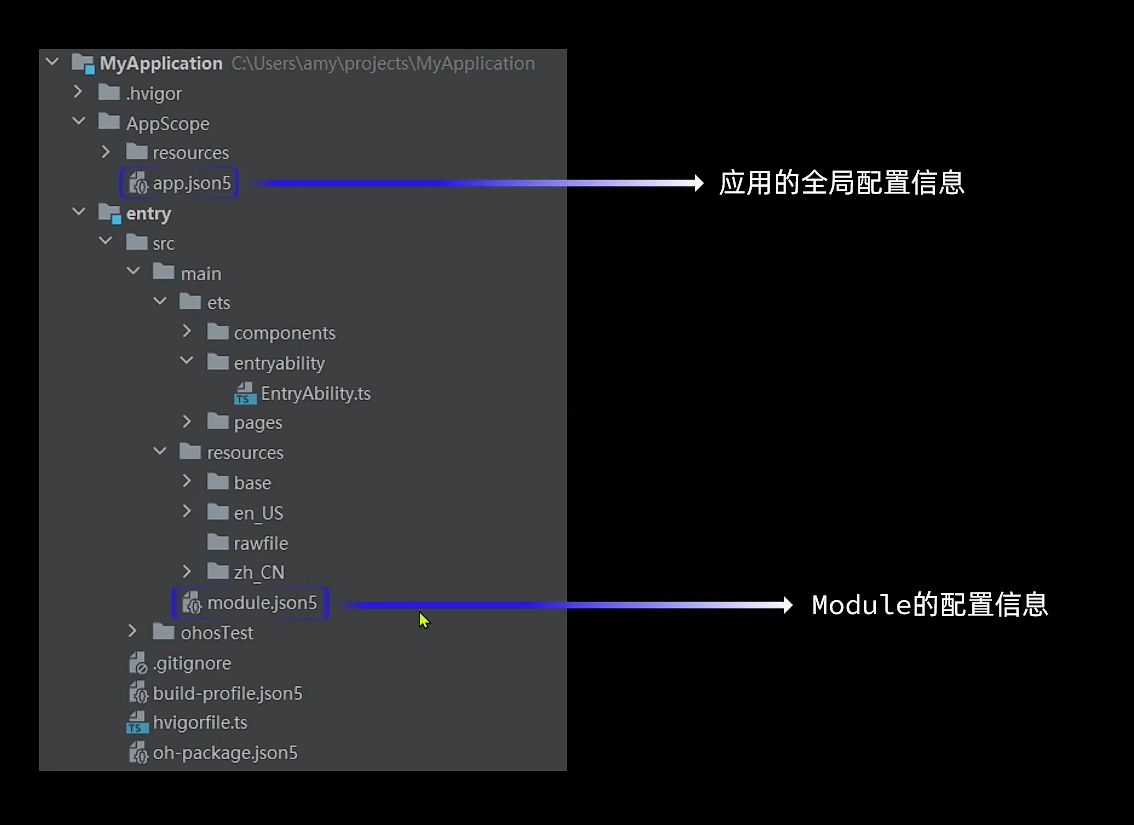
app.json5文件是应用的全局配置文件,用于配置应用的基本信息、版本信息、图标、名称、描述等。
| 属性名称 | 含义 | 数据类型 | 是否可缺省 |
|---|---|---|---|
| bundleName | 标识应用的Bundle名称,用于标识应用的唯一性。该标签不可缺省。标签的值命名规则 :- 字符串以字母、数字、下划线和符号“.”组成。- 以字母开头。- 最小长度7个字节,最大长度127个字节。推荐采用反域名形式命名(如com.example.demo,建议第一级为域名后缀com,第二级为厂商/个人名,第三级为应用名,也可以多级)。 | 字符串 | 该标签不可缺省。 |
| bundleType | 标识应用的Bundle类型,用于区分应用或者原子化服务。该标签可选值为app和atomicService :- app:当前Bundle为普通应用。- atomicService:当前Bundle为元服务。 | 字符串 | 该标签可以缺省,缺省为app。 |
| debug | 标识应用是否可调试,该标签由IDE编译构建时生成。- true:可调试。- false:不可调试。 | 布尔值 | 该标签可以缺省,缺省为false。 |
| icon | 标识 应用的图标,标签值为图标资源文件的索引。 | 字符串 | 该标签不可缺省。 |
| label | 标识 应用的名称,标签值为字符串资源的索引。 | 字符串 | 该标签不可缺省。 |
| description | 标识应用的描述信息,标签值是字符串类型(最大255个字节)或对描述内容的字符串资源索引。 | 字符串 | 该标签可缺省,缺省值为空。 |
| vendor | 标识对应用开发厂商的描述。该标签的值是字符串类型(最大255个字节)。 | 字符串 | 该标签可以缺省,缺省为空。 |
| versionCode | 标识应用的版本号,该标签值为32位非负整数。此数字仅用于确定某个版本是否比另一个版本更新,数值越大表示版本越高。开发者可以将该值设置为任何正整数,但是必须确保应用的新版本都使用比旧版本更大的值。该标签不可缺省,versionCode值应小于2^31次方。 | 数值 | 该标签不可缺省。 |
| versionName | 标识应用版本号的文字描述,用于向用户展示。该标签仅由数字和点构成,推荐采用“A.B.C.D”四段式的形式。四段式推荐的含义如下所示。第一段:主版本号/Major,范围0-99,重大修改的版本,如实现新的大功能或重大变化。第二段:次版本号/Minor,范围0-99,表示实现较突出的特点,如新功能添加或大问题修复。第三段:特性版本号/Feature,范围0-99,标识规划的新版本特性。第四段:修订版本号/Patch,范围0-999,表示维护版本,修复bug。标签最大字节长度为127。 | 字符串 | 该标签不可缺省。 |
| minCompatibleVersionCode | 标识应用能够兼容的最低历史版本号,用于跨设备兼容性判断。说明当前版本暂不支持跨设备能力。 | 数值 | 该标签可缺省,缺省值等于versionCode标签值。 |
| minAPIVersion | 标识应用运行需要的SDK的API最小版本。 | 数值 | 由build-profile.json5中的compatibleSdkVersion生成。 |
| targetAPIVersion | 标识应用运行需要的API目标版本。 | 数值 | 由build-profile.json5中的compileSdkVersion生成。 |
| apiReleaseType | 标识应用运行需要的API目标版本的类型,采用字符串类型表示。取值为“CanaryN”、“BetaN”或者“Release”,其中,N代表大于零的整数。- Canary:受限发布的版本。- Beta:公开发布的Beta版本。- Release:公开发布的正式版本。该字段由DevEco Studio读取当前使用的SDK的Stage来生成。 | 字符串 | 该标签可缺省,由IDE生成并覆盖。 |
| multiProjects | 标识当前工程是否支持多个工程的联合开发。- true:当前工程支持多个工程的联合开发。- false:当前工程不支持多个工程的联合开发。多工程开发可以参考文档: 多工程构建。 | 布尔值 | 可缺省,缺省值为false。 |
| tablet | 标识对tablet设备做的特殊配置,可以配置的属性字段有上文提到的:minAPIVersion、distributedNotificationEnabled。如果使用该属性对tablet设备做了特殊配置,则应用在tablet设备中会采用此处配置的属性值,并忽略在app.json5公共区域配置的属性值。 | 对象 | 该标签可缺省,缺省时tablet设备使用app.json5公共区域配置的属性值。 |
| tv | 标识对tv设备做的特殊配置,可以配置的属性字段有上文提到的:minAPIVersion、distributedNotificationEnabled。如果使用该属性对tv设备做了特殊配置,则应用在tv设备中会采用此处配置的属性值,并忽略在app.json5公共区域配置的属性值。 | 对象 | 该标签可缺省,缺省时tv设备使用app.json5公共区域配置的属性值。 |
| wearable | 标识对wearable设备做的特殊配置,可以配置的属性字段有上文提到的:minAPIVersion、distributedNotificationEnabled。如果使用该属性对wearable设备做了特殊配置,则应用在wearable设备中会采用此处配置的属性值,并忽略在app.json5公共区域配置的属性值。 | 对象 | 该标签可缺省,缺省时wearable设备使用app.json5公共区域配置的属性值。 |
| car | 标识对car设备做的特殊配置,可以配置的属性字段有上文提到的:minAPIVersion、distributedNotificationEnabled。如果使用该属性对car设备做了特殊配置,则应用在car设备中会采用此处配置的属性值,并忽略在app.json5公共区域配置的属性值。 | 对象 | 该标签可缺省,缺省时car设备使用app.json5公共区域配置的属性值。 |
| phone | 标识对phone设备做的特殊配置,可以配置的属性字段有上文提到的:minAPIVersion、distributedNotificationEnabled。如果使用该属性对phone设备做了特殊配置,则应用在phone设备中会采用此处配置的属性值,并忽略在app.json5公共区域配置的属性值。 | 对象 | 该标签可缺省,缺省时phone设备使用app.json5公共区域配置的属性值。 |
module.json5文件是Stage模型模块配置文件,用于配置HAP包的配置信息、应用/服务在具体设备上的配置信息以及应用/服务的全局配置信息。 以下是一个示例:
{
  "module": {
    "name": "entry",
    "type": "entry",
    "description": "$string:module_desc",
    "mainElement": "EntryAbility",
    "deviceTypes": [
      "tv",
      "tablet"
    ],
    "deliveryWithInstall": true,
    "installationFree": false,
    "pages": "$profile:main_pages",
    "virtualMachine": "ark",
    "metadata": [
      {
        "name": "string",
        "value": "string",
        "resource": "$profile:distributionFilter_config"
      }
    ],
    "abilities": [
      {
        "name": "EntryAbility",
        "srcEntry": "./ets/entryability/EntryAbility.ts",
        "description": "$string:EntryAbility_desc",
        "icon": "$media:icon",
        "label": "$string:EntryAbility_label",
        "startWindowIcon": "$media:icon",
        "startWindowBackground": "$color:start_window_background",
        "exported": true,
        "skills": [
          {
            "entities": [
              "entity.system.home"
            ],
            "actions": [
              "ohos.want.action.home"
            ]
          }
        ]
      }
    ],
    "requestPermissions": [
      {
        "name": "ohos.abilitydemo.permission.PROVIDER",
        "reason": "$string:reason",
        "usedScene": {
          "abilities": [
            "FormAbility"
          ],
          "when": "inuse"
        }
      }
    ]
  }
}
| 属性名称 | 含义 | 数据类型 | 是否可缺省 |
|---|---|---|---|
| name | 标识当前Module的名称,标签值采用字符串表示(最大长度31个字节),该名称在整个应用要唯一,仅支持英文字符。 | 字符串 | 该标签不可缺省。 |
| type | 标识当前Module的类型。类型有两种,分别:- entry:应用的主模块。- feature:应用的动态特性模块。-har:静态共享包模块。-shared:动态共享包模块。 | 字符串 | 该标签不可缺省。 |
| srcEntry | 标识当前Module所对应的代码路径,标签值为字符串(最长为127字节)。 | 字符串 | 该标签可缺省,缺省值为空。 |
| description | 标识当前Module的描述信息,标签值是字符串类型(最长255字节)或对描述内容的字符串资源索引。 | 字符串 | 该标签可缺省,缺省值为空。 |
| process | 标识当前Module的进程名,标签值为字符串类型(最长为31个字节)。如果在HAP标签下配置了process,该应用的所有UIAbility、DataShareExtensionAbility、ServiceExtensionAbility都运行在该进程中。说明:- 仅支持系统应用配置,三方应用配置不生效。 | 字符串 | 可缺省,缺省为app.json5文件下app标签下的bundleName。 |
| mainElement | 标识当前Module的入口UIAbility名称或者ExtensionAbility名称。标签最大字节长度为255。 | 字符串 | 该标签可缺省,缺省值为空。 |
| deviceTypes | 标识当前Module可以运行在哪类设备上,标签值采用字符串数组的表示。 | 字符串数组 | 该标签不可缺省。 |
| deliveryWithInstall | 标识当前Module是否在用户主动安装的时候安装,表示该Module对应的HAP是否跟随应用一起安装。- true:主动安装时安装。- false:主动安装时不安装。 | 布尔值 | 该标签不可缺省。 |
| installationFree | 标识当前Module是否支持免安装特性。- true:表示支持免安装特性,且符合免安装约束。- false:表示不支持免安装特性。说明:- 当应用的entry类型Module的该字段配置为true时,该应用的feature类型的该字段也需要配置为true。- 当应用的entry类型Module的该字段配置为false时,该应用的feature类型的该字段根据业务需求配置true或false。 | 布尔值 | 该标签不可缺省。 |
| virtualMachine | 标识当前Module运行的目标虚拟机类型,供云端分发使用,如应用市场和分发中心。该标签值为字符串。如果目标虚拟机类型为ArkTS引擎,则其值为“ark+版本号”。 | 字符串 | 该标签由IDE构建HAP的时候自动插入。 |
| pages | 标识当前Module的profile资源,用于列举每个页面信息。该标签最大长度为255个字节。 | 字符串 | 在有UIAbility的场景下,该标签不可缺省。 |
| metadata | 标识当前Module的自定义元信息,标签值为数组类型,只对当前Module、UIAbility、ExtensionAbility生效。 | 对象数组 | 该标签可缺省,缺省值为空。 |
| abilities | 标识当前Module中UIAbility的配置信息,标签值为数组类型,只对当前UIAbility生效。 | 对象 | 该标签可缺省,缺省值为空。 |
| extensionAbilities | 标识当前Module中ExtensionAbility的配置信息,标签值为数组类型,只对当前ExtensionAbility生效。 | 对象 | 该标签可缺省,缺省值为空。 |
| requestPermissions | 标识当前应用运行时需向系统申请的权限集合。 | 对象 | 该标签可缺省,缺省值为空。 |
| testRunner | 标识当前Module用于支持对测试框架的配置。 | 对象 | 该标签可缺省,缺省值为空。 |
生命周期
UIAbility组件生命周期

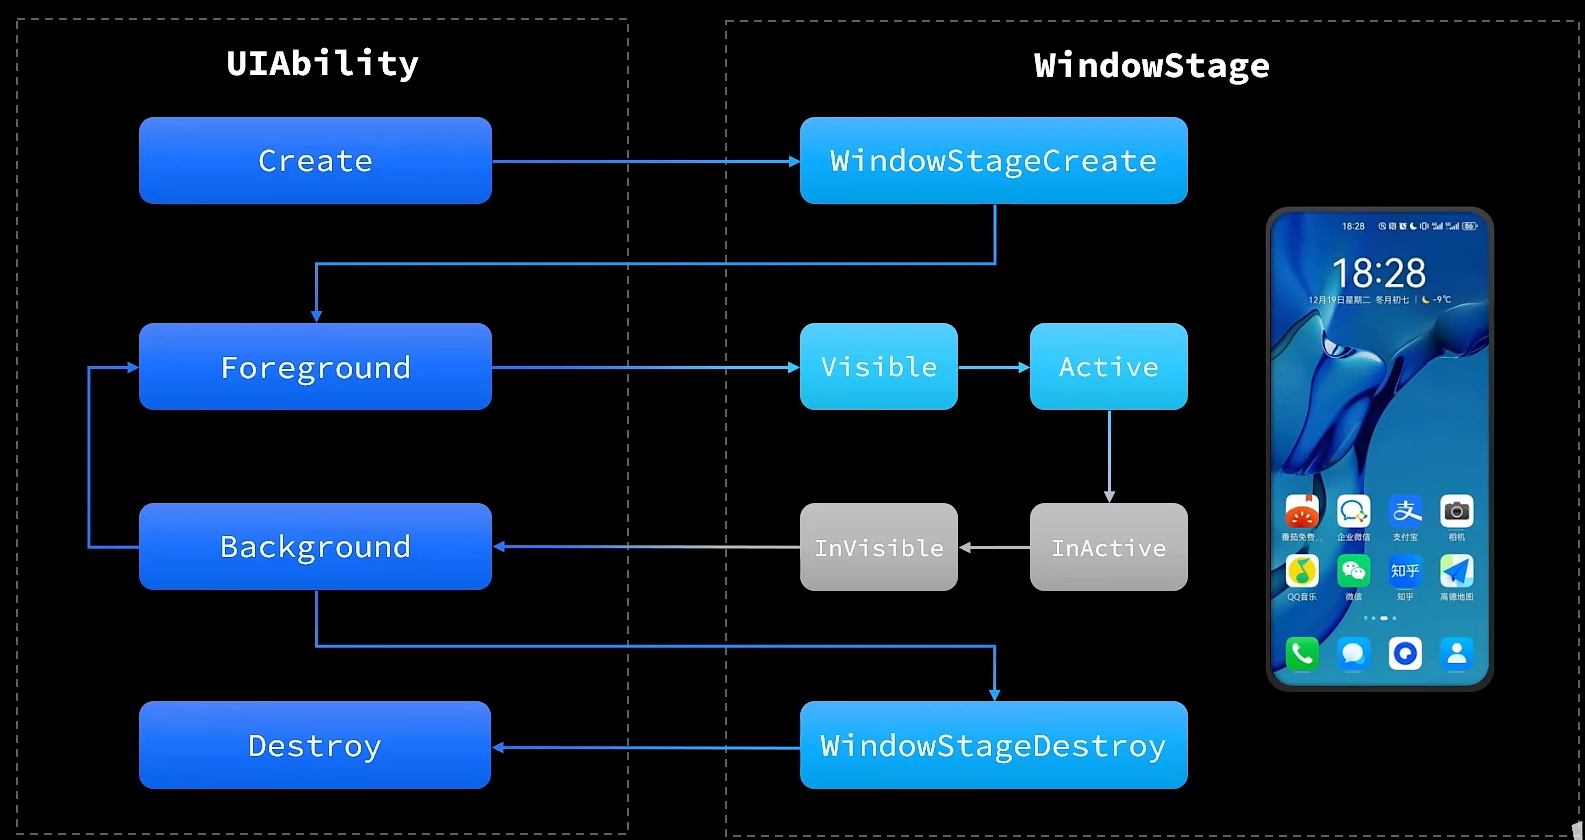
src/main/ets/entryability/EntryAbility.ts
Foreground和Background状态分别在UIAbility实例切换至前台和切换至后台时触发,对应于onForeground()回调和onBackground()回调。
onForeground()回调,在UIAbility的UI界面可见之前,如UIAbility切换至前台时触发。可以在onForeground()回调中申请系统需要的资源,或者重新申请在onBackground()中释放的资源。
onBackground()回调,在UIAbility的UI界面完全不可见之后,如UIAbility切换至后台时候触发。可以在onBackground()回调中释放UI界面不可见时无用的资源,或者在此回调中执行较为耗时的操作,例如状态保存等。
例如应用在使用过程中需要使用用户定位时,假设应用已获得用户的定位权限授权。在UI界面显示之前,可以在onForeground()回调中开启定位功能,从而获取到当前的位置信息。
当应用切换到后台状态,可以在onBackground()回调中停止定位功能,以节省系统的资源消耗。
页面和组件的生命周期
在开始之前,我们先明确自定义组件和页面的关系:
- 自定义组件:@Component装饰的UI单元,可以组合多个系统组件实现UI的复用,可以调用组件的生命周期。
- 页面:即应用的UI页面。可以由一个或者多个自定义组件组成, @Entry装饰的自定义组件为页面的入口组件,即页面的根节点,一个页面有且仅能有一个@Entry。只有被@Entry装饰的组件才可以调用页面的生命周期。
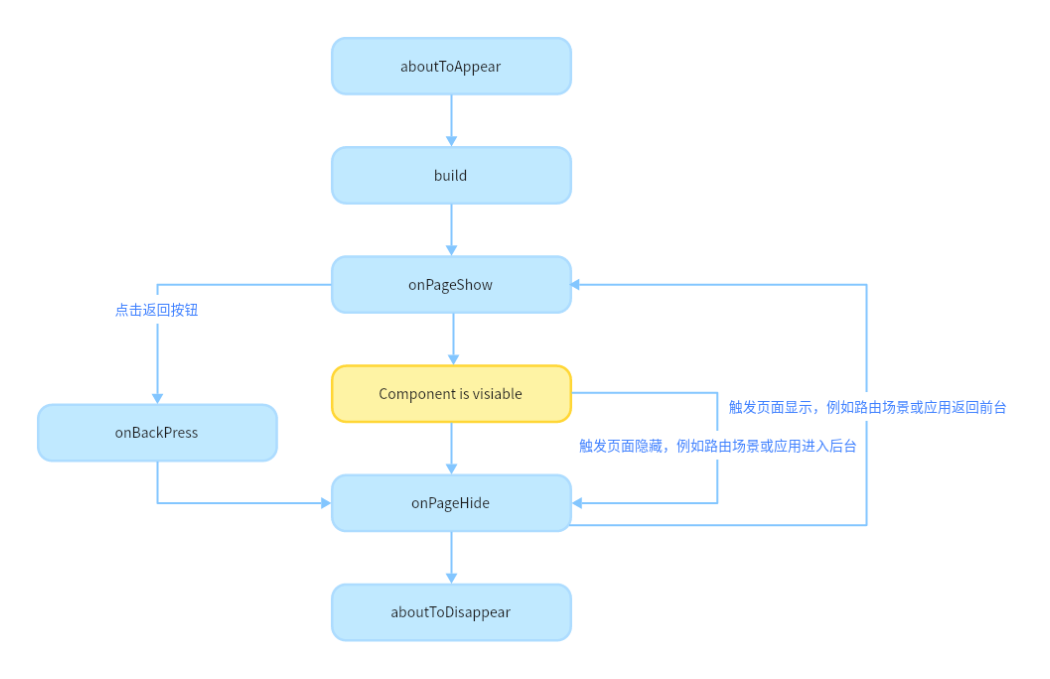
页面生命周期,即被@Entry装饰的组件生命周期,提供以下生命周期接口:
- onPageShow:页面每次显示时触发一次,包括路由过程、应用进入前台等场景。
- onPageHide:页面每次隐藏时触发一次,包括路由过程、应用进入后台等场景。
- onBackPress:当用户点击返回按钮时触发。
组件生命周期,即一般用@Component装饰的自定义组件的生命周期,提供以下生命周期接口:
- aboutToAppear:组件即将出现时回调该接口,具体时机为在创建自定义组件的新实例后,在执行其build()函数之前执行。
- aboutToDisappear:在自定义组件析构销毁之前执行。不允许在aboutToDisappear函数中改变状态变量,特别是@Link变量的修改可能会导致应用程序行为不稳定。
生命周期流程如下图所示,下图展示的是被@Entry装饰的组件(页面)生命周期。

// Index.ets
import router from '@ohos.router';

@Entry
@Component
struct MyComponent {
  @State showChild: boolean = true;

  // 只有被@Entry装饰的组件才可以调用页面的生命周期
  onPageShow() {
    console.info('Index onPageShow');
  }
  // 只有被@Entry装饰的组件才可以调用页面的生命周期
  onPageHide() {
    console.info('Index onPageHide');
  }

  // 只有被@Entry装饰的组件才可以调用页面的生命周期
  onBackPress() {
    console.info('Index onBackPress');
  }

  // 组件生命周期
  aboutToAppear() {
    console.info('MyComponent aboutToAppear');
  }

  // 组件生命周期
  aboutToDisappear() {
    console.info('MyComponent aboutToDisappear');
  }

  build() {
    Column() {
      // this.showChild为true,创建Child子组件,执行Child aboutToAppear
      if (this.showChild) {
        Child()
      }
      // this.showChild为false,删除Child子组件,执行Child aboutToDisappear
      Button('delete Child').onClick(() => {
        this.showChild = false;
      })
      // push到Page2页面,执行onPageHide
      Button('push to next page')
        .onClick(() => {
          router.pushUrl({ url: 'pages/Second' });
        })
    }

  }
}

@Component
struct Child {
  @State title: string = 'Hello World';
  // 组件生命周期
  aboutToDisappear() {
    console.info('[lifeCycle] Child aboutToDisappear')
  }
  // 组件生命周期
  aboutToAppear() {
    console.info('[lifeCycle] Child aboutToAppear')
  }

  build() {
    Text(this.title).fontSize(50).onClick(() => {
      this.title = 'Hello ArkUI';
    })
  }
}

UIAbility组件启动模式
UIAbility的启动模式是指UIAbility实例在启动时的不同呈现状态。针对不同的业务场景,系统提供了三种启动模式:
singleton启动模式
singleton启动模式为单实例模式,也是默认情况下的启动模式。
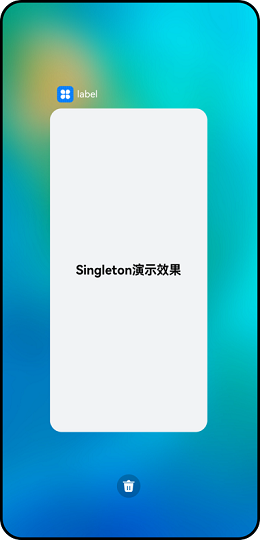
每次调用startAbility()方法时,如果应用进程中该类型的UIAbility实例已经存在,则复用系统中的UIAbility实例。系统中只存在唯一一个该UIAbility实例,即在最近任务列表中只存在一个该类型的UIAbility实例。
图1 单实例模式演示效果
说明
应用的UIAbility实例已创建,该UIAbility配置为单实例模式,再次调用startAbility()方法启动该UIAbility实例,此时只会进入该UIAbility的onNewWant()回调,不会进入其onCreate()和onWindowStageCreate()生命周期回调。
如果需要使用singleton启动模式,在 module.json5配置文件中的"launchType"字段配置为"singleton"即可。
{
  "module": {
    // ...
    "abilities": [
      {
        "launchType": "singleton",
        // ...
      }
    ]
  }
}
multiton启动模式
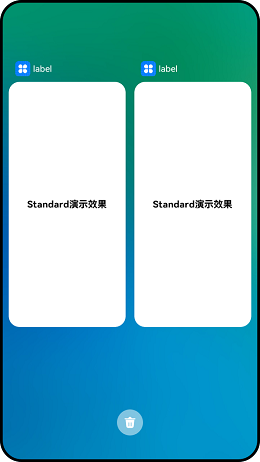
multiton启动模式为多实例模式,每次调用startAbility()方法时,都会在应用进程中创建一个新的该类型UIAbility实例。即在最近任务列表中可以看到有多个该类型的UIAbility实例。这种情况下可以将UIAbility配置为multiton(多实例模式)。
图2 多实例模式演示效果
multiton启动模式的开发使用,在 module.json5配置文件中的"launchType"字段配置为"multiton"即可。
{
  "module": {
    // ...
    "abilities": [
      {
        "launchType": "multiton",
        // ...
      }
    ]
  }
}
specified启动模式
specified启动模式为指定实例模式,针对一些特殊场景使用(例如文档应用中每次新建文档希望都能新建一个文档实例,重复打开一个已保存的文档希望打开的都是同一个文档实例)。
在UIAbility实例创建之前,允许开发者为该实例创建一个唯一的字符串Key,创建的UIAbility实例绑定Key之后,后续每次调用startAbility()方法时,都会询问应用使用哪个Key对应的UIAbility实例来响应startAbility()请求。运行时由UIAbility内部业务决定是否创建多实例,如果匹配有该UIAbility实例的Key,则直接拉起与之绑定的UIAbility实例,否则创建一个新的UIAbility实例。
图3 指定实例模式演示效果
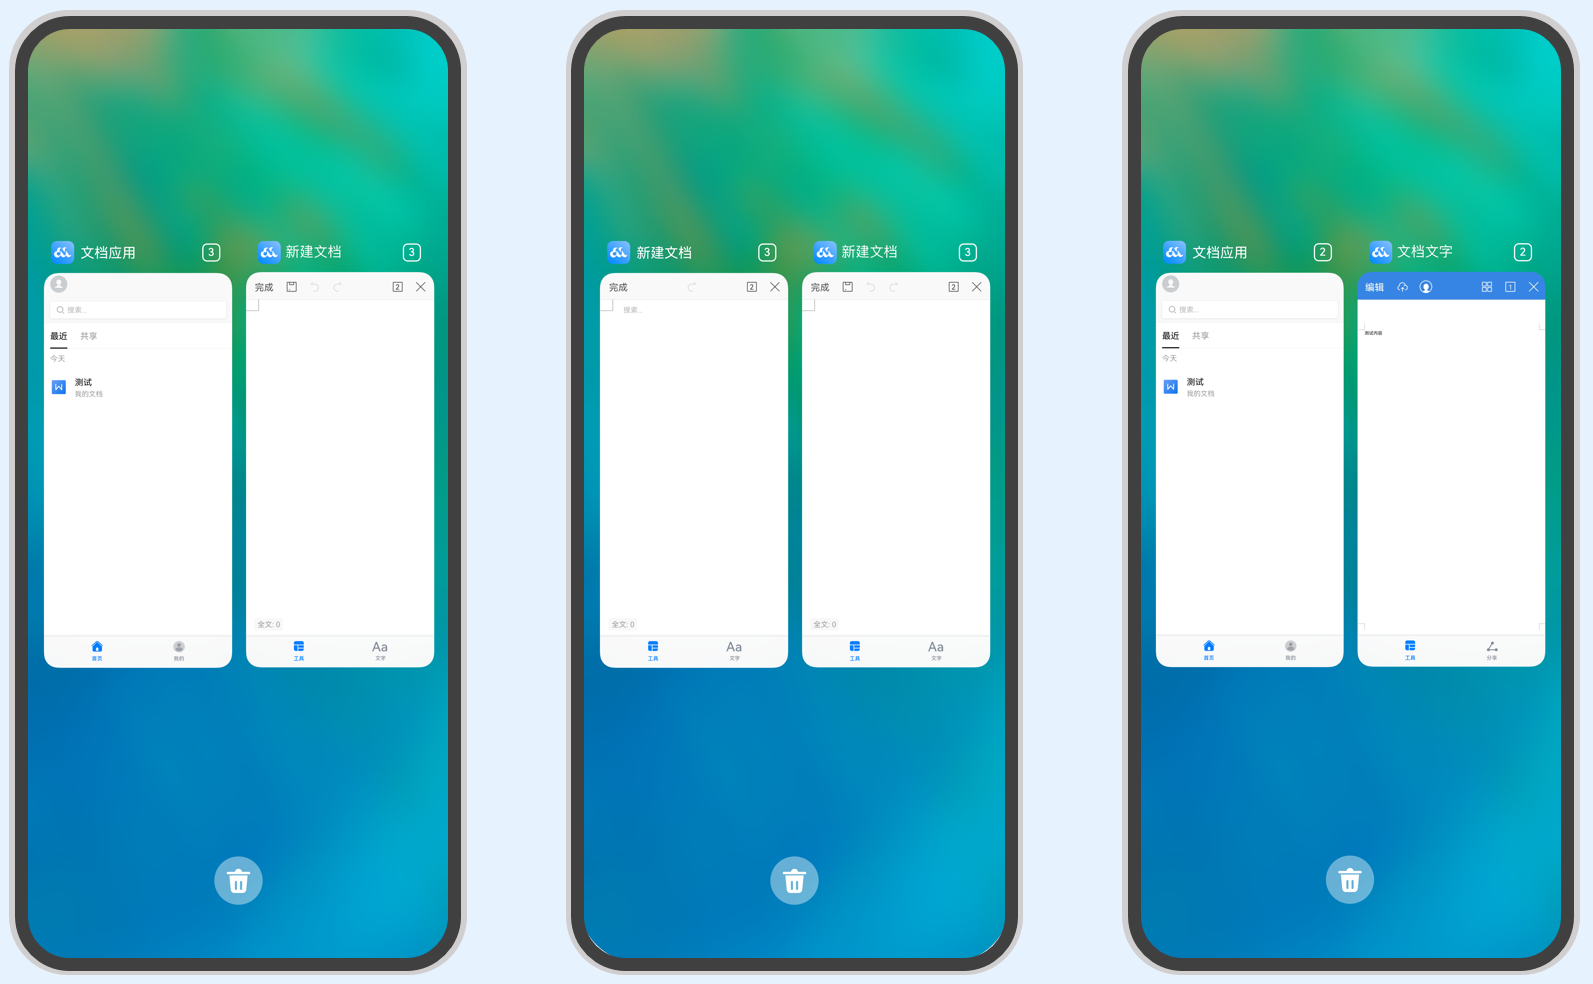
应用的UIAbility实例已创建,该UIAbility配置为指定实例模式,再次调用startAbility()方法启动该UIAbility实例,且 AbilityStage的 onAcceptWant()回调匹配到一个已创建的UIAbility实例。此时,再次启动该UIAbility时,只会进入该UIAbility的 onNewWant()回调,不会进入其onCreate()和onWindowStageCreate()生命周期回调。
例如有两个UIAbility:EntryAbility和FuncAbility,FuncAbility配置为specified启动模式,需要从EntryAbility的页面中启动FuncAbility。
在FuncAbility中,将 module.json5配置文件的"launchType"字段配置为"specified"。
{
  "module": {
    // ...
    "abilities": [
      {
        "launchType": "specified",
        // ...
      }
    ]
  }
}
在EntryAbility中,调用startAbility()方法时,在want参数中,增加一个自定义参数来区别UIAbility实例,例如增加一个"instanceKey"自定义参数。
// 在启动指定实例模式的UIAbility时,给每一个UIAbility实例配置一个独立的Key标识
// 例如在文档使用场景中,可以用文档路径作为Key标识
function getInstance() {
    // ...
}

let want = {
    deviceId: '', // deviceId为空表示本设备
    bundleName: 'com.example.myapplication',
    abilityName: 'FuncAbility',
    moduleName: 'module1', // moduleName非必选
    parameters: { // 自定义信息
        instanceKey: getInstance(),
    },
}
// context为调用方UIAbility的AbilityContext
this.context.startAbility(want).then(() => {
    // ...
}).catch((err) => {
    // ...
})
由于FuncAbility的启动模式配置为了指定实例启动模式,在FuncAbility启动之前,会先进入其对应的AbilityStage的 onAcceptWant()生命周期回调中,解析传入的want参数,获取"instanceKey"自定义参数。根据业务需要通过AbilityStage的 onAcceptWant()生命周期回调返回一个字符串Key标识。如果返回的Key对应一个已启动的UIAbility,则会将之前的UIAbility拉回前台并获焦,而不创建新的实例,否则创建新的实例并启动。
import AbilityStage from '@ohos.app.ability.AbilityStage';

export default class MyAbilityStage extends AbilityStage {
    onAcceptWant(want): string {
        // 在被调用方的AbilityStage中,针对启动模式为specified的UIAbility返回一个UIAbility实例对应的一个Key值
        // 当前示例指的是module1 Module的FuncAbility
        if (want.abilityName === 'FuncAbility') {
            // 返回的字符串Key标识为自定义拼接的字符串内容
            return `ControlModule_EntryAbilityInstance_${want.parameters.instanceKey}`;
        }

        return '';
    }
}
例如在文档应用中,可以对不同的文档实例内容绑定不同的Key值。当每次新建文档的时候,可以传入不同的新Key值(如可以将文件的路径作为一个Key标识),此时AbilityStage中启动UIAbility时都会创建一个新的UIAbility实例;当新建的文档保存之后,回到桌面,或者新打开一个已保存的文档,回到桌面,此时再次打开该已保存的文档,此时AbilityStage中再次启动该UIAbility时,打开的仍然是之前原来已保存的文档界面。
以如下步骤所示进行举例说明。
- 打开文件A,对应启动一个新的UIAbility实例,例如启动“UIAbility实例1”。
- 在最近任务列表中关闭文件A的进程,此时UIAbility实例1被销毁,回到桌面,再次打开文件A,此时对应启动一个新的UIAbility实例,例如启动“UIAbility实例2”。
- 回到桌面,打开文件B,此时对应启动一个新的UIAbility实例,例如启动“UIAbility实例3”。
- 回到桌面,再次打开文件A,此时对应启动的还是之前的“UIAbility实例2”。
网络连接
HTTP数据请求
https://developer.huawei.com/consumer/cn/doc/harmonyos-guides-V2/http-request-0000001478061585-V2
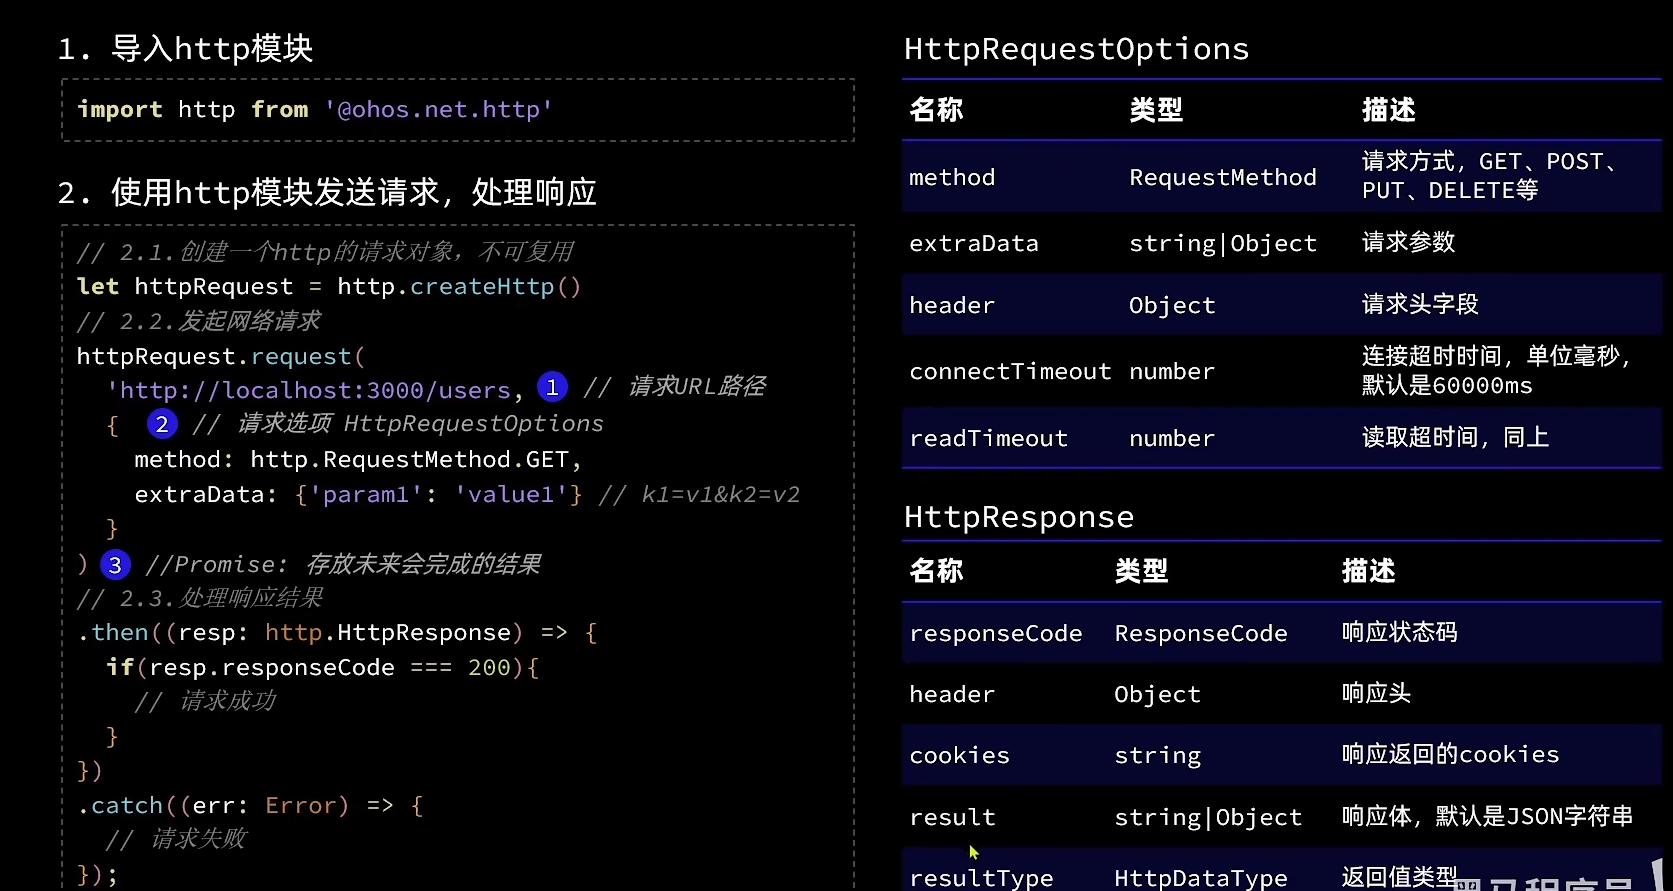
应用通过HTTP发起一个数据请求,支持常见的GET、POST、OPTIONS、HEAD、PUT、DELETE、TRACE、CONNECT方法。
HTTP数据请求功能主要由http模块提供。
使用该功能需要申请ohos.permission.INTERNET权限。
权限申请请参考 访问控制(权限)开发指导。
涉及的接口如下表,具体的接口说明请参考 API文档。
| 接口名 | 功能描述 |
|---|---|
| createHttp() | 创建一个http请求。 |
| request() | 根据URL地址,发起HTTP网络请求。 |
| destroy() | 中断请求任务。 |
| on(type: ‘headersReceive’) | 订阅HTTP Response Header 事件。 |
| off(type: ‘headersReceive’) | 取消订阅HTTP Response Header 事件。 |
| once(‘headersReceive’)8+ | 订阅HTTP Response Header 事件,但是只触发一次。 |
request接口开发步骤
- 从@ohos.net.http.d.ts中导入http命名空间。
- 调用createHttp()方法,创建一个HttpRequest对象。
- 调用该对象的on()方法,订阅http响应头事件,此接口会比request请求先返回。可以根据业务需要订阅此消息。
- 调用该对象的request()方法,传入http请求的url地址和可选参数,发起网络请求。
- 按照实际业务需要,解析返回结果。
- 调用该对象的off()方法,取消订阅http响应头事件。
- 当该请求使用完毕时,调用destroy()方法主动销毁。
// 引入包名
import http from '@ohos.net.http';

// 每一个httpRequest对应一个HTTP请求任务,不可复用
let httpRequest = http.createHttp();
// 用于订阅HTTP响应头,此接口会比request请求先返回。可以根据业务需要订阅此消息
// 从API 8开始,使用on('headersReceive', Callback)替代on('headerReceive', AsyncCallback)。 8+
httpRequest.on('headersReceive', (header) => {
    console.info('header: ' + JSON.stringify(header));
});
httpRequest.request(
    // 填写HTTP请求的URL地址,可以带参数也可以不带参数。URL地址需要开发者自定义。请求的参数可以在extraData中指定
    "EXAMPLE_URL",
    {
        method: http.RequestMethod.POST, // 可选,默认为http.RequestMethod.GET
        // 开发者根据自身业务需要添加header字段
        header: {
            'Content-Type': 'application/json'
        },
        // 当使用POST请求时此字段用于传递内容
        extraData: {
            "data": "data to send",
        },
        expectDataType: http.HttpDataType.STRING, // 可选,指定返回数据的类型
        usingCache: true, // 可选,默认为true
        priority: 1, // 可选,默认为1
        connectTimeout: 60000, // 可选,默认为60000ms
        readTimeout: 60000, // 可选,默认为60000ms
        usingProtocol: http.HttpProtocol.HTTP1_1, // 可选,协议类型默认值由系统自动指定
    }, (err, data) => {
        if (!err) {
            // data.result为HTTP响应内容,可根据业务需要进行解析
            console.info('Result:' + JSON.stringify(data.result));
            console.info('code:' + JSON.stringify(data.responseCode));
            // data.header为HTTP响应头,可根据业务需要进行解析
            console.info('header:' + JSON.stringify(data.header));
            console.info('cookies:' + JSON.stringify(data.cookies)); // 8+
        } else {
            console.info('error:' + JSON.stringify(err));
            // 取消订阅HTTP响应头事件
            httpRequest.off('headersReceive');
            // 当该请求使用完毕时,调用destroy方法主动销毁
            httpRequest.destroy();
        }
    }
);
案例
现在有这么一个接口: http://127.0.0.1:3000/shops?pageNo=1&&pageSize=4 返回值如下
[
  {
    "id": 1,
    "name": "103茶餐厅",
    "images": [
      "/images/s3fqawWswzk.jpg",
      "/images/aZGOT1OjpJmLxG6urQ.jpg"
    ],
    "area": "大关",
    "address": "金华路锦昌文华苑29号",
    "avgPrice": 80,
    "comments": 3035,
    "score": 37,
    "openHours": "10:00-22:00"
  },
  {
    "id": 2,
    "name": "蔡馬洪涛烤肉·老北京铜锅涮羊肉",
    "images": [
      "/images/faca41195272.jpg",
      "/images/a9f88d706914.jpg",
      "/images/jpJmLxG6urQ.jpg"
    ],
    "area": "拱宸桥/上塘",
    "address": "上塘路1035号(中国工商银行旁)",
    "avgPrice": 85,
    "comments": 1460,
    "score": 46,
    "openHours": "11:30-03:00"
  },
  {
    "id": 3,
    "name": "新白鹿餐厅(运河上街店)",
    "images": [
      "/images/7cgjmzif2w2aalka4gms.jpg",
      "/images/73w0k4d40mxjt54btzda.jpg",
      "/images/uyb31c7yfqy95dejvis1.jpg"
    ],
    "area": "运河上街",
    "address": "台州路2号运河上街购物中心F5",
    "avgPrice": 61,
    "comments": 8045,
    "score": 47,
    "openHours": "10:30-21:00"
  },
  {
    "id": 4,
    "name": "Mamala(杭州远洋乐堤港店)",
    "images": [
      "/images/xpm2bq95a3ro2lc4vp5u.jpg",
      "/images/7kd3rq9hvtougx3mhnlt.jpg"
    ],
    "area": "拱宸桥/上塘",
    "address": "丽水路66号远洋乐堤港商城2期1层B115号",
    "avgPrice": 290,
    "comments": 9529,
    "score": 49,
    "openHours": "11:00-22:00"
  }
]
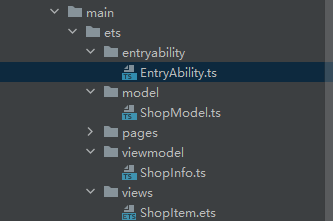
//src/main/ets/viewmodel/ShopInfo.ts

export default class ShopInfo {
  id: number
  name: string
  images: string[]
  area: string
  address: string
  avgPrice: number
  comments: number
  score: number
  openHours: string
}
// src/main/ets/model/ShopModel.ts

import http from '@ohos.net.http'
import ShopInfo from '../viewmodel/ShopInfo'

class ShopModel {
  pageNo: number = 1
  url: string = `http://127.0.0.1:3000/`

  getShopList(): Promise<ShopInfo[]> {
    return new Promise(
      (resolve, reject) => {
        let httpRequest = http.createHttp()

        httpRequest.request(
          this.url + `shops?pageNo=${this.pageNo}&pageSize=4`,
          {
            method: http.RequestMethod.GET
          }
        )
          .then((res: http.HttpResponse) => {
            if (res.responseCode === 200) {
              // 请求成功
              console.log("Success")
              resolve(JSON.parse(res.result.toString()))
            }
            else {
              console.log("Error", JSON.stringify(res))
              reject("Error")
            }
          })
          .catch((err: Error) => {
            // 请求失败
            console.log("Error", JSON.stringify(err))
            reject("Error")
          })
      }
    )
  }
}

const shopModel = new ShopModel()

export default shopModel as ShopModel
// src/main/ets/views

import ShopInfo from '../viewmodel/ShopInfo'

@Component
export default struct ShopItem {
  shop: ShopInfo

  build(){
    Column({space: 5}){
      Row(){
        Text(this.shop.name)
          .fontSize(20)
          .fontWeight(FontWeight.Bold)
          .ellipsisTextOverFlow()
      }
      .width('100%')

      Row(){
        Text(this.shop.address)
          .fontColor('#a3a3a3')
          .ellipsisTextOverFlow()
      }.width('100%')

      Row({space: 5}){
        Rating({rating: this.shop.score/10 , indicator: true}).stars(5).stepSize(0.1)
        Text(`${this.shop.score / 10}`).fontColor('#ffb04d')
        Text(`${this.shop.comments}条`).fontColor('#222')
        Blank()
        Text(`¥${this.shop.avgPrice}/人`)
      }.width('100%')

      List({space: 10}){
        ForEach(this.shop.images, (image) => {
          ListItem(){
            Column(){
              Image(image)
                .width(150).aspectRatio(1.1).borderRadius(5)
            }
          }
        })
      }
      .listDirection(Axis.Horizontal)
      .width('100%')
    }
    .width('100%')
    .height(240)
    .padding(12)
    .backgroundColor(Color.White)
    .borderRadius(15)
    .shadow({radius: 6, color: '#1F000000', offsetX: 2, offsetY: 4})
  }
}

// 文本超出时的统一样式处理
@Extend(Text)
function ellipsisTextOverFlow(line: number = 1){
  .textOverflow({overflow: TextOverflow.Ellipsis})
  .maxLines(line)
}
// src/main/ets/pages/Index.ets

import ShopInfo from '../viewmodel/ShopInfo'

@Component
export default struct ShopItem {
  shop: ShopInfo

  build(){
    Column({space: 5}){
      Row(){
        Text(this.shop.name)
          .fontSize(20)
          .fontWeight(FontWeight.Bold)
          .ellipsisTextOverFlow()
      }
      .width('100%')

      Row(){
        Text(this.shop.address)
          .fontColor('#a3a3a3')
          .ellipsisTextOverFlow()
      }.width('100%')

      Row({space: 5}){
        Rating({rating: this.shop.score/10 , indicator: true}).stars(5).stepSize(0.1)
        Text(`${this.shop.score / 10}`).fontColor('#ffb04d')
        Text(`${this.shop.comments}条`).fontColor('#222')
        Blank()
        Text(`¥${this.shop.avgPrice}/人`)
      }.width('100%')

      List({space: 10}){
        ForEach(this.shop.images, (image) => {
          ListItem(){
            Column(){
              Image(image)
                .width(150).aspectRatio(1.1).borderRadius(5)
            }
          }
        })
      }
      .listDirection(Axis.Horizontal)
      .width('100%')
    }
    .width('100%')
    .height(240)
    .padding(12)
    .backgroundColor(Color.White)
    .borderRadius(15)
    .shadow({radius: 6, color: '#1F000000', offsetX: 2, offsetY: 4})
  }
}

// 文本超出时的统一样式处理
@Extend(Text)
function ellipsisTextOverFlow(line: number = 1){
  .textOverflow({overflow: TextOverflow.Ellipsis})
  .maxLines(line)
}
第三方库 axios
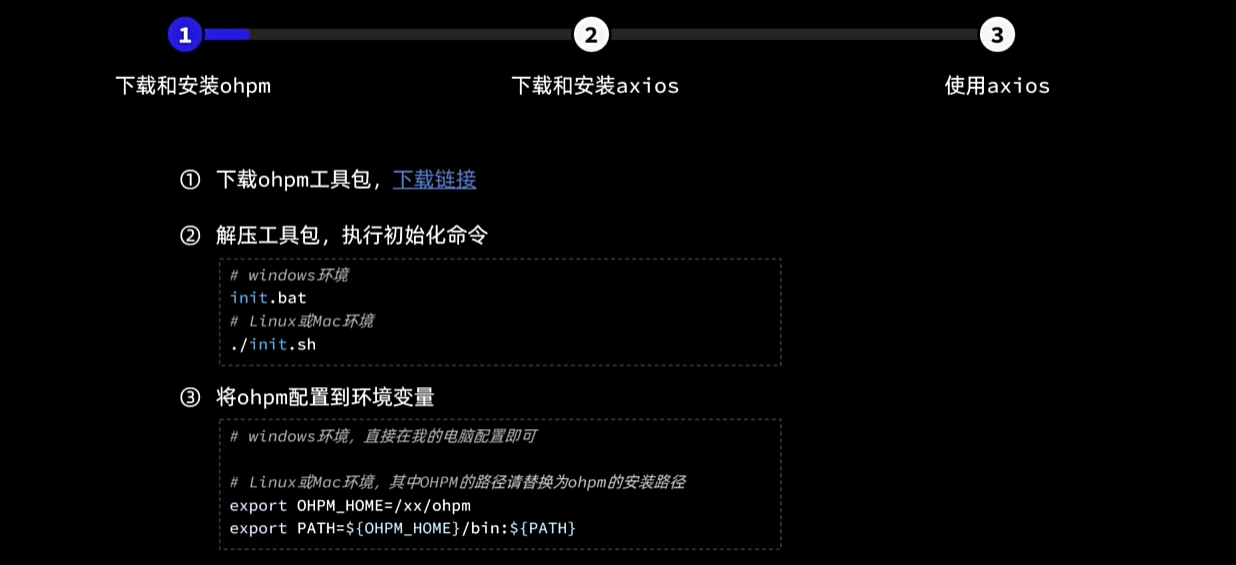
OHPM CLI 作为鸿蒙生态三方库的包管理工具,支持OpenHarmony共享包的发布、安装和依赖管理。
下载ohpm工具包, 点击链接获取。
解压文件,进入“ohpm/bin”目录,打开命令行工具,执行如下指令
init.bat初始化ohpm将ohpm配置到环境变量中。
Windows环境变量设置方法:
在此电脑 > 属性 > 高级系统设置 > 高级 > 环境变量中,将ohpm命令行工具的bin目录配置到系统或者用户的PATH变量中。
安装完成之后,执行
ohpm -v输出版本号即为安装成功
配置完环境变量后可能需要重启电脑才能生效

OpenHarmony三方库中心仓: https://ohpm.openharmony.cn/#/cn/home
以下为 使用案例
// import http from '@ohos.net.http'
import axios from '@ohos/axios'
import ShopInfo from '../viewmodel/ShopInfo'

class ShopModel {
  pageNo: number = 1
  url: string = `http://127.0.0.1:3000/`

  getShopList(): Promise<ShopInfo[]> {
    return new Promise(
      (resolve, reject) => {
        axios.get(
          this.url + `shops?pageNo=${this.pageNo}&pageSize=4`,
        )
          .then((res) => {
            if (res.status === 200) {
              // 请求成功
              console.log("Success")
              resolve(res.data)
            }
            else {
              console.log("Error", JSON.stringify(res))
              reject("Error")
            }
          })
          .catch((err: Error) => {
            // 请求失败
            console.log("Error", JSON.stringify(err))
            reject("Error")
          })
      }
    )
  }
}

const shopModel = new ShopModel()

export default shopModel as ShopModel
数据持久化
应用数据持久化,是指应用将内存中的数据通过文件或数据库的形式保存到设备上。内存中的数据形态通常是任意的数据结构或数据对象,存储介质上的数据形态可能是文本、数据库、二进制文件等。
HarmonyOS标准系统支持典型的存储数据形态,包括用户首选项、键值型数据库、关系型数据库。
开发者可以根据如下功能介绍,选择合适的数据形态以满足自己应用数据的持久化需要。
- 用户首选项(Preferences):通常用于保存应用的配置信息。数据通过文本的形式保存在设备中,应用使用过程中会将文本中的数据全量加载到内存中,所以访问速度快、效率高,但不适合需要存储大量数据的场景。
- 键值型数据库(KV-Store):一种非关系型数据库,其数据以“键值”对的形式进行组织、索引和存储,其中“键”作为唯一标识符。适合很少数据关系和业务关系的业务数据存储,同时因其在分布式场景中降低了解决数据库版本兼容问题的复杂度,和数据同步过程中冲突解决的复杂度而被广泛使用。相比于关系型数据库,更容易做到跨设备跨版本兼容。
- 关系型数据库(RelationalStore):一种关系型数据库,以行和列的形式存储数据,广泛用于应用中的关系型数据的处理,包括一系列的增、删、改、查等接口,开发者也可以运行自己定义的SQL语句来满足复杂业务场景的需要。
在 harmony 中, 比较常用的是 用户首选项以及关系型数据库
用户首选项
用户首选项为应用提供Key-Value键值型的数据处理能力,支持应用持久化轻量级数据,并对其修改和查询。当用户希望有一个全局唯一存储的地方,可以采用用户首选项来进行存储。Preferences会将该数据缓存在内存中,当用户读取的时候,能够快速从内存中获取数据,当需要持久化时可以使用flush接口将内存中的数据写入持久化文件中。Preferences会随着存放的数据量越多而导致应用占用的内存越大,因此,Preferences不适合存放过多的数据,适用的场景一般为应用保存用户的个性化设置(字体大小,是否开启夜间模式)等。
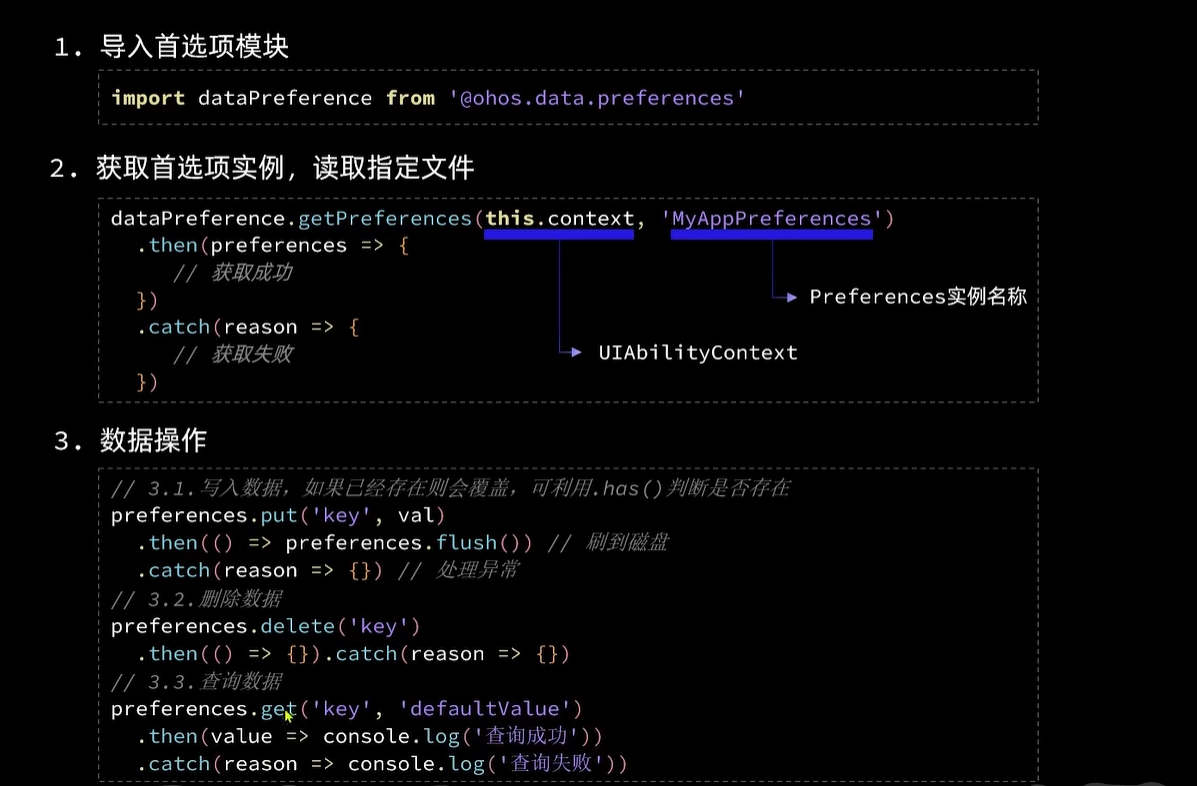
Key 为 string 类型, 要求非空且长度不超过80字节
Value 可以是 string, number, boolean及以上类型数组, 大小不超过 8192 字节
数据量建议不超过一万条
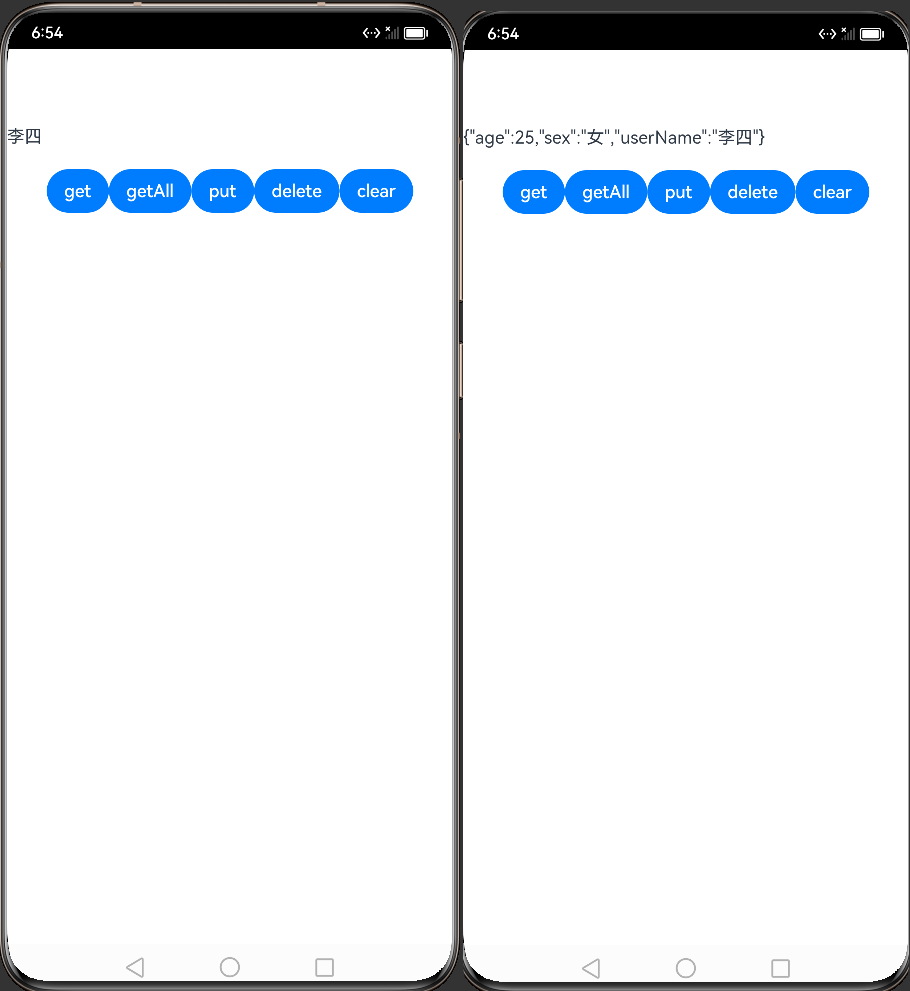
下面对preferences 进行封装,基本思路:
注意: 只要在真机预览才能看到效果
在获取preferences实例后会将其保存单例中,这个单例是GlobalContext,方便后期可以通过单例直接获取实例;由于get()返回值类型是不确定性,定义一个联合类型的别名ValueType 来接收
// src/main/ets/common/PreferencesUtil.ts

import dataPreferences from '@ohos.data.preferences'
import GlobalContext from '../../common/GlobalContext'
import { LogUtils } from '../LogUtils'

const LOG = 'PreferencesUtils-PUT'
// 默认文件名(数据库表名),可以在构造函数进行修改
const PREFERENCES_NAME = 'scjgPreferences'
const KEY_PREFERENCES = 'preferences'
type ValueType = number | string | boolean | Array<number> | Array<string> | Array<boolean>

class PreferencesUtils {
  // preferences的文件名-数据库表名
  private preferencesName: string = PREFERENCES_NAME
  // 用于获取preferences实例的key值,保存到单例中
  private keyPreferences: string = KEY_PREFERENCES

  constructor(name: string = PREFERENCES_NAME, key: string = KEY_PREFERENCES) {
    this.preferencesName = name
    this.keyPreferences = key
  }

  /**
   * 创建首选项实例
   * @param context: 应用上下文
   * @param preferencesName: 数据库表名
   * @returns
   */
  createPreferences(context): Promise<dataPreferences.Preferences> {
    let preferences = dataPreferences.getPreferences(context, this.preferencesName)
    GlobalContext.getContext().setObject(this.keyPreferences, preferences)
    return
  }

  /**
   * 获取首选项实例
   * @returns
   */
  getPreferences(): Promise<dataPreferences.Preferences> {
    return GlobalContext.getContext().getObject(this.keyPreferences) as Promise<dataPreferences.Preferences>
  }

  /**
   * 获取数据
   * @param key: 读取key值
   * @param def: 函数出参
   * @returns
   */
  async get(key: string, def?: ValueType): Promise<ValueType> {
    return (await this.getPreferences()).get(key, def)
  }

  // 获取全部数据
  async getAll(): Promise<Object> {
    let preferences = await this.getPreferences()
    return preferences.getAll()
  }

  /**
   * 插入数据
   * @param key: 存入key值
   * @param value: 存储数据
   * @returns
   */
  async put(key: string, value: ValueType): Promise<void> {
    let promise = await this.getPreferences().then(async preferences => {
      // 插入数据
      await preferences.put(key, value)
      // 写入文件
      await preferences.flush()
    }).catch(error => {
      LogUtils.error(LOG, `code:${error.code}, message:${error.message}`)
    })
    return promise
  }

  /**
   * 删除数据
   * @param key: 删除key的value值
   * @returns
   */
  async delete(key: string): Promise<void> {
    return (await this.getPreferences()).delete(key).finally(async () => {
      (await this.getPreferences()).flush()
    })
  }

  // 清空数据
  async clear(): Promise<void> {
    return (await this.getPreferences()).clear().finally(async () => {
      (await this.getPreferences()).flush()
    })
  }
}

export default new PreferencesUtils()
// src/main/ets/common/GlobalContext.ts

export default class GlobalContext {
  private constructor() {}
  private static instance: GlobalContext
  private _objects = new Map<string, Object>()

  public static getContext(): GlobalContext {
    if (!GlobalContext.instance) {
      GlobalContext.instance = new GlobalContext()
    }
    return GlobalContext.instance
  }

  getObject(value: string): Object | undefined {
    return this._objects.get(value)
  }

  setObject(key: string, objectClass: Object): void {
    this._objects.set(key, objectClass)
  }
}
在
EntryAbility中onCreate()方法初始化:
export default class EntryAbility extends UIAbility {
  onCreate(want: Want, launchParam: AbilityConstant.LaunchParam): void {
    PreferencesUtils.createPreferences(this.context)
    hilog.info(0x0000, 'testTag', '%{public}s', 'Ability onCreate')
  }
}
import PreferencesUtils from '../common/PreferencesUtil'

@Entry
@Component
struct member {
  @State text: string = ''

  aboutToAppear() {
    this.getAll()
  }

  async getAll() {
    this.text = JSON.stringify(await PreferencesUtils.getAll() as Object)
    console.log('getAll', this.text)
  }

  build() {
    Column() {
      Text(this.text)
        .width('100%')
        .height(60)
      Row() {
        Button('get')
          .onClick(async () => {
            this.text = await PreferencesUtils.get('userName') as string
          })
        Button('getAll')
          .onClick(async () => {
            this.getAll()
          })
        Button('put')
          .onClick(async () => {
            await PreferencesUtils.put('userName', '李四')
            await  PreferencesUtils.put('age', 25)
            await PreferencesUtils.put('sex', '女')
            this.getAll()
          })
        Button('delete')
          .onClick(async () => {
            await PreferencesUtils.delete('sex')
            this.getAll()
          })
        Button('clear')
          .onClick(async () => {
            await PreferencesUtils.clear()
            this.getAll()
          })
      }
      .width('100%')
      .justifyContent(FlexAlign.Center)
    }.margin({ top: 50 })
  }
}
关系型数据库
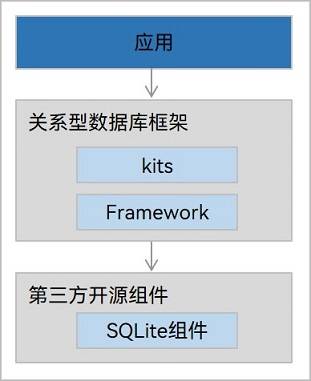
关系型数据库基于SQLite组件,适用于存储包含复杂关系数据的场景,比如一个班级的学生信息,需要包括姓名、学号、各科成绩等,又或者公司的雇员信息,需要包括姓名、工号、职位等,由于数据之间有较强的对应关系,复杂程度比键值型数据更高,此时需要使用关系型数据库来持久化保存数据。
- 谓词:数据库中用来代表数据实体的性质、特征或者数据实体之间关系的词项,主要用来定义数据库的操作条件。
- 结果集:指用户查询之后的结果集合,可以对数据进行访问。结果集提供了灵活的数据访问方式,可以更方便地拿到用户想要的数据。
关系型数据库对应用提供通用的操作接口,底层使用SQLite作为持久化存储引擎,支持SQLite具有的数据库特性,包括但不限于事务、索引、视图、触发器、外键、参数化查询和预编译SQL语句。
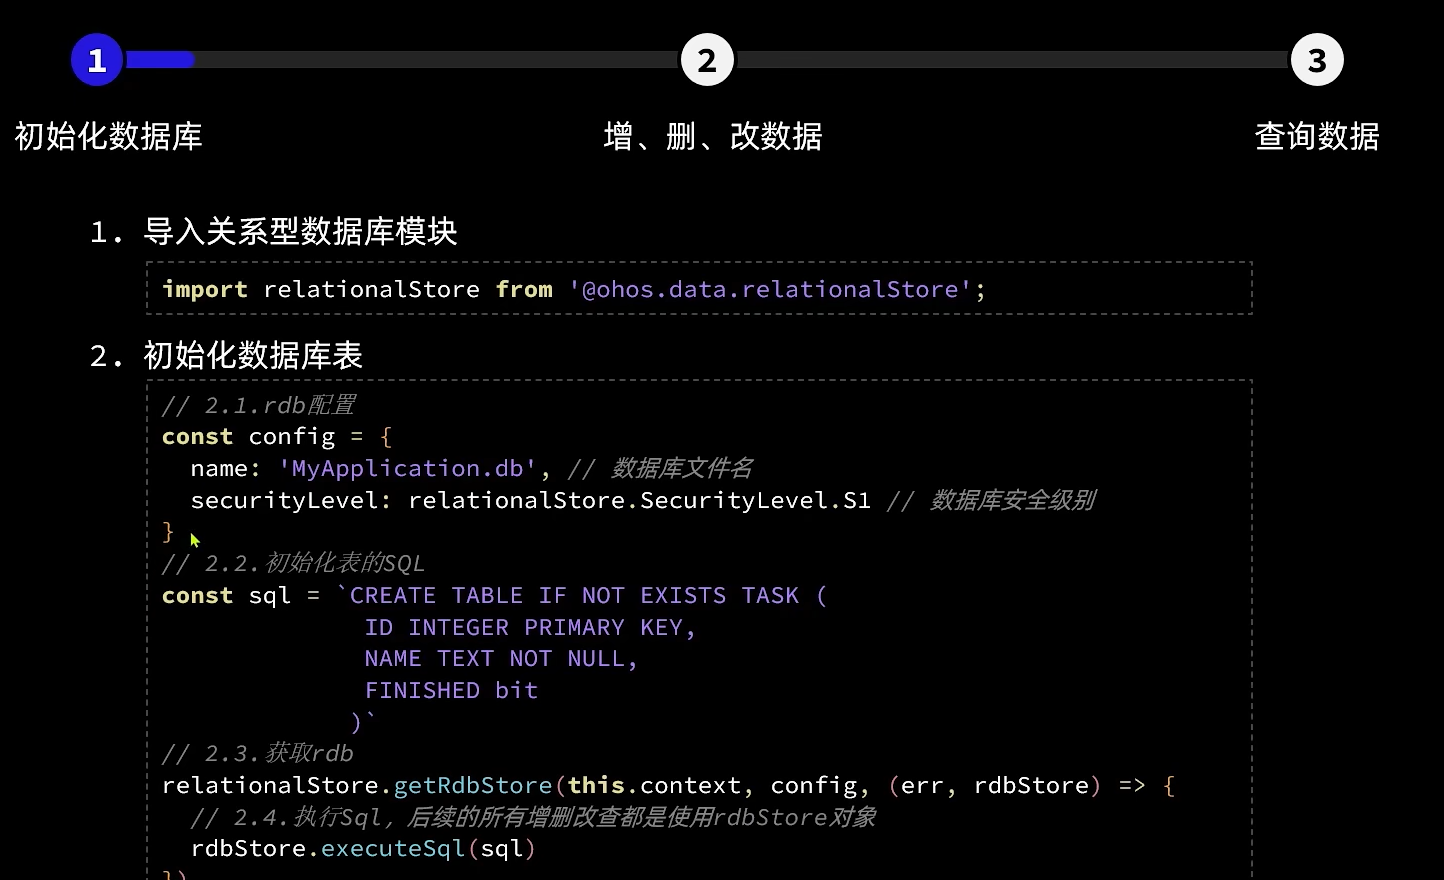
- 使用关系型数据库实现数据持久化,需要获取一个RdbStore。示例代码如下所示:
import relationalStore from '@ohos.data.relationalStore'; // 导入模块
import UIAbility from '@ohos.app.ability.UIAbility';

class EntryAbility extends UIAbility {
  onWindowStageCreate(windowStage) {
    const STORE_CONFIG = {
      name: 'RdbTest.db', // 数据库文件名
      securityLevel: relationalStore.SecurityLevel.S1 // 数据库安全级别
    };

    const SQL_CREATE_TABLE = 'CREATE TABLE IF NOT EXISTS EMPLOYEE (ID INTEGER PRIMARY KEY AUTOINCREMENT, NAME TEXT NOT NULL, AGE INTEGER, SALARY REAL, CODES BLOB)'; // 建表Sql语句

    relationalStore.getRdbStore(this.context, STORE_CONFIG, (err, store) => {
      if (err) {
        console.error(`Failed to get RdbStore. Code:${err.code}, message:${err.message}`);
        return;
      }
      console.info(`Succeeded in getting RdbStore.`);
      store.executeSql(SQL_CREATE_TABLE); // 创建数据表

      // 这里执行数据库的增、删、改、查等操作

    });
  }
}
- 获取到RdbStore后,调用insert()接口插入数据。示例代码如下所示:
const valueBucket = {
  'NAME': 'Lisa',
  'AGE': 18,
  'SALARY': 100.5,
  'CODES': new Uint8Array([1, 2, 3, 4, 5])
};
store.insert('EMPLOYEE', valueBucket, (err, rowId) => {
  if (err) {
    console.error(`Failed to insert data. Code:${err.code}, message:${err.message}`);
    return;
  }
  console.info(`Succeeded in inserting data. rowId:${rowId}`);
})
关系型数据库没有显式的flush操作实现持久化,数据插入即保存在持久化文件。
根据谓词指定的实例对象,对数据进行修改或删除。
调用update()方法修改数据,调用delete()方法删除数据。示例代码如下所示:
// 修改数据
const valueBucket = {
  'NAME': 'Rose',
  'AGE': 22,
  'SALARY': 200.5,
  'CODES': new Uint8Array([1, 2, 3, 4, 5])
};
let predicates = new relationalStore.RdbPredicates('EMPLOYEE'); // 创建表'EMPLOYEE'的predicates
predicates.equalTo('NAME', 'Lisa'); // 匹配表'EMPLOYEE'中'NAME'为'Lisa'的字段
store.update(valueBucket, predicates, (err, rows) => {
  if (err) {
    console.error(`Failed to update data. Code:${err.code}, message:${err.message}`);
    return;
  }
  console.info(`Succeeded in updating data. row count: ${rows}`);
})

// 删除数据
let predicates = new relationalStore.RdbPredicates('EMPLOYEE');
predicates.equalTo('NAME', 'Lisa');
store.delete(predicates, (err, rows) => {
  if (err) {
    console.error(`Failed to delete data. Code:${err.code}, message:${err.message}`);
    return;
  }
  console.info(`Delete rows: ${rows}`);
})
根据谓词指定的查询条件查找数据。
调用query()方法查找数据,返回一个ResultSet结果集。示例代码如下所示:
let predicates = new relationalStore.RdbPredicates('EMPLOYEE');
predicates.equalTo('NAME', 'Rose');
store.query(predicates, ['ID', 'NAME', 'AGE', 'SALARY', 'CODES'], (err, resultSet) => {
  if (err) {
    console.error(`Failed to query data. Code:${err.code}, message:${err.message}`);
    return;
  }
  console.info(`ResultSet column names: ${resultSet.columnNames}`);
  console.info(`ResultSet column count: ${resultSet.columnCount}`);
})
当应用完成查询数据操作,不再使用结果集(ResultSet)时,请及时调用close方法关闭结果集,释放系统为其分配的内存。
删除数据库。
调用deleteRdbStore()方法,删除数据库及数据库相关文件。示例代码如下
import UIAbility from '@ohos.app.ability.UIAbility';

class EntryAbility extends UIAbility {
  onWindowStageCreate(windowStage) {
    relationalStore.deleteRdbStore(this.context, 'RdbTest.db', (err) => {
      if (err) {
        console.error(`Failed to delete RdbStore. Code:${err.code}, message:${err.message}`);
        return;
      }
      console.info('Succeeded in deleting RdbStore.');
    });
  }
}
以下是一个案例, 包含增, 查, 代码很粗糙
// src/main/ets/utils/DbUtil.ts

import common from '@ohos.app.ability.common';
import relationalStore from '@ohos.data.relationalStore';
import { ColumnInfo, ColumnType } from '../type/ColumnInfo';
import Logger from './Logger';


//  操作的数据库名称
const DB_FILENAME: string = 'OliannaWen.db'

class DbUtil {
  // 使用变量来获取关系型数据库操作对象
  rdbStore: relationalStore.RdbStore


  // 初始化数据库
  initDB(context: common.UIAbilityContext): Promise<void> {
    let config: relationalStore.StoreConfig = {
      // 数据库名称
      name: DB_FILENAME,
      // 数据库操作安全等级
      securityLevel: relationalStore.SecurityLevel.S1
    }
    return new Promise<void>((resolve, reject) => {
      // 获取关系型数据库操作对象
      relationalStore.getRdbStore(context, config)
        .then(rdbStore => {
          this.rdbStore = rdbStore
          // 记录日志
          Logger.debug('rdbStore 初始化完成!')
          resolve()
        })
        .catch(reason => {
          Logger.debug('rdbStore 初始化异常', JSON.stringify(reason))
          reject(reason)
        })
    })
  }

  // 创建表函数,传入创建表语句
  createTable(createSQL: string): Promise<void> {
    return new Promise((resolve, reject) => {
      this.rdbStore.executeSql(createSQL)
        .then(() => {
          Logger.debug('创建表成功', createSQL)
          resolve()
        })
        .catch(err => {
          Logger.error('创建表失败,' + err.message, JSON.stringify(err))
          reject(err)
        })
    })
  }

  // 建立insert方法的映射关系(实体数据插入到数据库的字段映射)
  buildValueBucket(obj: any, columns: ColumnInfo[]): relationalStore.ValuesBucket {
    let value = {}
    columns.forEach(info => {
      let val = obj[info.name]
      if (typeof val !== 'undefined') {
        value[info.columnName] = val
      }
    })
    return value
  }


  // 新增方法,参数为表名称和新增对象
  insert(tableName: string, obj: any, columns: ColumnInfo[]): Promise<number> {
    return new Promise((resolve, reject) => {
      // 1.构建新增数据
      let value = this.buildValueBucket(obj, columns)
      // 2.新增
      this.rdbStore.insert(tableName, value, (err, id) => {
        if (err) {
          Logger.error('新增失败!', JSON.stringify(err))
          reject(err)
        } else {
          Logger.debug('新增成功!新增id:', id.toString())
          resolve(id)
        }
      })
    })
  }

  // 删除方法,传入删除条件
  delete(predicates: relationalStore.RdbPredicates): Promise<number> {
    return new Promise((resolve, reject) => {
      this.rdbStore.delete(predicates, (err, rows) => {
        if (err) {
          Logger.error('删除失败!', JSON.stringify(err))
          reject(err)
        } else {
          Logger.debug('删除成功!删除行数:', rows.toString())
          resolve(rows)
        }
      })
    })
  }

  // 查询方法,传入查询条件,字段,返回结果
  queryForList<T>(predicates: relationalStore.RdbPredicates, columns: ColumnInfo[]): Promise<T[]> {
    Logger.debug("dddfafa")
    return new Promise((resolve, reject) => {
      this.rdbStore.query(predicates, columns.map(info => info.columnName), (err, result) => {
        if (err) {
          Logger.error('查询失败!', JSON.stringify(err))
          reject(err)
        } else {
          Logger.debug('查询成功!查询行数:', result.rowCount.toString())
          resolve(this.parseResultSet(result, columns))
        }
      })
    })
  }

  // 解析结果集
  parseResultSet<T>(result: relationalStore.ResultSet, columns: ColumnInfo[]): T[] {
    // 1.声明最终返回的结果
    let arr = []
    // 2.判断是否有结果
    if (result.rowCount <= 0) {
      return arr
    }
    // 3.处理结果
    while (!result.isAtLastRow) {
      // 3.1.去下一行
      result.goToNextRow()
      // 3.2.解析这行数据,转为对象
      let obj = {}
      columns.forEach(info => {
        let val = null
        switch (info.type) {
          case ColumnType.LONG:
            val = result.getLong(result.getColumnIndex(info.columnName))
            break
          case ColumnType.DOUBLE:
            val = result.getDouble(result.getColumnIndex(info.columnName))
            break
          case ColumnType.STRING:
            val = result.getString(result.getColumnIndex(info.columnName))
            break
          case ColumnType.BLOB:
            val = result.getBlob(result.getColumnIndex(info.columnName))
            break
        }
        obj[info.name] = val
      })
      // 3.3.将对象填入结果数组
      arr.push(obj)
      Logger.debug('查询到数据:', JSON.stringify(obj))
    }
    return arr
  }
}


let dbUtil: DbUtil = new DbUtil();

export default dbUtil as DbUtil
// src/main/ets/entryability/EntryAbility.ets
async onCreate(want, launchParam) {
  // 初始化任务表
  await DbUtil.initDB(this.context)
}
import dbUtil from '../utils/DbUtil';
import Logger from '../utils/Logger';
import relationalStore from '@ohos.data.relationalStore';

enum ColumnType {
  LONG,
  DOUBLE,
  STRING,
  BLOB
}

interface ColumnInfo {
  // 实体字段
  name: string
  // 映射到数据库对应的字段
  columnName: string
  // 数据库字段类型
  type: ColumnType
}

interface ValuesBucket {
  [key: string]: any;
}

const DB_NAME = 'testDB';
const TABLE_NAME = 'table1';

const SQL_CREATE_TABLE = `
  CREATE TABLE IF NOT EXISTS ${TABLE_NAME}  (
    ID INTEGER PRIMARY KEY AUTOINCREMENT,
    NAME TEXT NOT NULL,
    AGE INTEGER,
    SALARY REAL,
    CODES BLOB
  )
`

const columns: ColumnInfo[] = [
  { name: 'NAME', columnName: 'NAME', type: ColumnType.STRING },
  { name: 'AGE', columnName: 'AGE', type: ColumnType.LONG },
  { name: 'SALARY', columnName: 'SALARY', type: ColumnType.DOUBLE },
  { name: 'CODES', columnName: 'CODES', type: ColumnType.BLOB },
]


const valBucket: ValuesBucket = {
  'NAME': 'John Doe',
  'AGE': 30,
  'SALARY': 5000.50,
  'CODES': new Uint8Array([1, 2, 3, 4, 5]),
};

let predicates = new relationalStore.RdbPredicates(TABLE_NAME);

const createTable = async () => {
  const res = await dbUtil.createTable(SQL_CREATE_TABLE)
  Logger.debug(JSON.stringify(res))
}

const insertData = async () => {
  const res = await dbUtil.insert(TABLE_NAME, valBucket, columns);
  return res
};

const queryData = async () => {
  const res = await dbUtil.queryForList(predicates, columns)
  Logger.debug(JSON.stringify(res))
}

export {
  createTable, insertData, queryData
}
import { createTable, insertData, queryData } from '../viewmodel/useDb'

@Entry
@Component
struct Index {
  build() {
    Column({ space: 10 }) {
      Button("Create")
        .onClick(() => {
          createTable()
        })

      Button("Insert")
        .onClick(async () => {
          insertData()
        })

      Button("Query")
        .onClick(async () => {
          await queryData()
        })


    }
    .width('100%')
  }
}


通知
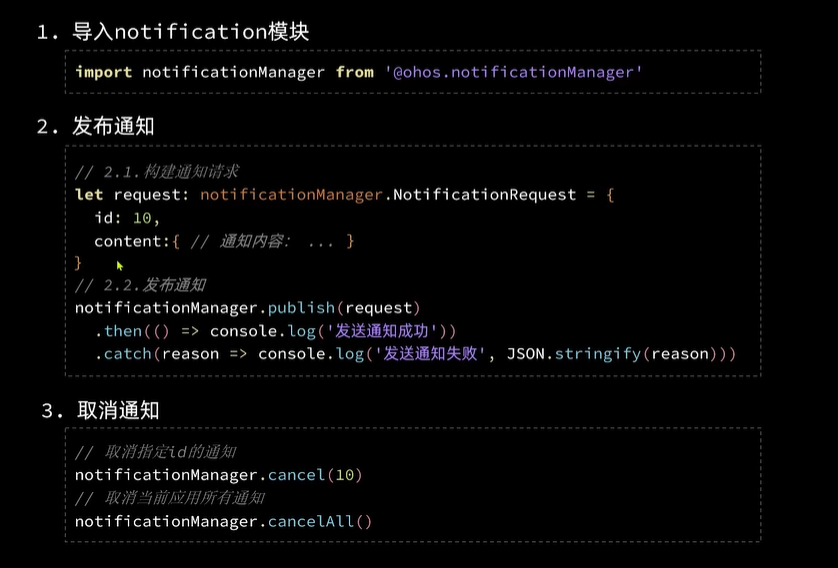
基础通知
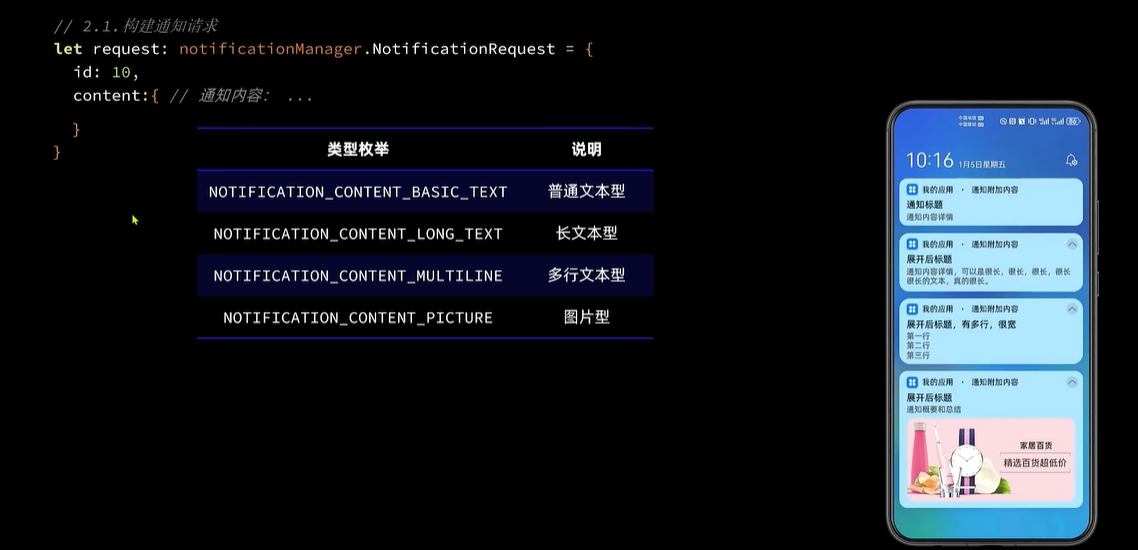
| 名称 | 值 | 说明 |
|---|---|---|
| NOTIFICATION_CONTENT_BASIC_TEXT | ContentType | 普通类型通知。 |
| NOTIFICATION_CONTENT_LONG_TEXT | ContentType | 长文本类型通知。 |
| NOTIFICATION_CONTENT_PICTURE | ContentType | 图片类型通知。 |
| NOTIFICATION_CONTENT_CONVERSATION | ContentType | 社交类型通知。 |
| NOTIFICATION_CONTENT_MULTILINE | ContentType | 多行文本类型通知。 |
系统能力:以下各项对应的系统能力均为SystemCapability.Notification.Notification
| 名称 | 可读 | 可写 | 类型 | 必填 | 描述 |
|---|---|---|---|---|---|
| content | 是 | 是 | NotificationContent | 是 | 通知内容。 |
| id | 是 | 是 | number | 否 | 通知ID。 |
| slotType | 是 | 是 | SlotType | 否 | 通道类型。 |
| isOngoing | 是 | 是 | boolean | 否 | 是否进行时通知。 |
| isUnremovable | 是 | 是 | boolean | 否 | 是否可移除。 |
| deliveryTime | 是 | 是 | number | 否 | 通知发送时间。 |
| tapDismissed | 是 | 是 | boolean | 否 | 通知是否自动清除。 |
| autoDeletedTime | 是 | 是 | number | 否 | 自动清除的时间。 |
| wantAgent | 是 | 是 | WantAgent | 否 | 点击跳转的WantAgent。 |
| extraInfo | 是 | 是 | {[key: string]: any} | 否 | 扩展参数。 |
| color | 是 | 是 | number | 否 | 通知背景颜色。 |
| colorEnabled | 是 | 是 | boolean | 否 | 通知背景颜色是否使能。 |
| isAlertOnce | 是 | 是 | boolean | 否 | 设置是否仅有一次此通知警报。 |
| isStopwatch | 是 | 是 | boolean | 否 | 是否显示已用时间。 |
| isCountDown | 是 | 是 | boolean | 否 | 是否显示倒计时时间。 |
| isFloatingIcon | 是 | 是 | boolean | 否 | 是否显示状态栏图标。 |
| label | 是 | 是 | string | 否 | 通知标签。 |
| badgeIconStyle | 是 | 是 | number | 否 | 通知角标类型。 |
| showDeliveryTime | 是 | 是 | boolean | 否 | 是否显示分发时间。 |
| actionButtons | 是 | 是 | Array< NotificationActionButton> | 否 | 通知按钮,最多两个按钮。 |
| smallIcon | 是 | 是 | PixelMap | 否 | 通知小图标。 |
| largeIcon | 是 | 是 | PixelMap | 否 | 通知大图标。 |
| creatorBundleName | 是 | 否 | string | 否 | 创建通知的包名。 |
| creatorUid | 是 | 否 | number | 否 | 创建通知的UID。 |
| creatorPid | 是 | 否 | number | 否 | 创建通知的PID。 |
| creatorUserId8+ | 是 | 否 | number | 否 | 创建通知的UserId。 |
| hashCode | 是 | 否 | string | 否 | 通知唯一标识。 |
| groupName8+ | 是 | 是 | string | 否 | 组通知名称。 |
| template8+ | 是 | 是 | NotificationTemplate | 否 | 通知模板。 |
| distributedOption8+ | 是 | 是 | DistributedOptions | 否 | 分布式通知的选项。 |
| notificationFlags8+ | 是 | 否 | NotificationFlags | 否 | 获取NotificationFlags。 |
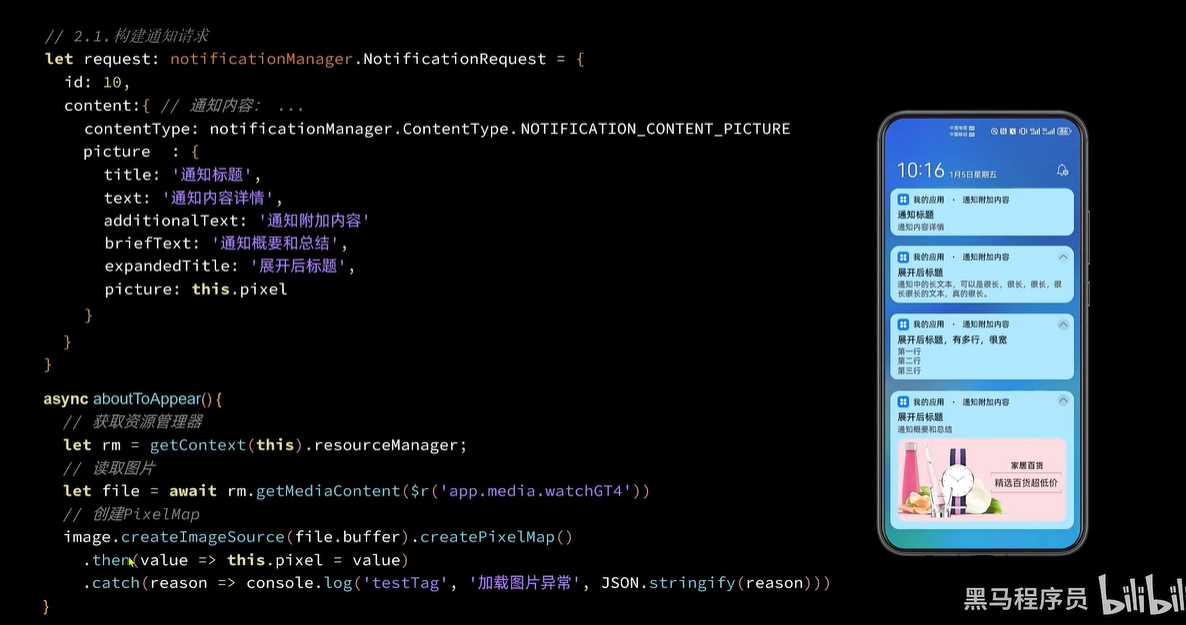
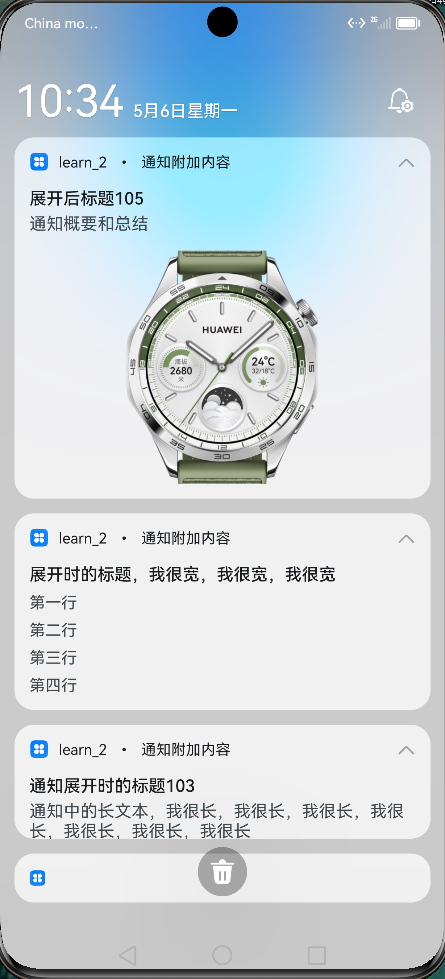

import notify from '@ohos.notificationManager'
import image from '@ohos.multimedia.image'

@Entry
@Component
struct Index {
  // 全局任务 id
  idx: number = 100
  // 图像
  pixel: PixelMap

  async aboutToAppear() {
    // 获取资源管理器
    let rm = getContext(this).resourceManager
    // 读取图片
    let file = await rm.getMediaContent($r('app.media.watchGT4'))
    // 创建 PixelMap
    image.createImageSource(file.buffer).createPixelMap()
      .then(value => this.pixel = value)
      .catch(reason => console.error(reason))
  }

  build() {
    Column({ space: 10 }) {
      Button(`发送normalText通知`)
        .onClick(() => this.publishNormalTextNotification())
      Button(`发送longText通知`)
        .onClick(() => this.publishLongTextNotification())
      Button(`发送multiLine通知`)
        .onClick(() => this.publishMultiLineNotification())
      Button(`发送Picture通知`)
        .onClick(() => this.publishPictureNotification())

    }
    .width('100%')
  }

  publishNormalTextNotification() {
    let request: notify.NotificationRequest = {
      id: this.idx++,
      content: {
        contentType: notify.ContentType.NOTIFICATION_CONTENT_BASIC_TEXT,
        normal: {
          title: '通知标题' + this.idx,
          text: '通知内容详情',
          additionalText: '通知附加内容'
        }
      },
      showDeliveryTime: true,
      deliveryTime: new Date().getTime(),
      groupName: 'wechat',
      slotType: notify.SlotType.SOCIAL_COMMUNICATION
    }
    this.publish(request)
  }

  publishLongTextNotification() {
    let request: notify.NotificationRequest = {
      id: this.idx++,
      content: {
        contentType: notify.ContentType.NOTIFICATION_CONTENT_LONG_TEXT,
        longText: {
          title: '通知标题' + this.idx,
          text: '通知内容详情',
          additionalText: '通知附加内容',
          longText: '通知中的长文本,我很长,我很长,我很长,我很长,我很长,我很长,我很长',
          briefText: '通知概要和总结',
          expandedTitle: '通知展开时的标题' + this.idx
        }
      }
    }
    this.publish(request)
  }

  publishMultiLineNotification() {
    let request: notify.NotificationRequest = {
      id: this.idx++,
      content: {
        contentType: notify.ContentType.NOTIFICATION_CONTENT_MULTILINE,
        multiLine: {
          title: '通知标题' + this.idx,
          text: '通知内容详情',
          additionalText: '通知附加内容',
          briefText: '通知概要和总结',
          longTitle: '展开时的标题,我很宽,我很宽,我很宽',
          lines: [
            '第一行',
            '第二行',
            '第三行',
            '第四行',
          ]
        }
      }
    }
    this.publish(request)
  }

  publishPictureNotification() {
    let request: notify.NotificationRequest = {
      id: this.idx++,
      content: {
        contentType: notify.ContentType.NOTIFICATION_CONTENT_PICTURE,
        picture: {
          title: '通知标题' + this.idx,
          text: '通知内容详情',
          additionalText: '通知附加内容',
          briefText: '通知概要和总结',
          expandedTitle: '展开后标题' + this.idx,
          picture: this.pixel
        }
      }
    }
    this.publish(request)
  }

  private publish(request: notify.NotificationRequest) {
    notify.publish(request)
      .then(() => console.log('notify test', '发送通知成功'))
      .then(reason => console.log('notify test', '发送通知失败', JSON.stringify(reason)))
  }
}
进度条通知
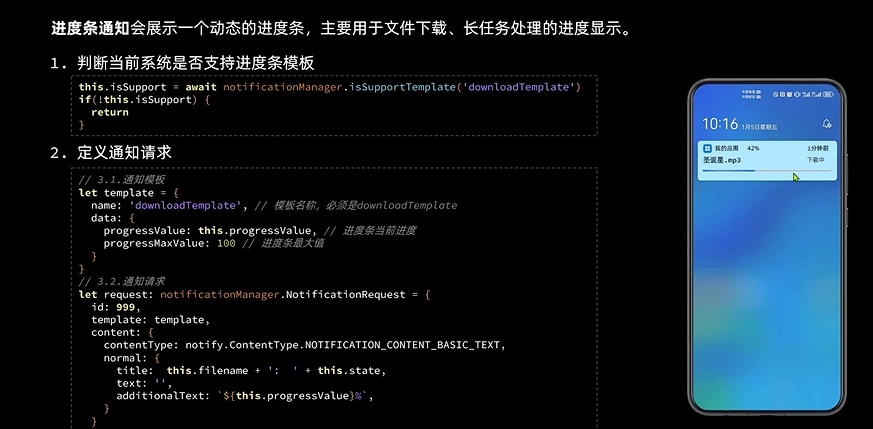
import Notification from '@ohos.notificationManager'
import wantAgent, { WantAgent } from '@ohos.app.ability.wantAgent'
import promptAction from '@ohos.promptAction'
import Prompt from '@system.prompt'

enum DownloadState {
  NOT_BEGIN = '未开始',
  DOWNLOADING = '下载中',
  PAUSE = '已暂停',
  FINISHED = '已完成',
}

@Entry
@Component
struct Index {
  // 下载进度
  @State progressValue: number = 0
  progressMaxValue: number = 100
  // 任务状态
  @State state: DownloadState = DownloadState.NOT_BEGIN

  // 下载的文件名
  filename: string = '圣诞星.mp4'

  // 模拟下载的任务的id
  taskId: number = -1

  // 通知id
  notificationId: number = 999
  isSupport: boolean = false
  wantAgentInstance: WantAgent

  async aboutToAppear() {
    // 1.判断当前系统是否支持进度条模板
    this.isSupport = await Notification.isSupportTemplate('downloadTemplate')
    // 2.创建拉取当前应用的行为意图
    // 2.1.创建wantInfo信息
    let wantInfo: wantAgent.WantAgentInfo = {
      wants: [
        {
          bundleName: 'com.example.myapplication',
          abilityName: 'EntryAbility',
        }
      ],
      requestCode: 0,
      operationType: wantAgent.OperationType.START_ABILITY,
      wantAgentFlags: [wantAgent.WantAgentFlags.CONSTANT_FLAG]
    }
    // 2.2.创建wantAgent实例
    this.wantAgentInstance = await wantAgent.getWantAgent(wantInfo)
  }

  build() {
    Row({ space: 10 }) {
      Image($r('app.media.ic_files_video')).width(50)
      Column({ space: 5 }) {
        Row() {
          Text(this.filename)
          Text(`${this.progressValue}%`).fontColor('#c1c2c1')
        }
        .width('100%')
        .justifyContent(FlexAlign.SpaceBetween)

        Progress({
          value: this.progressValue,
          total: this.progressMaxValue,
        })

        Row({ space: 5 }) {
          Text(`${(this.progressValue * 0.43).toFixed(2)}MB`)
            .fontSize(14).fontColor('#c1c2c1')
          Blank()
          if (this.state === DownloadState.NOT_BEGIN) {
            Button('开始').downloadButton()
              .onClick(() => this.download())

          } else if (this.state === DownloadState.DOWNLOADING) {
            Button('取消').downloadButton().backgroundColor('#d1d2d3')
              .onClick(() => this.cancel())

            Button('暂停').downloadButton()
              .onClick(() => this.pause())

          } else if (this.state === DownloadState.PAUSE) {
            Button('取消').downloadButton().backgroundColor('#d1d2d3')
              .onClick(() => this.cancel())

            Button('继续').downloadButton()
              .onClick(() => this.download())
          } else {
            Button('打开').downloadButton()
              .onClick(() => this.open())
          }
        }.width('100%')
      }
      .layoutWeight(1)
    }
    .width('100%')
    .borderRadius(20)
    .padding(15)
    .backgroundColor(Color.White)
  }

  cancel() {
    // 取消定时任务
    if (this.taskId > 0) {
      clearInterval(this.taskId);
      this.taskId = -1
    }
    console.log(this.notificationId.toString())
    // 清理下载任务进度
    this.progressValue = 0
    // 标记任务状态:未开始
    this.state = DownloadState.NOT_BEGIN
    // 取消通知
    Notification.cancel(this.notificationId).then((response) => {
      console.log('ssssss', JSON.stringify(response))
    })
  }

  download() {
    // 清理旧任务
    if (this.taskId > 0) {
      clearInterval(this.taskId);
    }
    // 开启定时任务,模拟下载
    this.taskId = setInterval(() => {
      // 判断任务进度是否达到100
      if (this.progressValue >= 100) {
        // 任务完成了,应该取消定时任务
        clearInterval(this.taskId)
        this.taskId = -1
        // 并且标记任务状态为已完成
        this.state = DownloadState.FINISHED
        // 发送通知
        this.publishProgressNotification()
        return
      }
      // 模拟任务进度变更
      this.progressValue += 2
      // 发送通知
      this.publishProgressNotification()
    }, 500)
    // 标记任务状态:下载中
    this.state = DownloadState.DOWNLOADING
  }

  pause() {
    // 取消定时任务
    if (this.taskId > 0) {
      clearInterval(this.taskId);
      this.taskId = -1
    }
    // 标记任务状态:已暂停
    this.state = DownloadState.PAUSE
    // 发送通知
    this.publishProgressNotification()
  }

  open() {
    promptAction.showToast({
      message: '功能未实现'
    })
  }

  async publishProgressNotification() {
    let isSupportTpl: boolean;
    await Notification.isSupportTemplate('downloadTemplate').then((data) => {
      isSupportTpl = data;
    }).catch((err) => {
      Prompt.showToast({
        message: `判断是否支持进度条模板时报错,error[${err}]`,
        duration: 2000
      })
    })
    if (isSupportTpl) {
      // 构造模板
      let template = {
        name: 'downloadTemplate',
        data: {
          progressValue: this.progressValue, // 当前进度值
          progressMaxValue: this.progressMaxValue // 最大进度值
        }
      };

      let notificationRequest: Notification.NotificationRequest = {
        id: this.notificationId,
        content: {
          contentType: Notification.ContentType.NOTIFICATION_CONTENT_BASIC_TEXT,
          normal: {
            title: this.filename + ':  ' + this.state,
            text: '',
            additionalText: this.progressValue + '%'
          }
        },
        template: template
      };

      // 发布通知
      Notification.publish(notificationRequest).then(() => {
        Prompt.showToast({
          message: `发布通知成功!`,
          duration: 2000
        })
      }).catch((err) => {
        Prompt.showToast({
          message: `发布通知失败,error[${err}]`,
          duration: 2000
        })
      })

    } else {
      Prompt.showToast({
        message: '不支持downloadTemplate进度条通知模板',
        duration: 2000
      })
    }
  }

  publishDownloadNotification() {
    // 1.判断当前系统是否支持进度条模板
    if (!this.isSupport) {
      // 当前系统不支持进度条模板
      console.log("not support")
      return
    }
    // 2.准备进度条模板的参数
    let template = {
      name: 'downloadTemplate',
      data: {
        progressValue: this.progressValue,
        progressMaxValue: this.progressMaxValue
      }
    }
    let request: Notification.NotificationRequest = {
      id: this.notificationId,
      template: template,
      wantAgent: this.wantAgentInstance,
      content: {
        contentType: Notification.ContentType.NOTIFICATION_CONTENT_BASIC_TEXT,
        normal: {
          title: this.filename + ':  ' + this.state,
          text: '',
          additionalText: this.progressValue + '%'
        }
      }
    }
    // 3.发送通知
    Notification.publish(request)
      .then(() => console.log('test', '通知发送成功'))
      .catch(reason => console.log('test', '通知发送失败!', JSON.stringify(reason)))
  }
}

@Extend(Button) function downloadButton() {
  .width(75).height(28).fontSize(14)
}
通知意图
具体参数看官方文档
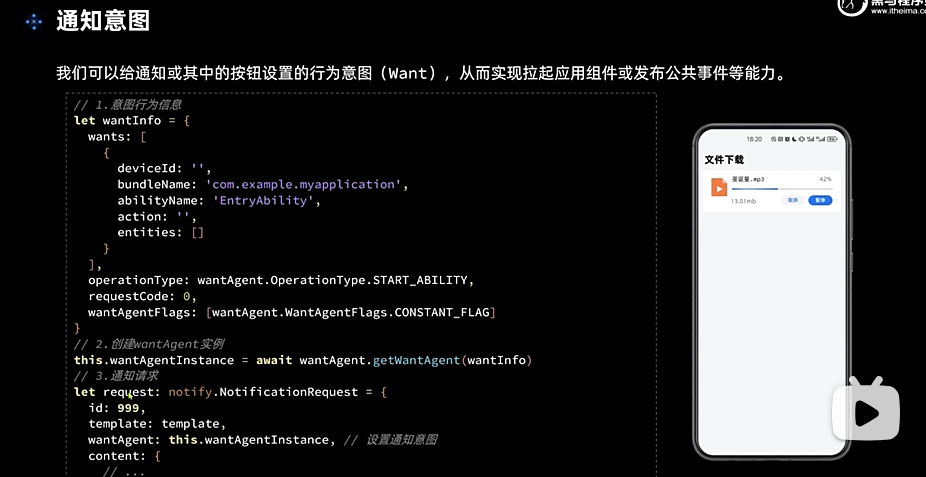
async aboutToAppear() {
  // 1.判断当前系统是否支持进度条模板
  this.isSupport = await Notification.isSupportTemplate('downloadTemplate')
  // 2.创建拉取当前应用的行为意图
  // 2.1.创建wantInfo信息
  let wantInfo: wantAgent.WantAgentInfo = {
    wants: [
      {
        bundleName: 'com.example.learn_2',
        abilityName: 'EntryAbility',
      }
    ],
    requestCode: 0,
    operationType: wantAgent.OperationType.START_ABILITY,
    wantAgentFlags: [wantAgent.WantAgentFlags.CONSTANT_FLAG]
  }
  // 2.2.创建wantAgent实例
  this.wantAgentInstance = await wantAgent.getWantAgent(wantInfo)
}
async publishProgressNotification() {
  let isSupportTpl: boolean;
  await Notification.isSupportTemplate('downloadTemplate').then((data) => {
    isSupportTpl = data;
  }).catch((err) => {
    Prompt.showToast({
      message: `判断是否支持进度条模板时报错,error[${err}]`,
      duration: 2000
    })
  })
  if (isSupportTpl) {
    // 构造模板
    let template = {
      name: 'downloadTemplate',
      data: {
        progressValue: this.progressValue, // 当前进度值
        progressMaxValue: this.progressMaxValue // 最大进度值
      }
    };

    let notificationRequest: Notification.NotificationRequest = {
      id: this.notificationId,
      wantAgent: this.wantAgentInstance,
      content: {
        contentType: Notification.ContentType.NOTIFICATION_CONTENT_BASIC_TEXT,
        normal: {
          title: this.filename + ':  ' + this.state,
          text: '',
          additionalText: this.progressValue + '%'
        }
      },
      template: template
    };

    // 发布通知
    Notification.publish(notificationRequest).then(() => {
      Prompt.showToast({
        message: `发布通知成功!`,
        duration: 2000
      })
    }).catch((err) => {
      Prompt.showToast({
        message: `发布通知失败,error[${err}]`,
        duration: 2000
      })
    })

  } else {
    Prompt.showToast({
      message: '不支持downloadTemplate进度条通知模板',
      duration: 2000
    })
  }
}