页面路由
页面路由指在应用程序中实现不同页面之间的跳转和数据传递。HarmonyOS提供了Router模块,通过不同的url地址,可以方便地进行页面路由,轻松地访问不同的页面。
页面跳转
页面跳转是开发过程中的一个重要组成部分。在使用应用程序时,通常需要在不同的页面之间跳转,有时还需要将数据从一个页面传递到另一个页面。
Router模块提供了两种跳转模式,分别是router.pushUrl()和router.replaceUrl()。这两种模式决定了目标页是否会替换当前页。
- router.pushUrl():目标页不会替换当前页,而是压入页面栈。这样可以保留当前页的状态,并且可以通过返回键或者调用router.back()方法返回到当前页。
- router.replaceUrl():目标页会替换当前页,并销毁当前页。这样可以释放当前页的资源,并且无法返回到当前页。
页面栈的最大容量为32个页面。如果超过这个限制,可以调用router.clear()方法清空历史页面栈,释放内存空间。
同时,Router模块提供了两种实例模式,分别是Standard和Single。这两种模式决定了目标url是否会对应多个实例。
Standard:标准实例模式,也是默认情况下的实例模式。每次调用该方法都会新建一个目标页,并压入栈顶。
Single:单实例模式。即如果目标页的url在页面栈中已经存在同url页面,则离栈顶最近的同url页面会被移动到栈顶,并重新加载;如果目标页的url在页面栈中不存在同url页面,则按照标准模式跳转。
在使用页面路由Router相关功能之前,需要在代码中先导入Router模块。
import router from '@ohos.router';
场景一:有一个主页(Home)和一个详情页(Detail),希望从主页点击一个商品,跳转到详情页。同时,需要保留主页在页面栈中,以便返回时恢复状态。这种场景下,可以使用pushUrl()方法,并且使用Standard实例模式(或者省略)。
// 在Home页面中
function onJumpClick(): void {
  router.pushUrl({
    url: 'pages/Detail' // 目标url
  }, router.RouterMode.Standard, (err) => {
    if (err) {
      console.error(`Invoke pushUrl failed, code is ${err.code}, message is ${err.message}`);
      return;
    }
    console.info('Invoke pushUrl succeeded.');
  });
}
标准实例模式下,router.RouterMode.Standard参数可以省略。
场景二:有一个登录页(Login)和一个个人中心页(Profile),希望从登录页成功登录后,跳转到个人中心页。同时,销毁登录页,在返回时直接退出应用。这种场景下,可以使用replaceUrl()方法,并且使用Standard实例模式(或者省略)。
// 在Login页面中
function onJumpClick(): void {
  router.replaceUrl({
    url: 'pages/Profile' // 目标url
  }, router.RouterMode.Standard, (err) => {
    if (err) {
      console.error(`Invoke replaceUrl failed, code is ${err.code}, message is ${err.message}`);
      return;
    }
    console.info('Invoke replaceUrl succeeded.');
  })
}
场景三:有一个设置页(Setting)和一个主题切换页(Theme),希望从设置页点击主题选项,跳转到主题切换页。同时,需要保证每次只有一个主题切换页存在于页面栈中,在返回时直接回到设置页。这种场景下,可以使用pushUrl()方法,并且使用Single实例模式。
// 在Setting页面中
function onJumpClick(): void {
  router.pushUrl({
    url: 'pages/Theme' // 目标url
  }, router.RouterMode.Single, (err) => {
    if (err) {
      console.error(`Invoke pushUrl failed, code is ${err.code}, message is ${err.message}`);
      return;
    }
    console.info('Invoke pushUrl succeeded.');
  });
}
场景四:有一个搜索结果列表页(SearchResult)和一个搜索结果详情页(SearchDetail),希望从搜索结果列表页点击某一项结果,跳转到搜索结果详情页。同时,如果该结果已经被查看过,则不需要再新建一个详情页,而是直接跳转到已经存在的详情页。这种场景下,可以使用replaceUrl()方法,并且使用Single实例模式。
// 在SearchResult页面中
function onJumpClick(): void {
  router.replaceUrl({
    url: 'pages/SearchDetail' // 目标url
  }, router.RouterMode.Single, (err) => {
    if (err) {
      console.error(`Invoke replaceUrl failed, code is ${err.code}, message is ${err.message}`);
      return;
    }
    console.info('Invoke replaceUrl succeeded.');})
}
传递参数
如果需要在跳转时传递一些数据给目标页,则可以在调用Router模块的方法时,添加一个params属性,并指定一个对象作为参数。例如:
class DataModelInfo {
  age: number;
}

class DataModel {
  id: number;
  info: DataModelInfo;
}

function onJumpClick(): void {
  // 在Home页面中
  let paramsInfo: DataModel = {
    id: 123,
    info: {
      age: 20
    }
  };

  router.pushUrl({
    url: 'pages/Detail', // 目标url
    params: paramsInfo // 添加params属性,传递自定义参数
  }, (err) => {
    if (err) {
      console.error(`Invoke pushUrl failed, code is ${err.code}, message is ${err.message}`);
      return;
    }
    console.info('Invoke pushUrl succeeded.');
  })
}
在目标页中,可以通过调用Router模块的getParams()方法来获取传递过来的参数。例如:
const params = router.getParams(); // 获取传递过来的参数对象
const id = params['id']; // 获取id属性的值
const age = params['info'].age; // 获取age属性的值
页面返回
当用户在一个页面完成操作后,通常需要返回到上一个页面或者指定页面,这就需要用到页面返回功能。在返回的过程中,可能需要将数据传递给目标页,这就需要用到数据传递功能。
方式一:返回到上一个页面。
router.back();
这种方式会返回到上一个页面,即上一个页面在页面栈中的位置。但是,上一个页面必须存在于页面栈中才能够返回,否则该方法将无效。
方式二:返回到指定页面。
router.back({
  url: 'pages/Home'
});
这种方式可以返回到指定页面,需要指定目标页的路径。目标页必须存在于页面栈中才能够返回。
方式三:返回到指定页面,并传递自定义参数信息。
router.back({
  url: 'pages/Home',
  params: {
    info: '来自Home页'
  }
});
这种方式不仅可以返回到指定页面,还可以在返回的同时传递自定义参数信息。这些参数信息可以在目标页中通过调用router.getParams()方法进行获取和解析。
在目标页中,在需要获取参数的位置调用router.getParams()方法即可,例如在onPageShow()生命周期回调中:
onPageShow() {
  const params = router.getParams(); // 获取传递过来的参数对象
  const info = params['info']; // 获取info属性的值
}
自定义询问框
自定义询问框的方式,可以使用弹窗或者自定义弹窗实现。这样可以让应用界面与系统默认询问框有所区别,提高应用的用户体验度。本文以弹窗为例,介绍如何实现自定义询问框。
在事件回调中,调用弹窗的promptAction.showDialog()方法:
function onBackClick() {
  // 弹出自定义的询问框
  promptAction.showDialog({
    message: '您还没有完成支付,确定要返回吗?',
    buttons: [
      {
        text: '取消',
        color: '#FF0000'
      },
      {
        text: '确认',
        color: '#0099FF'
      }
    ]
  }).then((result) => {
    if (result.index === 0) {
      // 用户点击了“取消”按钮
      console.info('User canceled the operation.');
    } else if (result.index === 1) {
      // 用户点击了“确认”按钮
      console.info('User confirmed the operation.');
      // 调用router.back()方法,返回上一个页面
      router.back();
    }
  }).catch((err) => {
    console.error(`Invoke showDialog failed, code is ${err.code}, message is ${err.message}`);
  })
}
状态管理
在声明式UI编程框架中,UI是程序状态的运行结果,用户构建了一个UI模型,其中应用的运行时的状态是参数。当参数改变时,UI作为返回结果,也将进行对应的改变。这些运行时的状态变化所带来的UI的重新渲染,在ArkUI中统称为状态管理机制。
自定义组件拥有变量,变量必须被装饰器装饰才可以成为状态变量,状态变量的改变会引起UI的渲染刷新。如果不使用状态变量,UI只能在初始化时渲染,后续将不会再刷新。 下图展示了State和View(UI)之间的关系。

View(UI):UI渲染,指将build方法内的UI描述和@Builder装饰的方法内的UI描述映射到界面。
State:状态,指驱动UI更新的数据。用户通过触发组件的事件方法,改变状态数据。状态数据的改变,引起UI的重新渲染。
基本概念
- 状态变量:被状态装饰器装饰的变量,状态变量值的改变会引起UI的渲染更新。示例:@State num: number = 1,其中,@State是状态装饰器,num是状态变量。
- 常规变量:没有被状态装饰器装饰的变量,通常应用于辅助计算。它的改变永远不会引起UI的刷新。以下示例中increaseBy变量为常规变量。
- 数据源/同步源:状态变量的原始来源,可以同步给不同的状态数据。通常意义为父组件传给子组件的数据。以下示例中数据源为count: 1。
- 命名参数机制:父组件通过指定参数传递给子组件的状态变量,为父子传递同步参数的主要手段。示例:CompA: ({ aProp: this.aProp })。
- 从父组件初始化:父组件使用命名参数机制,将指定参数传递给子组件。子组件初始化的默认值在有父组件传值的情况下,会被覆盖。示例:
@Component
struct MyComponent {
  @State count: number = 0;
  private increaseBy: number = 1;

  build() {
  }
}

@Component
struct Parent {
  build() {
    Column() {
      // 从父组件初始化,覆盖本地定义的默认值
      MyComponent({ count: 1, increaseBy: 2 })
    }
  }
}
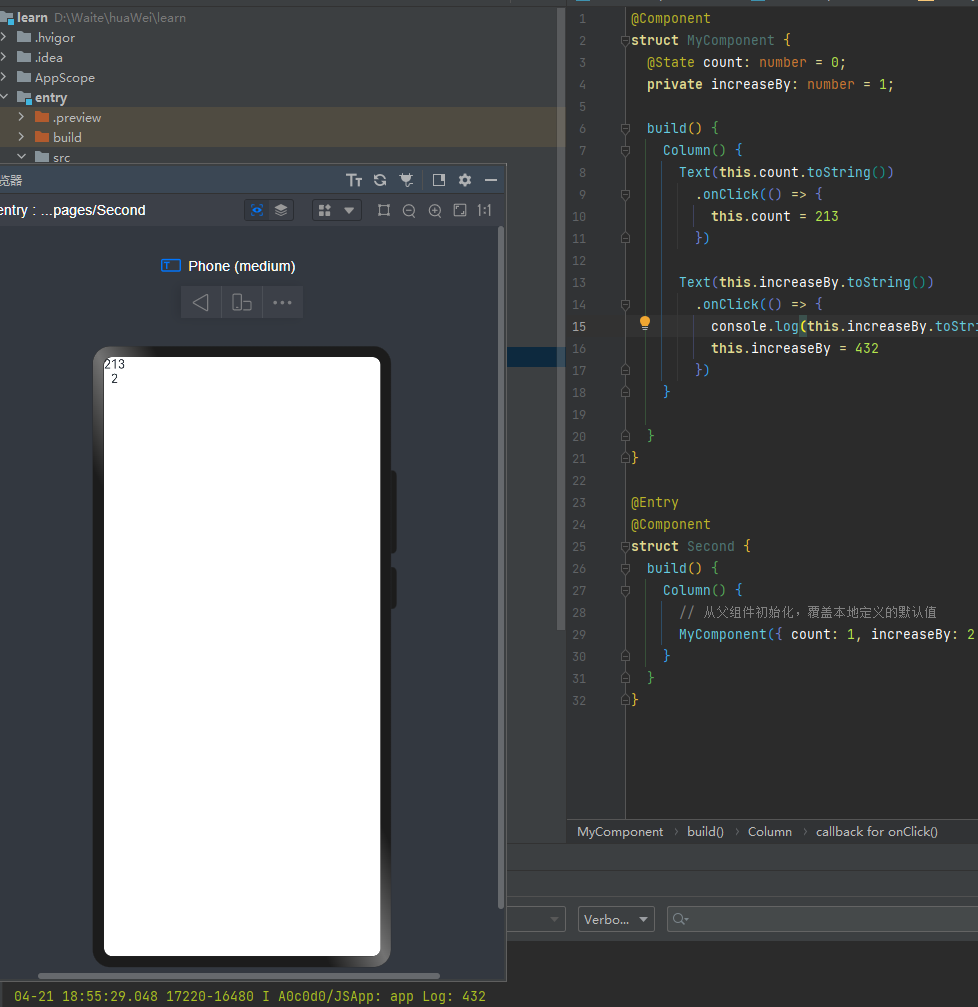
初始化子节点:父组件中状态变量可以传递给子组件,初始化子组件对应的状态变量。示例同上。
本地初始化:在变量声明的时候赋值,作为变量的默认值。示例:@State count: number = 0。
管理组件拥有的状态
@State装饰器:组件内状态
@state 装饰器标记的变量必须初始化, 不能为空值
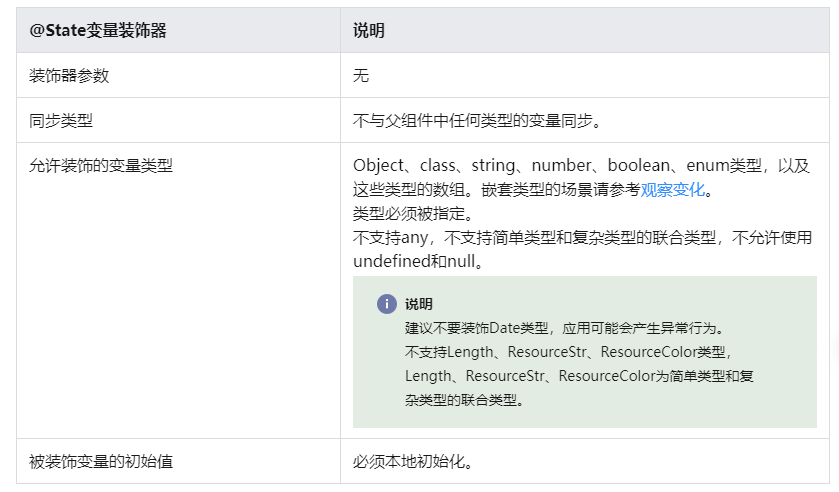
@state 支持Object、class、string、number、boolean、enum类型,以及这些类型的数组。不支持any,不支持简单类型和复杂类型的联合类型,不允许使用undefined和null。
嵌套类型以及数组中的对象属性无法触发视图更新
class Person {
  name: string
  age: number
  gf: Person


  constructor(name: string, age: number, gf?: Person) {
    this.age = age
    this.name = name
    this.gf = gf
  }
}

@Entry
@Component
struct Second {
  @State p: Person = new Person('jack', 21, new Person('aaa', 11))

  build() {
    Column() {
      Text(`${this.p.name}: ${this.p.age}`)
        .fontSize(50)
        .onClick(() => {
          this.p.age ++
        })

      Text(`${this.p.gf.name}: ${this.p.gf.age}`)
        .fontSize(50)
        .onClick(() => {
          console.log(`${this.p.gf.name}: ${this.p.gf.age}`)
          this.p.gf.age ++
        })
    }
    .width("100%")
  }
}
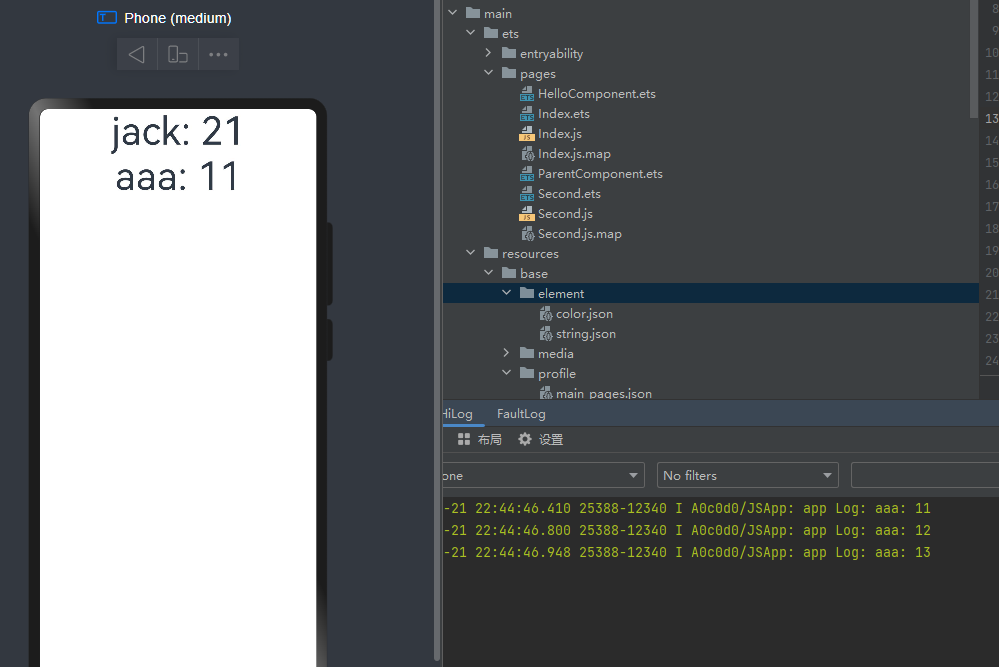
当点击下面时,不会触发视图更新, 只有点击上面非嵌套属性时才会触发视图整体更新
@State装饰的变量,或称为状态变量,一旦变量拥有了状态属性,就和自定义组件的渲染绑定起来。当状态改变时,UI会发生对应的渲染改变。
在状态变量相关装饰器中,@State是最基础的,使变量拥有状态属性的装饰器,它也是大部分状态变量的数据源。
@State装饰的变量,与声明式范式中的其他被装饰变量一样,是私有的,只能从组件内部访问,在声明时必须指定其类型和本地初始化。初始化也可选择使用命名参数机制从父组件完成初始化。
@State装饰的变量拥有以下特点:
- @State装饰的变量与子组件中的@Prop装饰变量之间建立单向数据同步,与@Link、@ObjectLink装饰变量之间建立双向数据同步。
- @State装饰的变量生命周期与其所属自定义组件的生命周期相同。
案例
class Task {
  static id: number = 1
  name: string = `Task${Task.id++}`
  finished: boolean = false
}

@Styles function card() {
  .width("95%")
  .padding(20)
  .backgroundColor(Color.White)
  .borderRadius(15)
  .shadow(
    {
      radius: 6,
      color: "#1F000000",
      offsetX: 2,
      offsetY: 4
    }
  )
}

@Extend(Text) function finishedTask() {
  .decoration({ type: TextDecorationType.LineThrough })
  .fontSize("##B1B2B1")
}

@Entry
@Component
struct Second {
  @State totalTask: number = 0
  @State finishTask: number = 0
  @State task: Task[] = []

  handTaskChange() {
    this.totalTask = this.task.length
    this.finishTask = this.task.filter(item => item.finished).length
  }

  build() {
    Column({ space: 10 }) {
      // 任务进度卡片
      Row() {
        Text("任务进度: ")
          .fontSize(30)
          .fontWeight(FontWeight.Bold)

        Stack() {
          Progress({
            value: this.finishTask,
            total: this.totalTask,
            type: ProgressType.Ring
          })
            .width(100)

          Row() {
            Text(this.finishTask.toString())
              .fontSize(24)
              .fontColor("#36D")
            Text("/" + this.totalTask.toString())
              .fontSize(24)
          }
        }
      }
      .card()
      .margin({ top: 20, bottom: 10 })
      .justifyContent(FlexAlign.SpaceEvenly)

      // 新增任务按钮
      Button("添加任务")
        .width(200)
        .onClick(() => {
          this.task.push(new Task())
          this.handTaskChange()
        })

      // 渲染任务列表
      List({ space: 10 }) {
        ForEach(
          this.task,
          (item: Task, index) => {
            ListItem() {
              Row() {
                Text(item.name)
                  .fontSize(24)

                Checkbox()
                  .select(item.finished)
                  .onChange(value => {
                    item.finished = value
                    this.handTaskChange()
                  })
              }
              .card()
              .justifyContent(FlexAlign.SpaceBetween)
            }
            .swipeAction({
              end: this.DeleteButton(index)
            })
          }
        )
      }
      .width("100%")
      .alignListItem(ListItemAlign.Center)
      .layoutWeight(1)
    }
    .width("100%")
    .height("100%")
    .backgroundColor("#F1F2F3")
  }

  // 构建函数
  @Builder DeleteButton(index: number) {
    Text("Del")
      .fontColor(Color.White)
      .padding(20)
      .backgroundColor(Color.Red)
      .borderRadius("50%")
      .margin(5)
      .onClick(() => {
        this.task.splice(index, 1)
        this.handTaskChange()
      })
  }
}
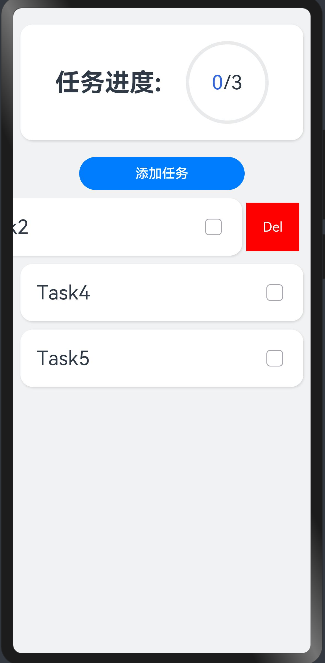
@Prop/ @Link 装饰器
@Prop 父子组件单向同步: @Prop装饰的变量可以和父组件建立单向的同步关系。@Prop装饰的变量是可变的,但是变化不会同步回其父组件。 @Link 父子组件双向同步: 子组件中被@Link装饰的变量与其父组件中对应的数据源建立双向数据绑定。@Link装饰的变量与其父组件中的数据源共享相同的值。
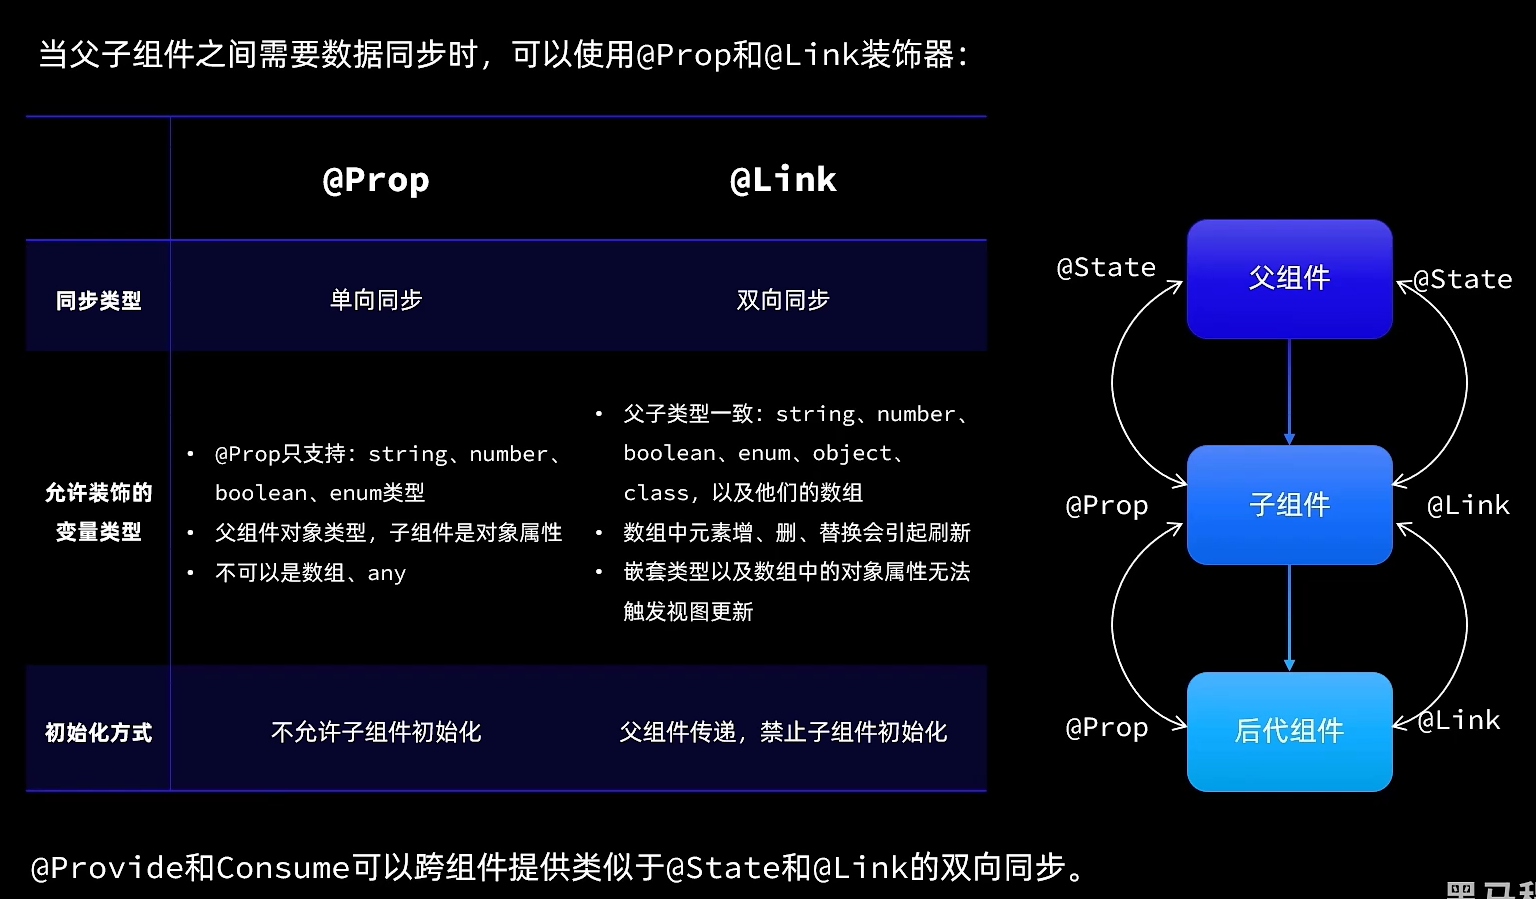
在最新版本中, @Prop 可以在子组件初始化, 但是编辑器 eslint 会报错
@Component
struct Child {
  @Prop value: number;

  build() {
    Text(`${this.value}`)
      .fontSize(50)
      .onClick(() => {
        console.log(`${this.value}`)
        this.value++
      })
  }
}

@Entry
@Component
struct Index {
  @State arr: number[] = [1, 2, 3];

  build() {
    Row() {
      Column() {
        Child({ value: this.arr[0] })
        Child({ value: this.arr[1] })
        Child({ value: this.arr[2] })

        Divider().height(5)

        ForEach(this.arr,
          item => {
            Child({ 'value': item } as Record<string, number>)
          },
          item => item.toString()
        )
        Text('replace entire arr')
          .fontSize(50)
          .onClick(() => {
            // 两个数组都包含项“3”。
            this.arr = this.arr[0] == 1 ? [3, 4, 5] : [1, 2, 3];
          })
      }
    }
  }
}
如果点击界面上的“1”六次、“2”五次、“3”四次,将所有变量的本地取值都变为“7”。
7
7
7
----
7
7
7
单击replace entire arr后,屏幕将显示以下信息,为什么?
3
4
5
----
7
4
5
- 在子组件Child中做的所有的修改都不会同步回父组件Index组件,所以即使6个组件显示都为7,但在父组件Index中,this.arr保存的值依旧是[1,2,3]。
- 点击replace entire arr,this.arr[0] == 1成立,将this.arr赋值为[3, 4, 5];
- 因为this.arr[0]已更改,Child({value: this.arr[0]})组件将this.arr[0]更新同步到实例@Prop装饰的变量。Child({value: this.arr[1]})和Child({value: this.arr[2]})的情况也类似。
- this.arr的更改触发ForEach更新,this.arr更新的前后都有数值为3的数组项:[3, 4, 5] 和[1, 2, 3]。根据diff算法,数组项“3”将被保留,删除“1”和“2”的数组项,添加为“4”和“5”的数组项。这就意味着,数组项“3”的组件不会重新生成,而是将其移动到第一位。所以“3”对应的组件不会更新,此时“3”对应的组件数值为“7”,ForEach最终的渲染结果是“7”,“4”,“5”。
diff算法是一种用于比较两个数据结构(比如两个数组或两个树)之间差异的算法。在前端开发中,diff算法通常用于虚拟DOM的更新和渲染优化。
在React等前端框架中,当数据发生变化时,diff算法可以帮助确定哪些DOM节点需要被更新,哪些需要被添加或删除,以及哪些可以被保留而不进行重新渲染。这可以提高性能并减少不必要的DOM操作。
diff算法通常包括以下步骤:
- 比较两个数据结构的差异,找出新增、删除和更新的部分。
- 标记需要进行更新的部分,并记录其变化。
- 应用这些变化,更新DOM或其他视图。
@Styles function btn() {
  .margin(12)
  .width(312)
  .height(40)
}


@Component
struct Child {
  @Link items: number[];

  build() {
    Column() {
      Button(`Button1: push`)
        .btn()
        .onClick(() => {
          this.items.push(this.items.length + 1);
        })
      Button(`Button2: replace whole item`)
        .btn()
        .onClick(() => {
          this.items = [100, 200, 300];
        })
    }
  }
}

@Entry
@Component
struct Parent {
  @State arr: number[] = [1, 2, 3];

  build() {
    Column() {
      Button('Button Parent push')
        .btn()
        .onClick(() => {
          this.arr.push(this.arr.length + 1);
        })
      Child({ items: $arr })
        .margin(12)
      ForEach(this.arr,
        (item: number) => {
          Button(`${item}`)
            .margin(12)
            .width(312)
            .height(40)
            .backgroundColor('#11a2a2a2')
            .fontColor('#e6000000')
        },
        (item: ForEachInterface) => item.toString()
      )
    }
  }
}
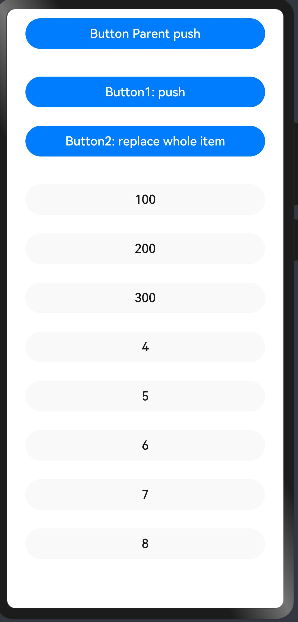
@Observed装饰器和@ObjectLink装饰器:嵌套类对象属性变化
上文所述的装饰器仅能观察到第一层的变化,但是在实际应用开发中,应用会根据开发需要,封装自己的数据模型。对于多层嵌套的情况,比如二维数组,或者数组项class,或者class的属性是class,他们的第二层的属性变化是无法观察到的。这就引出了@Observed/@ObjectLink装饰器。
以下是引入@Observed/@ObjectLink装饰器的示例:
@Observed
class Person {
  name: string
  age: number
  gf: Person

  constructor(name: string, age: number, gf?: Person) {
    this.name = name
    this.age = age
    this.gf = gf
  }
}

@Entry
@Component
struct Child {
  @State p: Person = new Person("Waite", 18, new Person("www", 11))
  @State gfs: Person[] = [
    new Person("Jack", 18),
    new Person("XiaoMing", 20)
  ]

  build() {
    Column({ space: 10 }) {
      PersonChild({ p: this.p.gf })
        .onClick(() => {
          console.log(`${this.p.gf.age}`)
          this.p.gf.age++
        })

      Text("Girl Friends List")

      ForEach(
        this.gfs,
        item => {
          PersonChild({ p: item })
            .onClick(() => item.age++)
        }
      )
    }
  }
}

@Component
struct PersonChild {
  @ObjectLink p: Person

  build() {
    Column() {
      Text(`${this.p.name}: ${this.p.age}`)
    }
  }
}
为了给变量加 @ObjectLink 装饰器, 写成组件 -> 因为装饰器没法装饰一个参数
@Observed class 不管嵌套几个类型, 凡是嵌套的, 都要加上 @Observed 装饰器
完善案例, 当 Checkbox 选中时, 会触发对应的任务完成状态, 任务完成状态改变时, 会触发任务进度的更新
@Observed
class Task {
  static id: number = 1
  name: string = `Task${Task.id++}`
  finished: boolean = false
}

@Styles function card() {
  .width("95%")
  .padding(20)
  .backgroundColor(Color.White)
  .borderRadius(15)
  .shadow(
    {
      radius: 6,
      color: "#1F000000",
      offsetX: 2,
      offsetY: 4
    }
  )
}

@Extend(Text) function finishedTask() {
  .fontColor("#B1B2B1")
}

@Entry
@Component
struct Second {
  @State totalTask: number = 0
  @State finishTask: number = 0
  @State task: Task[] = []

  handTaskChange() {
    this.totalTask = this.task.length
    this.finishTask = this.task.filter(item => item.finished).length
  }

  build() {
    Column({ space: 10 }) {
      // 任务进度卡片
      TaskStatistics({ finishTask: this.finishTask, totalTask: this.totalTask })

      // 新增任务按钮
      Button("添加任务")
        .width(200)
        .onClick(() => {
          this.task.push(new Task())
          this.handTaskChange()
        })

      // 渲染任务列表
      List({ space: 10 }) {
        ForEach(
          this.task,
          (item: Task, index) => {
            ListItem() {
              itemChild({item: item, onTaskChanged: () => this.handTaskChange()})
            }
            .swipeAction({
              end: this.DeleteButton(index)
            })
          }
        )
      }
      .width("100%")
      .height(0)
      .alignListItem(ListItemAlign.Center)
      .layoutWeight(1)
    }
    .width("100%")
    .height("100%")
    .backgroundColor("#F1F2F3")
  }

  // 构建函数
  @Builder DeleteButton(index: number) {
    Text("Del")
      .fontColor(Color.White)
      .padding(20)
      .backgroundColor(Color.Red)
      .borderRadius("50%")
      .margin(5)
      .onClick(() => {
        this.task.splice(index, 1)
        this.handTaskChange()
      })
  }
}

@Component
struct TaskStatistics {
  @Prop finishTask: number
  @Prop totalTask: number

  build() {
    Row() {
      Text("任务进度: ")
        .fontSize(30)
        .fontWeight(FontWeight.Bold)

      Stack() {
        Progress({
          value: this.finishTask,
          total: this.totalTask,
          type: ProgressType.Ring
        })
          .width(100)

        Row() {
          Text(this.finishTask.toString())
            .fontSize(24)
            .fontColor("#36D")
          Text("/" + this.totalTask.toString())
            .fontSize(24)
        }
      }
    }
    .card()
    .margin({ top: 20, bottom: 10 })
    .justifyContent(FlexAlign.SpaceEvenly)
  }
}

@Component
struct itemChild {
  @ObjectLink item: Task
  onTaskChanged: () => void

  build(){
    Row() {
      if (this.item.finished) {
        Text(this.item.name)
          .finishedTask()
      }
      else {
        Text(this.item.name)
      }


      Checkbox()
        .select(this.item.finished)
        .onChange(value => {
          this.item.finished = value
          this.onTaskChanged()
        })
    }
    .card()
    .justifyContent(FlexAlign.SpaceBetween)
  }
}
动画
基础通知
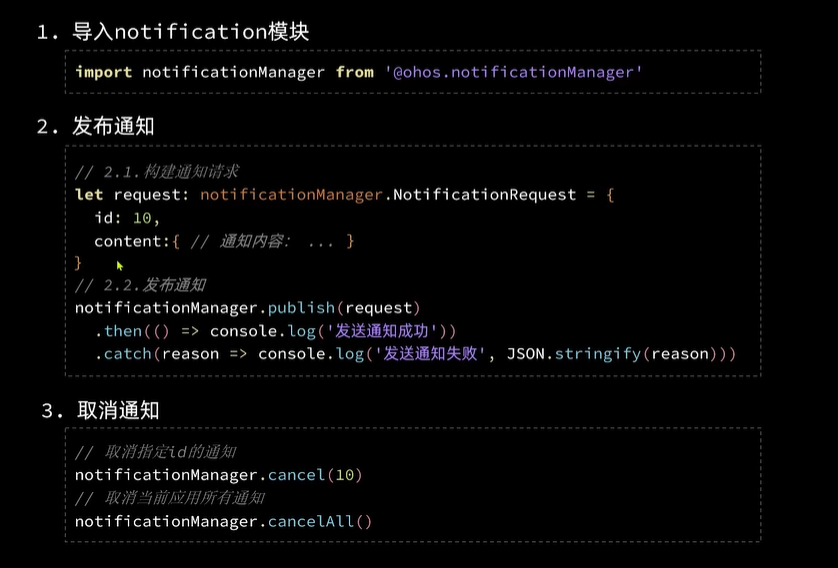
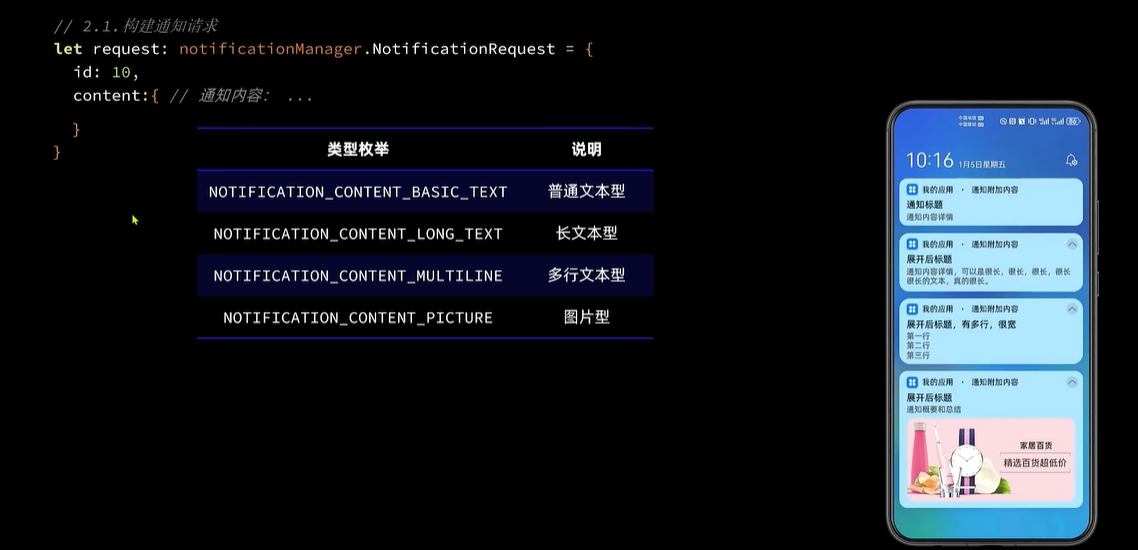
| 名称 | 值 | 说明 |
|---|---|---|
| NOTIFICATION_CONTENT_BASIC_TEXT | ContentType | 普通类型通知。 |
| NOTIFICATION_CONTENT_LONG_TEXT | ContentType | 长文本类型通知。 |
| NOTIFICATION_CONTENT_PICTURE | ContentType | 图片类型通知。 |
| NOTIFICATION_CONTENT_CONVERSATION | ContentType | 社交类型通知。 |
| NOTIFICATION_CONTENT_MULTILINE | ContentType | 多行文本类型通知。 |
系统能力:以下各项对应的系统能力均为SystemCapability.Notification.Notification
| 名称 | 可读 | 可写 | 类型 | 必填 | 描述 |
|---|---|---|---|---|---|
| content | 是 | 是 | NotificationContent | 是 | 通知内容。 |
| id | 是 | 是 | number | 否 | 通知ID。 |
| slotType | 是 | 是 | SlotType | 否 | 通道类型。 |
| isOngoing | 是 | 是 | boolean | 否 | 是否进行时通知。 |
| isUnremovable | 是 | 是 | boolean | 否 | 是否可移除。 |
| deliveryTime | 是 | 是 | number | 否 | 通知发送时间。 |
| tapDismissed | 是 | 是 | boolean | 否 | 通知是否自动清除。 |
| autoDeletedTime | 是 | 是 | number | 否 | 自动清除的时间。 |
| wantAgent | 是 | 是 | WantAgent | 否 | 点击跳转的WantAgent。 |
| extraInfo | 是 | 是 | {[key: string]: any} | 否 | 扩展参数。 |
| color | 是 | 是 | number | 否 | 通知背景颜色。 |
| colorEnabled | 是 | 是 | boolean | 否 | 通知背景颜色是否使能。 |
| isAlertOnce | 是 | 是 | boolean | 否 | 设置是否仅有一次此通知警报。 |
| isStopwatch | 是 | 是 | boolean | 否 | 是否显示已用时间。 |
| isCountDown | 是 | 是 | boolean | 否 | 是否显示倒计时时间。 |
| isFloatingIcon | 是 | 是 | boolean | 否 | 是否显示状态栏图标。 |
| label | 是 | 是 | string | 否 | 通知标签。 |
| badgeIconStyle | 是 | 是 | number | 否 | 通知角标类型。 |
| showDeliveryTime | 是 | 是 | boolean | 否 | 是否显示分发时间。 |
| actionButtons | 是 | 是 | Array< NotificationActionButton> | 否 | 通知按钮,最多两个按钮。 |
| smallIcon | 是 | 是 | PixelMap | 否 | 通知小图标。 |
| largeIcon | 是 | 是 | PixelMap | 否 | 通知大图标。 |
| creatorBundleName | 是 | 否 | string | 否 | 创建通知的包名。 |
| creatorUid | 是 | 否 | number | 否 | 创建通知的UID。 |
| creatorPid | 是 | 否 | number | 否 | 创建通知的PID。 |
| creatorUserId8+ | 是 | 否 | number | 否 | 创建通知的UserId。 |
| hashCode | 是 | 否 | string | 否 | 通知唯一标识。 |
| groupName8+ | 是 | 是 | string | 否 | 组通知名称。 |
| template8+ | 是 | 是 | NotificationTemplate | 否 | 通知模板。 |
| distributedOption8+ | 是 | 是 | DistributedOptions | 否 | 分布式通知的选项。 |
| notificationFlags8+ | 是 | 否 | NotificationFlags | 否 | 获取NotificationFlags。 |
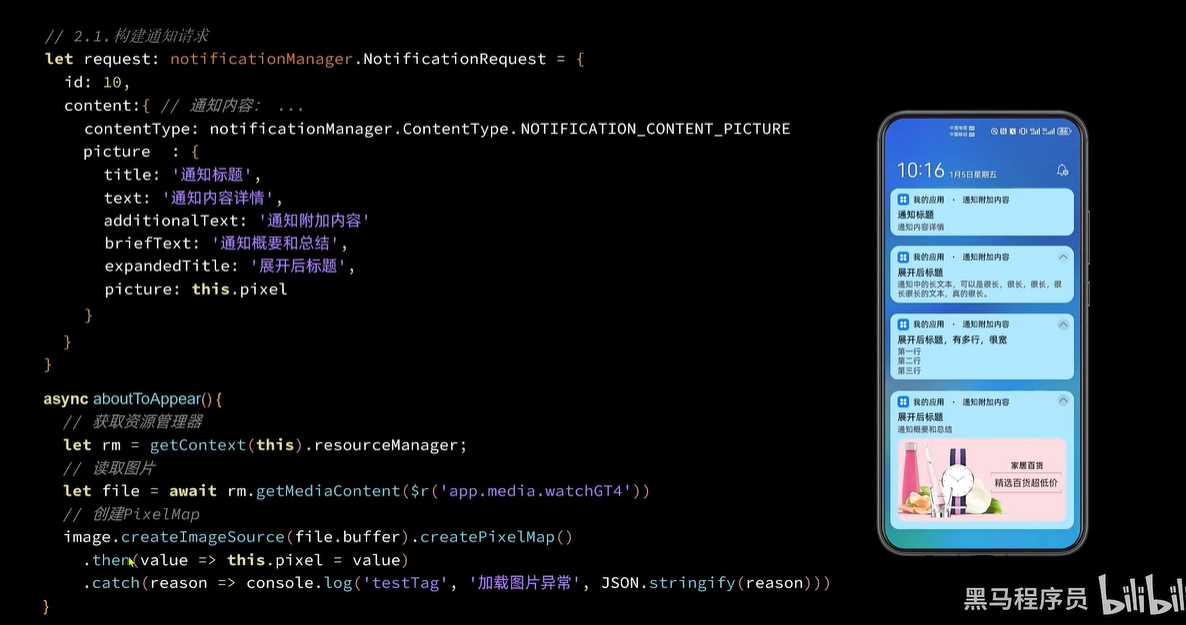
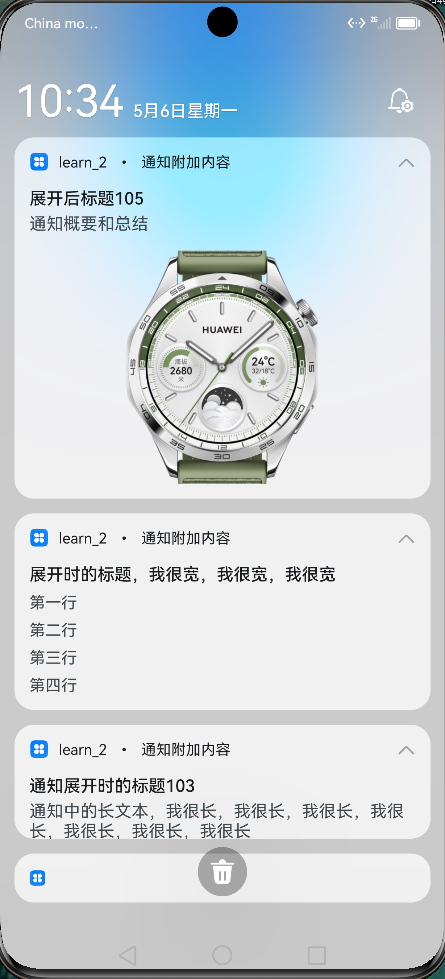

import notify from '@ohos.notificationManager'
import image from '@ohos.multimedia.image'

@Entry
@Component
struct Index {
  // 全局任务 id
  idx: number = 100
  // 图像
  pixel: PixelMap

  async aboutToAppear() {
    // 获取资源管理器
    let rm = getContext(this).resourceManager
    // 读取图片
    let file = await rm.getMediaContent($r('app.media.watchGT4'))
    // 创建 PixelMap
    image.createImageSource(file.buffer).createPixelMap()
      .then(value => this.pixel = value)
      .catch(reason => console.error(reason))
  }

  build() {
    Column({ space: 10 }) {
      Button(`发送normalText通知`)
        .onClick(() => this.publishNormalTextNotification())
      Button(`发送longText通知`)
        .onClick(() => this.publishLongTextNotification())
      Button(`发送multiLine通知`)
        .onClick(() => this.publishMultiLineNotification())
      Button(`发送Picture通知`)
        .onClick(() => this.publishPictureNotification())

    }
    .width('100%')
  }

  publishNormalTextNotification() {
    let request: notify.NotificationRequest = {
      id: this.idx++,
      content: {
        contentType: notify.ContentType.NOTIFICATION_CONTENT_BASIC_TEXT,
        normal: {
          title: '通知标题' + this.idx,
          text: '通知内容详情',
          additionalText: '通知附加内容'
        }
      },
      showDeliveryTime: true,
      deliveryTime: new Date().getTime(),
      groupName: 'wechat',
      slotType: notify.SlotType.SOCIAL_COMMUNICATION
    }
    this.publish(request)
  }

  publishLongTextNotification() {
    let request: notify.NotificationRequest = {
      id: this.idx++,
      content: {
        contentType: notify.ContentType.NOTIFICATION_CONTENT_LONG_TEXT,
        longText: {
          title: '通知标题' + this.idx,
          text: '通知内容详情',
          additionalText: '通知附加内容',
          longText: '通知中的长文本,我很长,我很长,我很长,我很长,我很长,我很长,我很长',
          briefText: '通知概要和总结',
          expandedTitle: '通知展开时的标题' + this.idx
        }
      }
    }
    this.publish(request)
  }

  publishMultiLineNotification() {
    let request: notify.NotificationRequest = {
      id: this.idx++,
      content: {
        contentType: notify.ContentType.NOTIFICATION_CONTENT_MULTILINE,
        multiLine: {
          title: '通知标题' + this.idx,
          text: '通知内容详情',
          additionalText: '通知附加内容',
          briefText: '通知概要和总结',
          longTitle: '展开时的标题,我很宽,我很宽,我很宽',
          lines: [
            '第一行',
            '第二行',
            '第三行',
            '第四行',
          ]
        }
      }
    }
    this.publish(request)
  }

  publishPictureNotification() {
    let request: notify.NotificationRequest = {
      id: this.idx++,
      content: {
        contentType: notify.ContentType.NOTIFICATION_CONTENT_PICTURE,
        picture: {
          title: '通知标题' + this.idx,
          text: '通知内容详情',
          additionalText: '通知附加内容',
          briefText: '通知概要和总结',
          expandedTitle: '展开后标题' + this.idx,
          picture: this.pixel
        }
      }
    }
    this.publish(request)
  }

  private publish(request: notify.NotificationRequest) {
    notify.publish(request)
      .then(() => console.log('notify test', '发送通知成功'))
      .then(reason => console.log('notify test', '发送通知失败', JSON.stringify(reason)))
  }
}
进度条通知
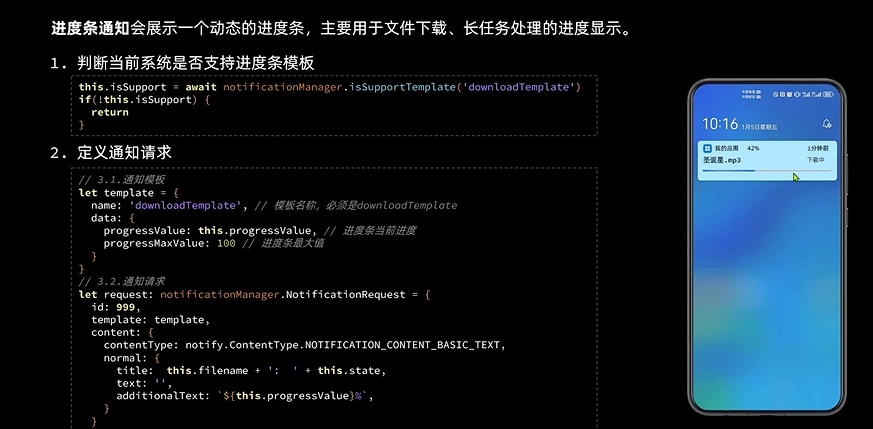
import Notification from '@ohos.notificationManager'
import wantAgent, { WantAgent } from '@ohos.app.ability.wantAgent'
import promptAction from '@ohos.promptAction'
import Prompt from '@system.prompt'

enum DownloadState {
  NOT_BEGIN = '未开始',
  DOWNLOADING = '下载中',
  PAUSE = '已暂停',
  FINISHED = '已完成',
}

@Entry
@Component
struct Index {
  // 下载进度
  @State progressValue: number = 0
  progressMaxValue: number = 100
  // 任务状态
  @State state: DownloadState = DownloadState.NOT_BEGIN

  // 下载的文件名
  filename: string = '圣诞星.mp4'

  // 模拟下载的任务的id
  taskId: number = -1

  // 通知id
  notificationId: number = 999
  isSupport: boolean = false
  wantAgentInstance: WantAgent

  async aboutToAppear() {
    // 1.判断当前系统是否支持进度条模板
    this.isSupport = await Notification.isSupportTemplate('downloadTemplate')
    // 2.创建拉取当前应用的行为意图
    // 2.1.创建wantInfo信息
    let wantInfo: wantAgent.WantAgentInfo = {
      wants: [
        {
          bundleName: 'com.example.myapplication',
          abilityName: 'EntryAbility',
        }
      ],
      requestCode: 0,
      operationType: wantAgent.OperationType.START_ABILITY,
      wantAgentFlags: [wantAgent.WantAgentFlags.CONSTANT_FLAG]
    }
    // 2.2.创建wantAgent实例
    this.wantAgentInstance = await wantAgent.getWantAgent(wantInfo)
  }

  build() {
    Row({ space: 10 }) {
      Image($r('app.media.ic_files_video')).width(50)
      Column({ space: 5 }) {
        Row() {
          Text(this.filename)
          Text(`${this.progressValue}%`).fontColor('#c1c2c1')
        }
        .width('100%')
        .justifyContent(FlexAlign.SpaceBetween)

        Progress({
          value: this.progressValue,
          total: this.progressMaxValue,
        })

        Row({ space: 5 }) {
          Text(`${(this.progressValue * 0.43).toFixed(2)}MB`)
            .fontSize(14).fontColor('#c1c2c1')
          Blank()
          if (this.state === DownloadState.NOT_BEGIN) {
            Button('开始').downloadButton()
              .onClick(() => this.download())

          } else if (this.state === DownloadState.DOWNLOADING) {
            Button('取消').downloadButton().backgroundColor('#d1d2d3')
              .onClick(() => this.cancel())

            Button('暂停').downloadButton()
              .onClick(() => this.pause())

          } else if (this.state === DownloadState.PAUSE) {
            Button('取消').downloadButton().backgroundColor('#d1d2d3')
              .onClick(() => this.cancel())

            Button('继续').downloadButton()
              .onClick(() => this.download())
          } else {
            Button('打开').downloadButton()
              .onClick(() => this.open())
          }
        }.width('100%')
      }
      .layoutWeight(1)
    }
    .width('100%')
    .borderRadius(20)
    .padding(15)
    .backgroundColor(Color.White)
  }

  cancel() {
    // 取消定时任务
    if (this.taskId > 0) {
      clearInterval(this.taskId);
      this.taskId = -1
    }
    console.log(this.notificationId.toString())
    // 清理下载任务进度
    this.progressValue = 0
    // 标记任务状态:未开始
    this.state = DownloadState.NOT_BEGIN
    // 取消通知
    Notification.cancel(this.notificationId).then((response) => {
      console.log('ssssss', JSON.stringify(response))
    })
  }

  download() {
    // 清理旧任务
    if (this.taskId > 0) {
      clearInterval(this.taskId);
    }
    // 开启定时任务,模拟下载
    this.taskId = setInterval(() => {
      // 判断任务进度是否达到100
      if (this.progressValue >= 100) {
        // 任务完成了,应该取消定时任务
        clearInterval(this.taskId)
        this.taskId = -1
        // 并且标记任务状态为已完成
        this.state = DownloadState.FINISHED
        // 发送通知
        this.publishProgressNotification()
        return
      }
      // 模拟任务进度变更
      this.progressValue += 2
      // 发送通知
      this.publishProgressNotification()
    }, 500)
    // 标记任务状态:下载中
    this.state = DownloadState.DOWNLOADING
  }

  pause() {
    // 取消定时任务
    if (this.taskId > 0) {
      clearInterval(this.taskId);
      this.taskId = -1
    }
    // 标记任务状态:已暂停
    this.state = DownloadState.PAUSE
    // 发送通知
    this.publishProgressNotification()
  }

  open() {
    promptAction.showToast({
      message: '功能未实现'
    })
  }

  async publishProgressNotification() {
    let isSupportTpl: boolean;
    await Notification.isSupportTemplate('downloadTemplate').then((data) => {
      isSupportTpl = data;
    }).catch((err) => {
      Prompt.showToast({
        message: `判断是否支持进度条模板时报错,error[${err}]`,
        duration: 2000
      })
    })
    if (isSupportTpl) {
      // 构造模板
      let template = {
        name: 'downloadTemplate',
        data: {
          progressValue: this.progressValue, // 当前进度值
          progressMaxValue: this.progressMaxValue // 最大进度值
        }
      };

      let notificationRequest: Notification.NotificationRequest = {
        id: this.notificationId,
        content: {
          contentType: Notification.ContentType.NOTIFICATION_CONTENT_BASIC_TEXT,
          normal: {
            title: this.filename + ':  ' + this.state,
            text: '',
            additionalText: this.progressValue + '%'
          }
        },
        template: template
      };

      // 发布通知
      Notification.publish(notificationRequest).then(() => {
        Prompt.showToast({
          message: `发布通知成功!`,
          duration: 2000
        })
      }).catch((err) => {
        Prompt.showToast({
          message: `发布通知失败,error[${err}]`,
          duration: 2000
        })
      })

    } else {
      Prompt.showToast({
        message: '不支持downloadTemplate进度条通知模板',
        duration: 2000
      })
    }
  }

  publishDownloadNotification() {
    // 1.判断当前系统是否支持进度条模板
    if (!this.isSupport) {
      // 当前系统不支持进度条模板
      console.log("not support")
      return
    }
    // 2.准备进度条模板的参数
    let template = {
      name: 'downloadTemplate',
      data: {
        progressValue: this.progressValue,
        progressMaxValue: this.progressMaxValue
      }
    }
    let request: Notification.NotificationRequest = {
      id: this.notificationId,
      template: template,
      wantAgent: this.wantAgentInstance,
      content: {
        contentType: Notification.ContentType.NOTIFICATION_CONTENT_BASIC_TEXT,
        normal: {
          title: this.filename + ':  ' + this.state,
          text: '',
          additionalText: this.progressValue + '%'
        }
      }
    }
    // 3.发送通知
    Notification.publish(request)
      .then(() => console.log('test', '通知发送成功'))
      .catch(reason => console.log('test', '通知发送失败!', JSON.stringify(reason)))
  }
}

@Extend(Button) function downloadButton() {
  .width(75).height(28).fontSize(14)
}
通知意图
具体参数看官方文档
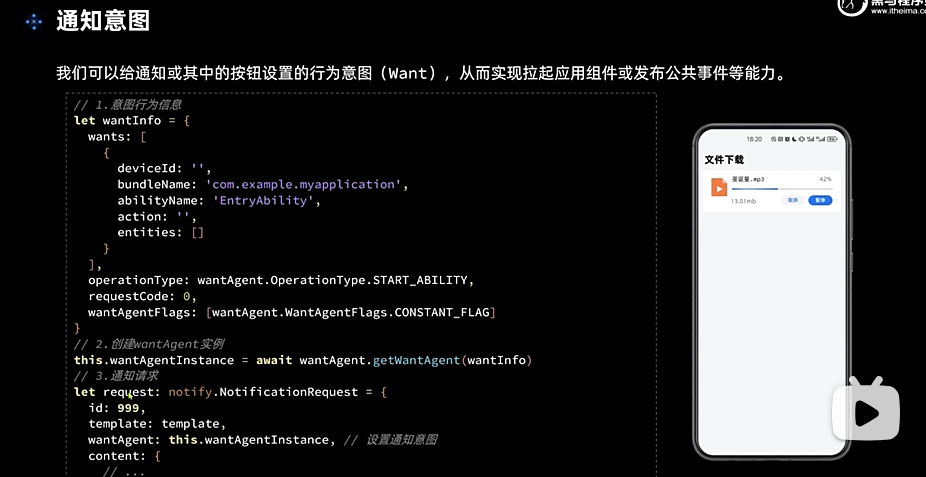
async aboutToAppear() {
  // 1.判断当前系统是否支持进度条模板
  this.isSupport = await Notification.isSupportTemplate('downloadTemplate')
  // 2.创建拉取当前应用的行为意图
  // 2.1.创建wantInfo信息
  let wantInfo: wantAgent.WantAgentInfo = {
    wants: [
      {
        bundleName: 'com.example.learn_2',
        abilityName: 'EntryAbility',
      }
    ],
    requestCode: 0,
    operationType: wantAgent.OperationType.START_ABILITY,
    wantAgentFlags: [wantAgent.WantAgentFlags.CONSTANT_FLAG]
  }
  // 2.2.创建wantAgent实例
  this.wantAgentInstance = await wantAgent.getWantAgent(wantInfo)
}
async publishProgressNotification() {
  let isSupportTpl: boolean;
  await Notification.isSupportTemplate('downloadTemplate').then((data) => {
    isSupportTpl = data;
  }).catch((err) => {
    Prompt.showToast({
      message: `判断是否支持进度条模板时报错,error[${err}]`,
      duration: 2000
    })
  })
  if (isSupportTpl) {
    // 构造模板
    let template = {
      name: 'downloadTemplate',
      data: {
        progressValue: this.progressValue, // 当前进度值
        progressMaxValue: this.progressMaxValue // 最大进度值
      }
    };

    let notificationRequest: Notification.NotificationRequest = {
      id: this.notificationId,
      wantAgent: this.wantAgentInstance,
      content: {
        contentType: Notification.ContentType.NOTIFICATION_CONTENT_BASIC_TEXT,
        normal: {
          title: this.filename + ':  ' + this.state,
          text: '',
          additionalText: this.progressValue + '%'
        }
      },
      template: template
    };

    // 发布通知
    Notification.publish(notificationRequest).then(() => {
      Prompt.showToast({
        message: `发布通知成功!`,
        duration: 2000
      })
    }).catch((err) => {
      Prompt.showToast({
        message: `发布通知失败,error[${err}]`,
        duration: 2000
      })
    })

  } else {
    Prompt.showToast({
      message: '不支持downloadTemplate进度条通知模板',
      duration: 2000
    })
  }
}